By Nebula Haze
For indoor growers, there are tons of “techniques” for plant training to increase cannabis yields, including LST, topping, manifolding, ScrOG, etc. These tactics have been developed and named by various growers over the years, and it can get confusing. There are so many terms and acronyms being thrown around, and some of the techniques are complicated and time-consuming. Let me simplify things a little bit.
Plant training increases cannabis yields by growing only long, dense bud “colas” (without any under-developed buds)
This tutorial will teach you how to grow cannabis plants with many big colas/buds per plant.
Why are long cannabis buds called a “cola”?
When you hear growers talk about “colas” they’re talking about the main stems/branches of a cannabis plant, and/or the buds that grow on those branches. “Cola” is Spanish for “tail” and is often used to describe the prized long dense buds that grow at the top of a cannabis plant. Weed used to look a lot more like leaves than the buds we know today (check out some of the “top strains” from 1977) and the word “cola” originally differentiated long big buds from the old leafy weed. The story goes that the term originated in Mexico from the first growers who figured out how to grow big long buds (through breeding new strains and separating males from female plants). They called these long buds “colas” because they resembled a tail, and the term has stuck around. Now the word is also often used to describe any big long stems in general, even in the vegetative stage, as these are the stems that grow the longest and biggest buds.
Today’s tutorial will teach you how to grow lots of cannabis colas, so you get big yields of top-shelf buds!
Why do growers train cannabis plants to grow flat and wide?
The idea behind almost any marijuana plant training technique is to make a flat, wide table-top shape for your plant canopy with many colas (bud sites). There are about a million ways to accomplish this which is why there are so many different techniques, but they all have at least that one thing in common.
This shape ensures that each of your main buds gets plenty of light and air, resulting in lots of long, fat buds and bigger yields for you. In fact, with plant training, you can increase your yields by as much as 40% compared to not training your plants!
In the marijuana vegetative stage, you encourage your plants to grow many bud sites in a wide, flat, table-top shape. This can be accomplished in a few different ways.
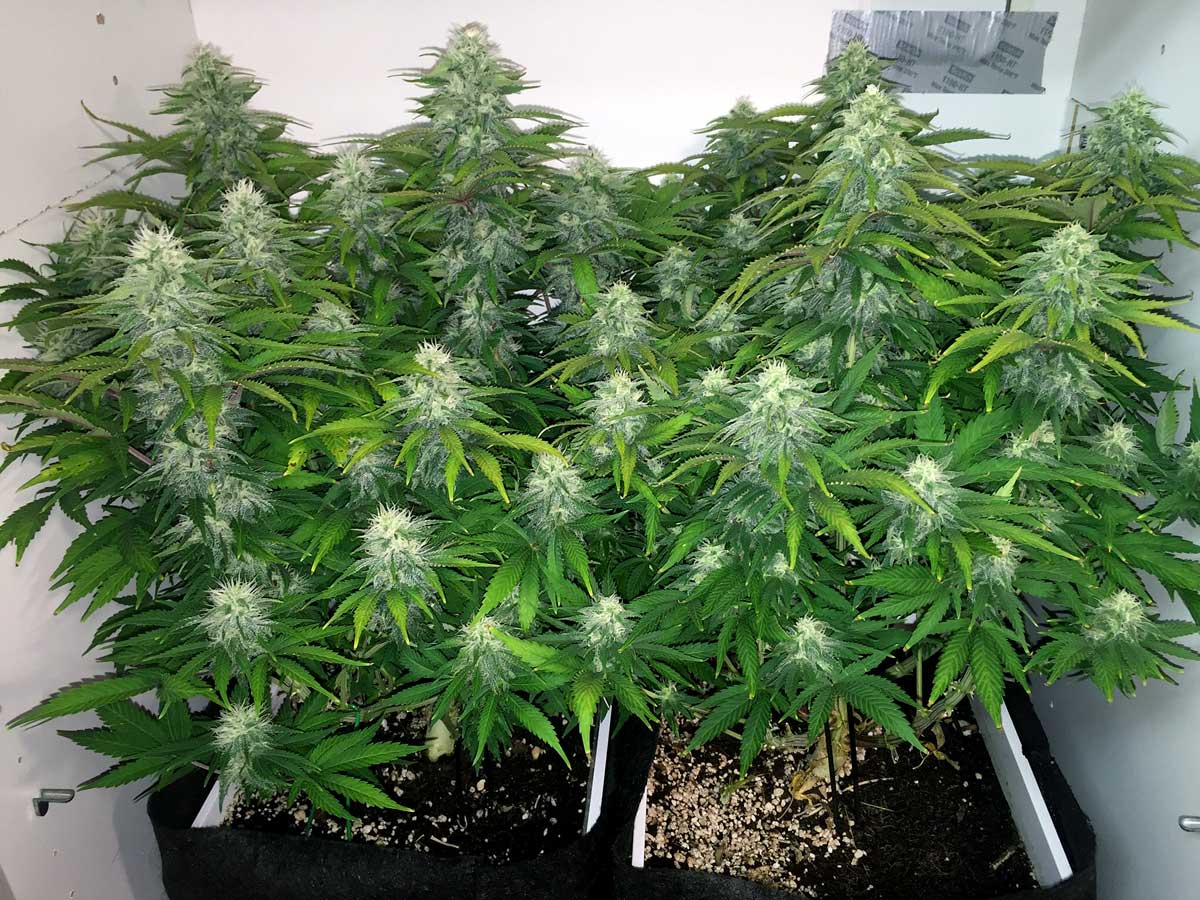
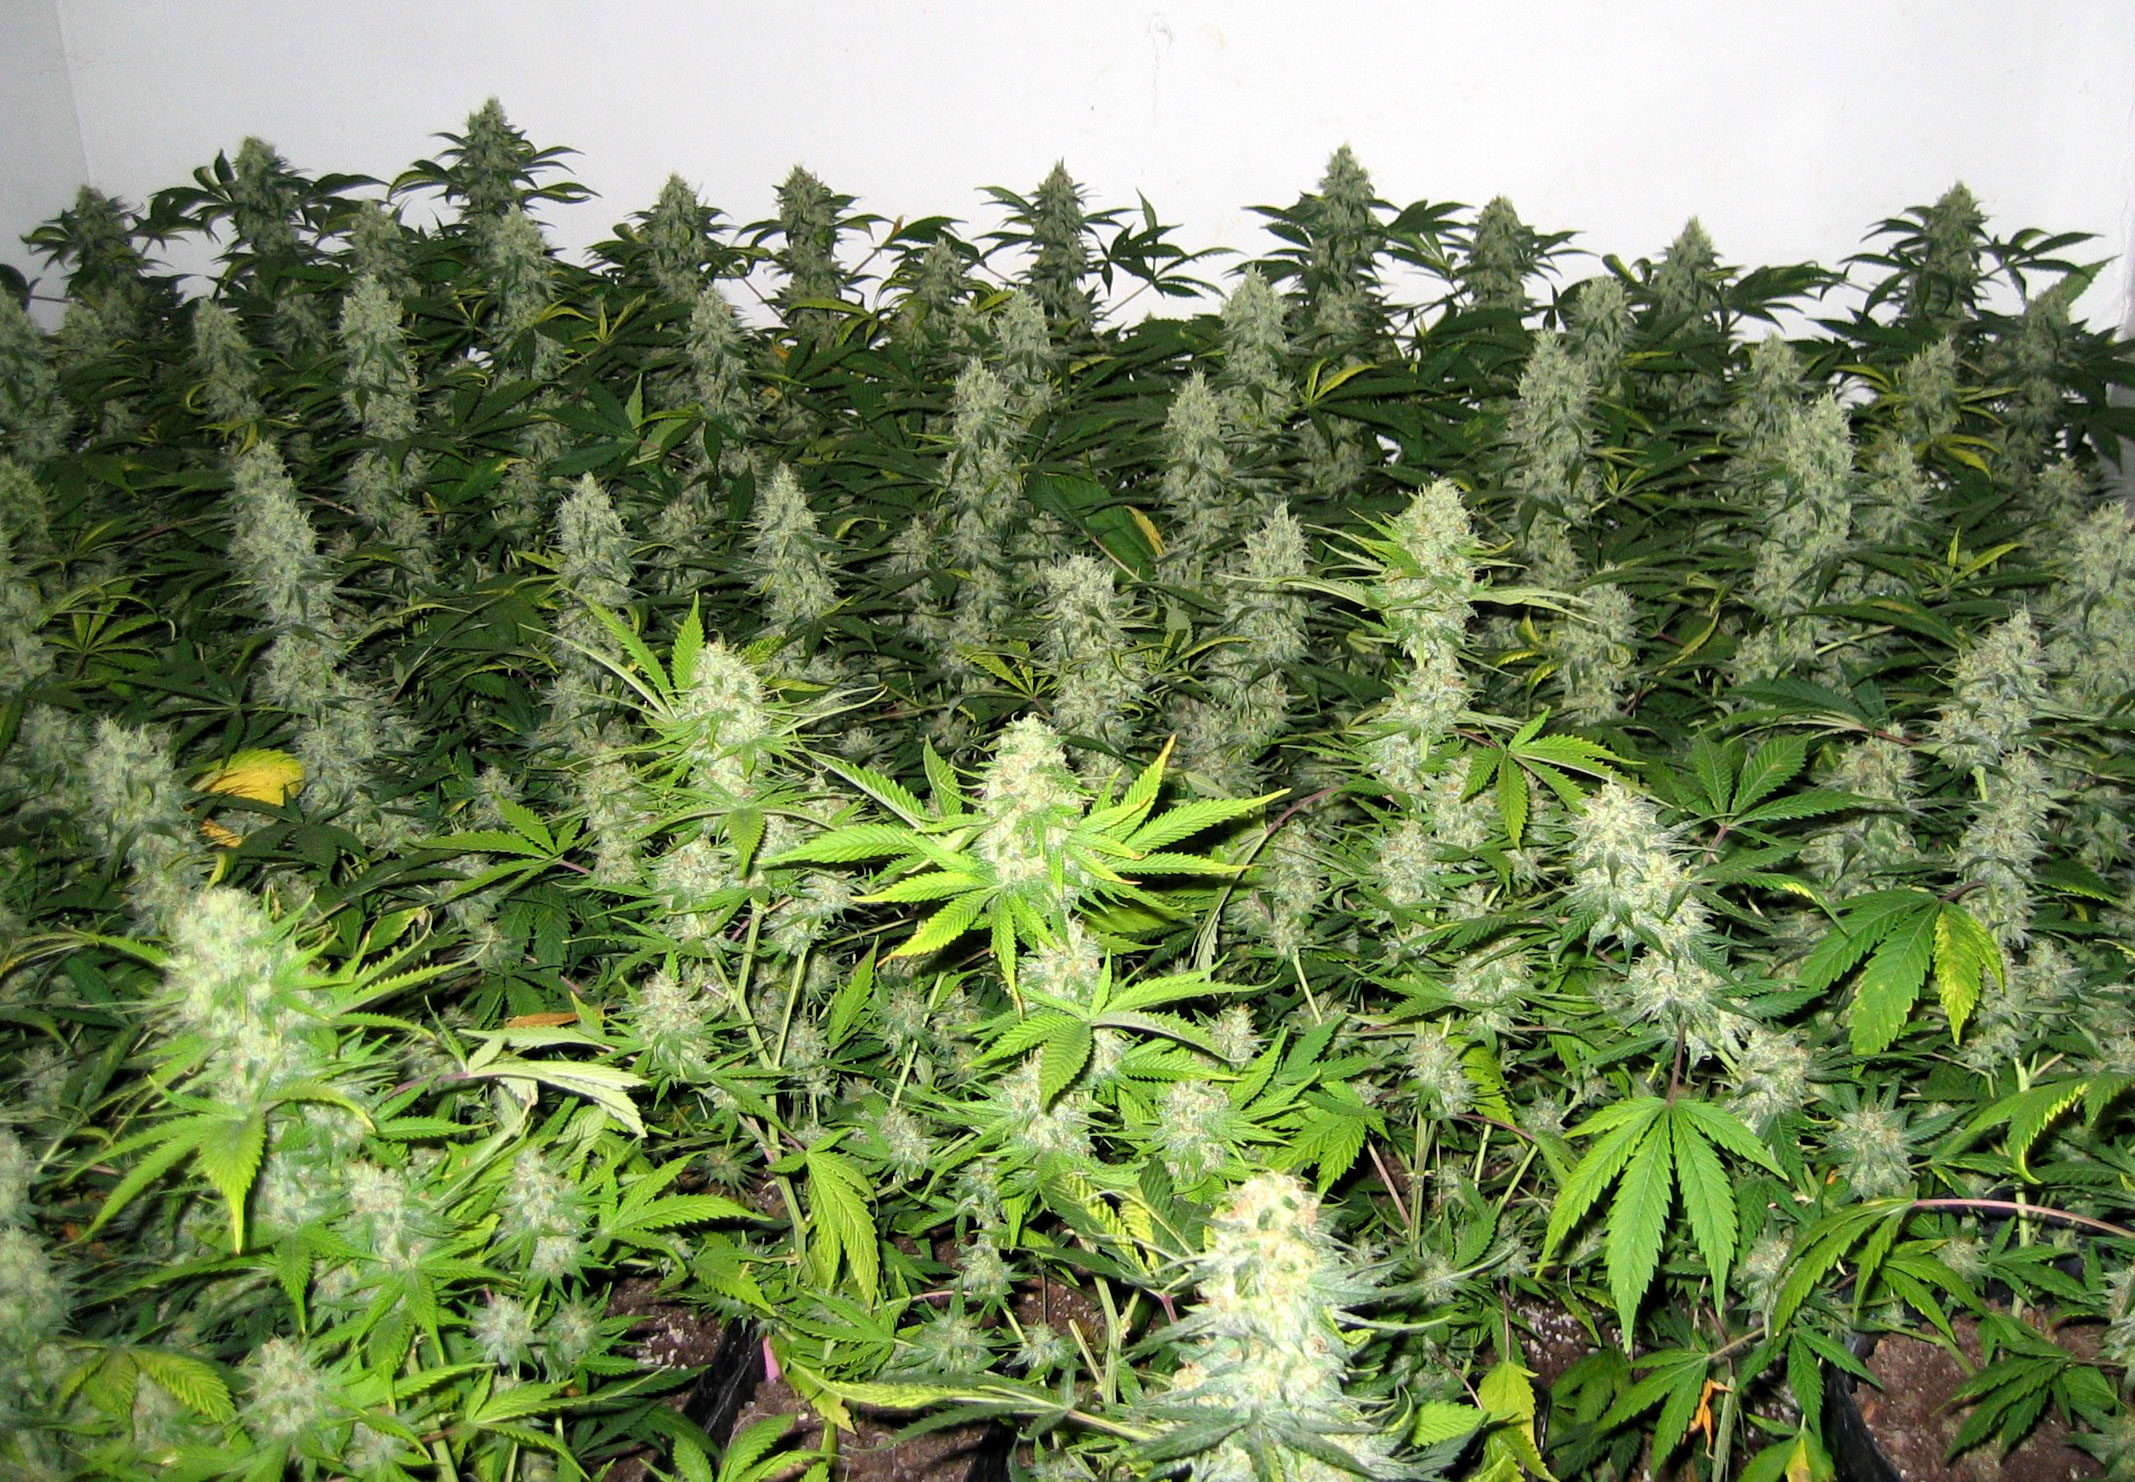
You don’t want too many colas because each one will start to become smaller as they lose their ‘personal space’. You’ll get optimum yields by making sure every cola has some breathing room of around 2-3 inches (5-8 cm) between each cola. This gives them room for buds to fatten up. But other than that, try to fill the space under your light with as many colas as you can. Every “empty” spot under the grow light without any buds growing is wasting some amount of light that could be going towards increasing your yields.
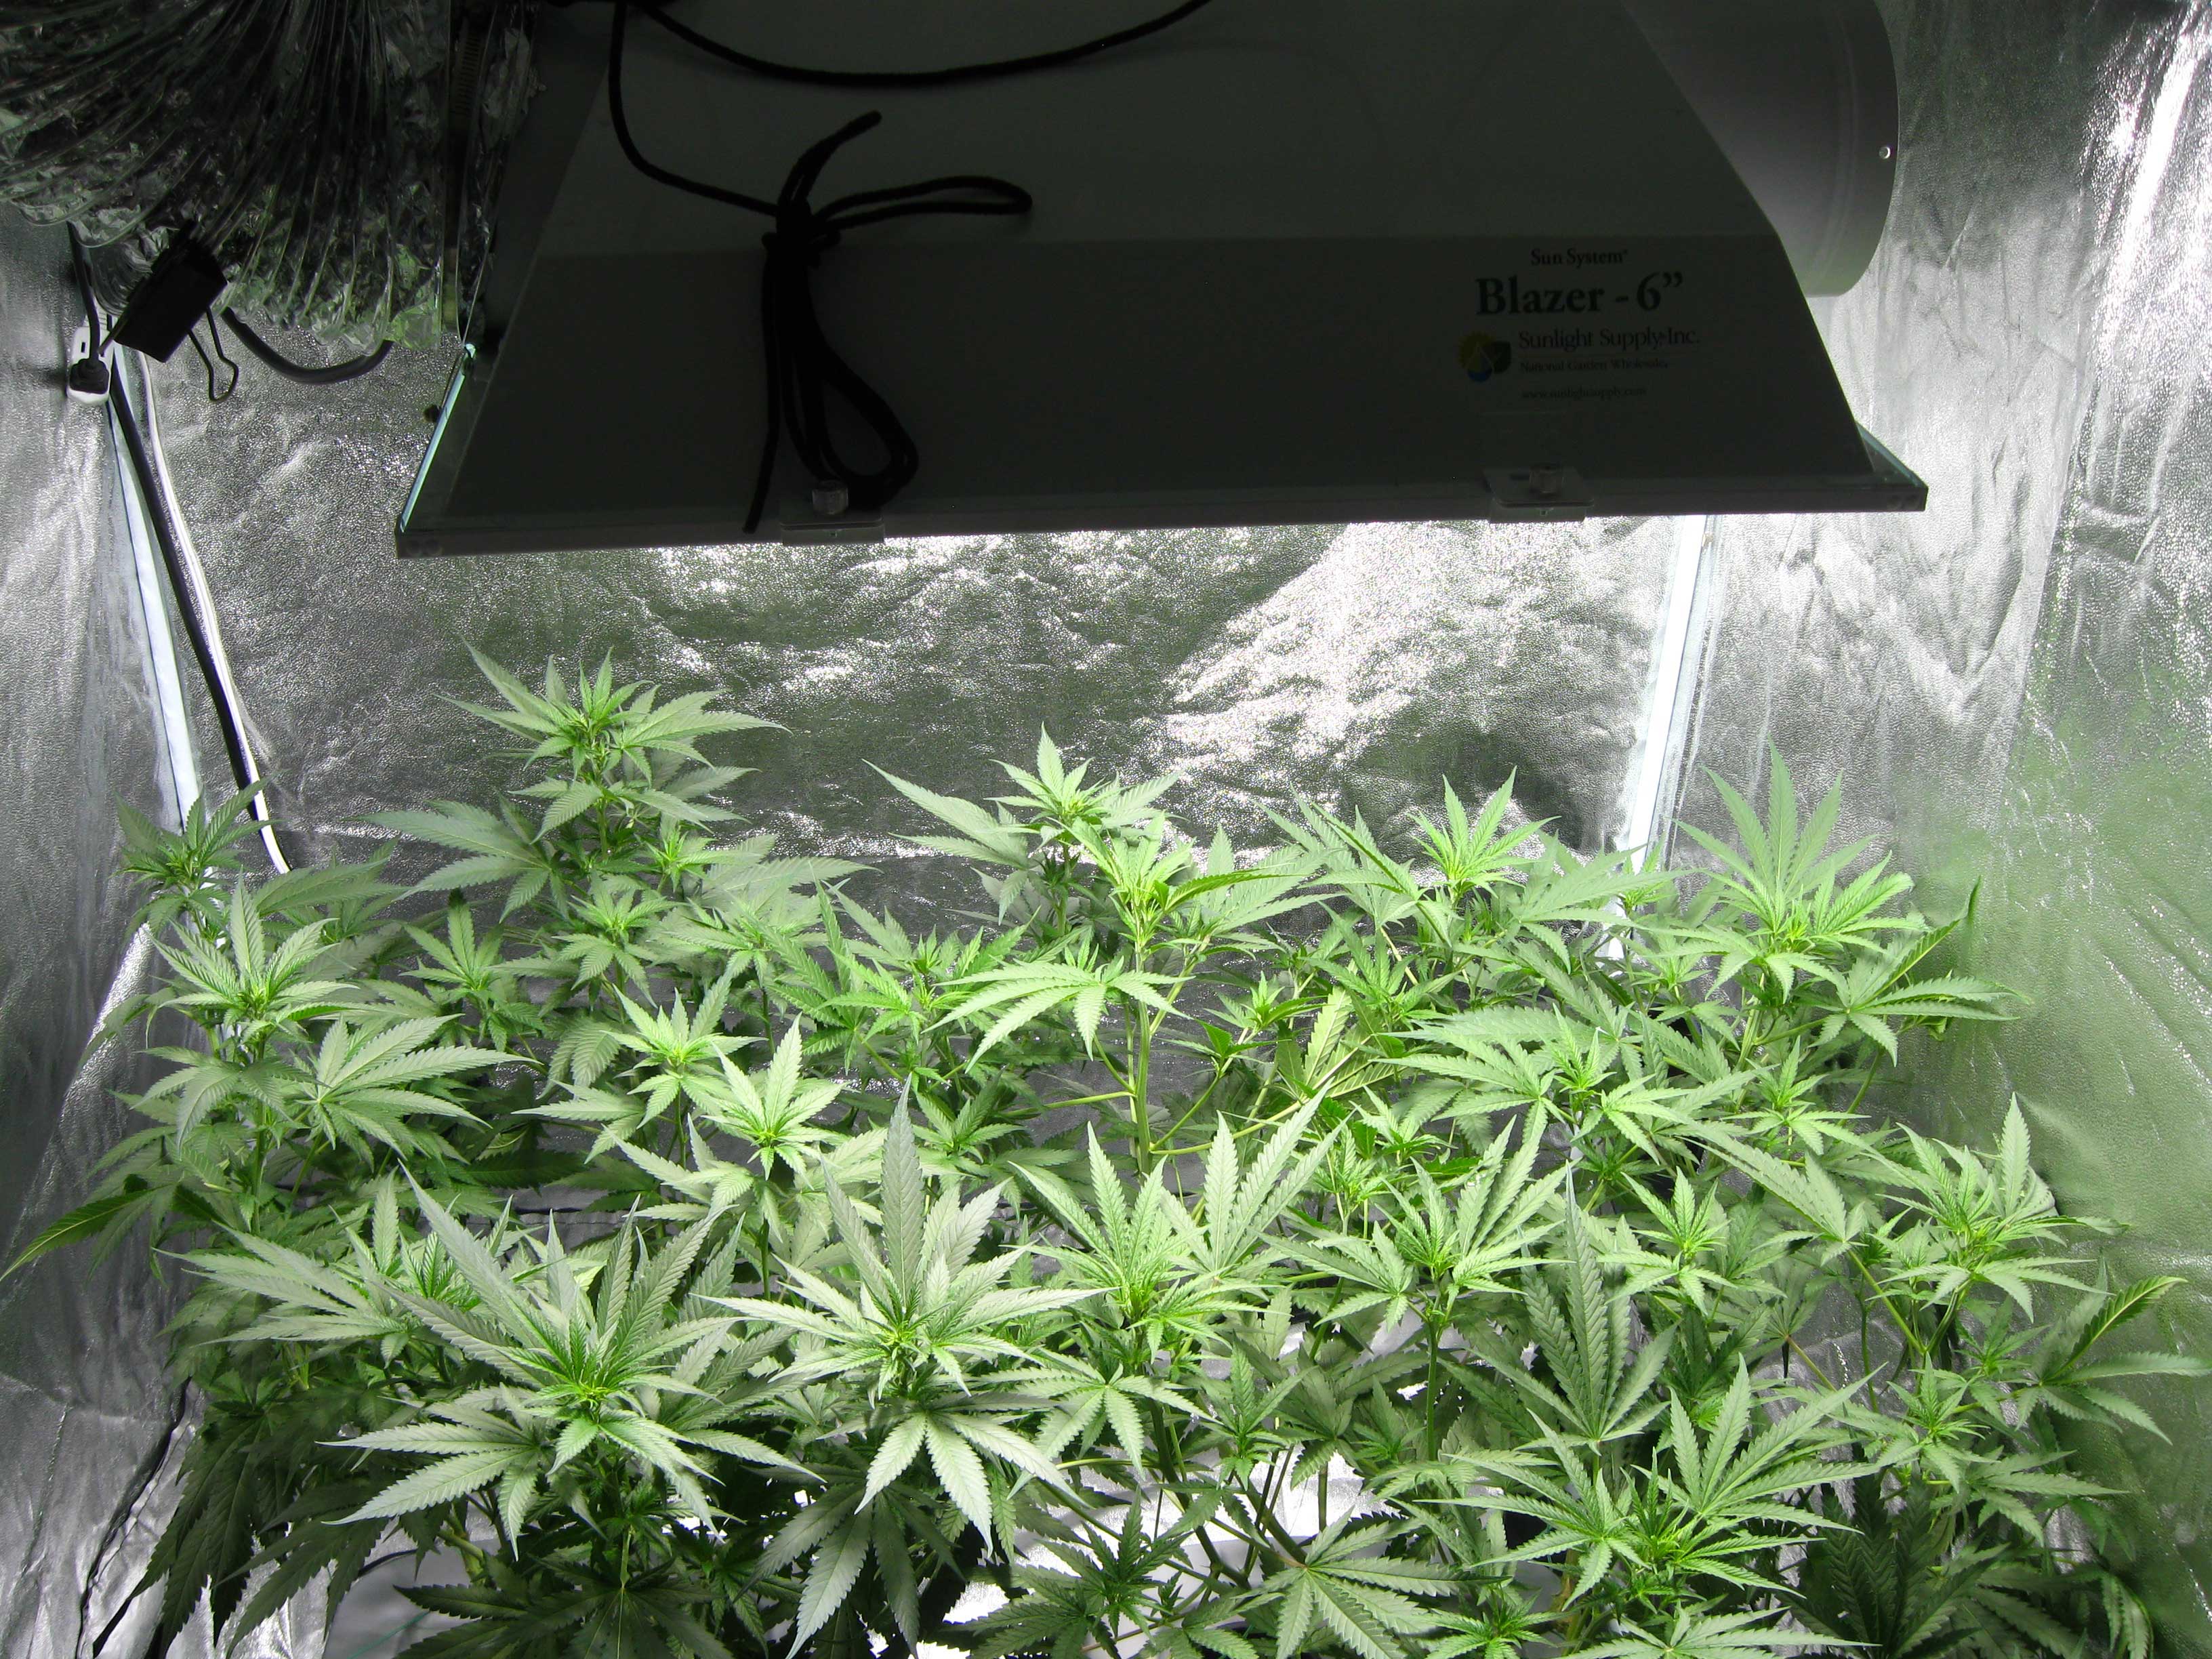
Optimally, you want your colas spaced something like this by the time you start flowering…
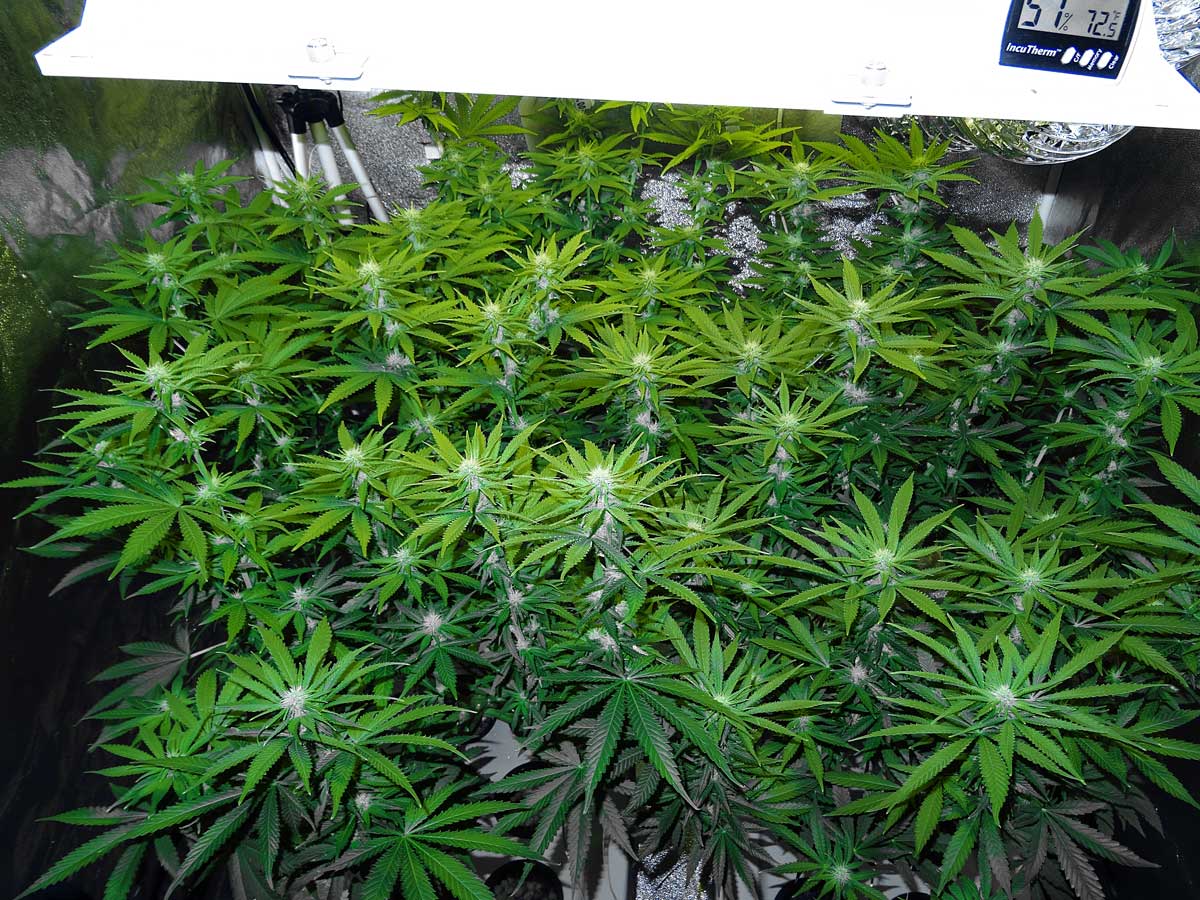
…which is how you can achieve something like this!
Making lots of long colas increases yields because that’s where the biggest, longest, and most dense buds form.
So today, you’ll learn how to succeed with simple and easy plant training, without any special techniques!
Simple Cannabis Plant Training Guide
Now we’re going to skip all the techniques, and I’m just going to break it down to the most basic principles you need to remember. But before we get started, a quick definition that’s very important to plant training…
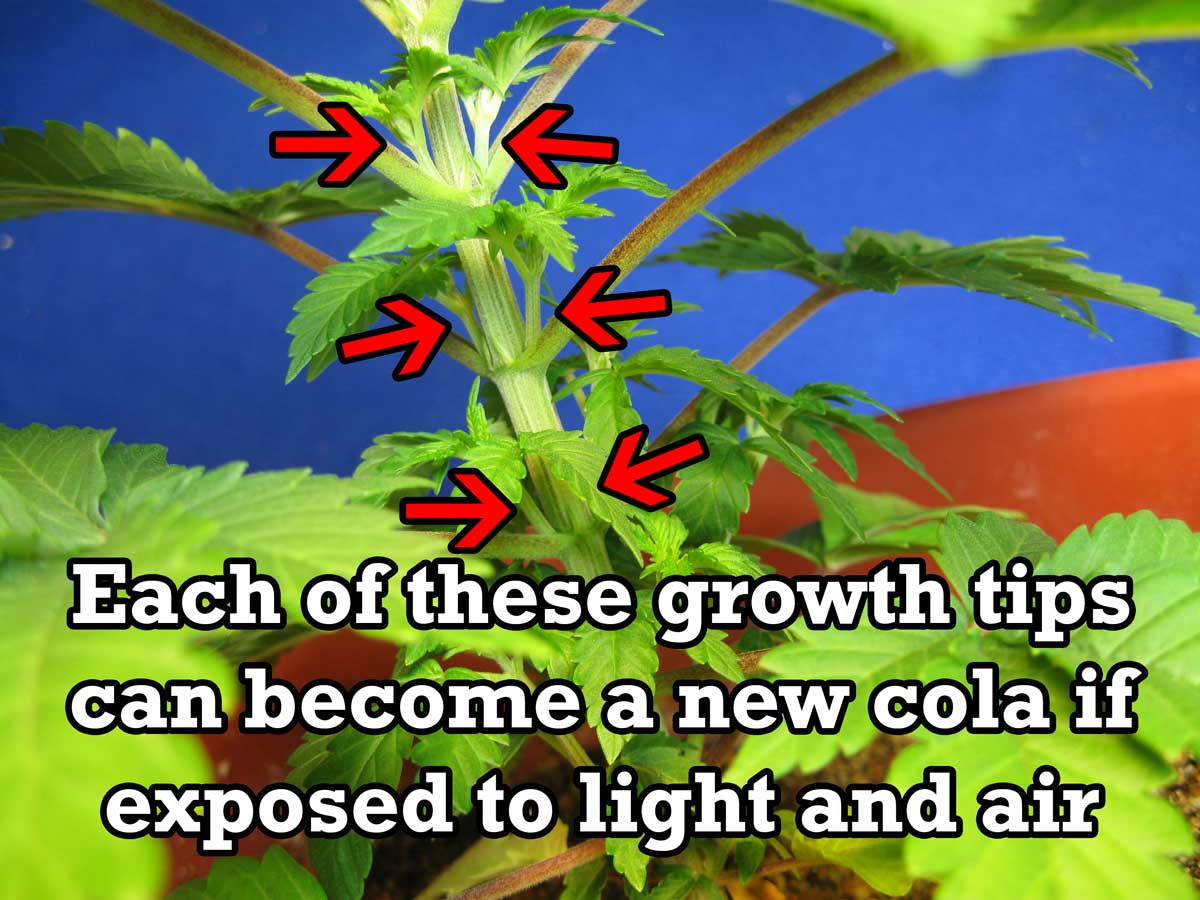
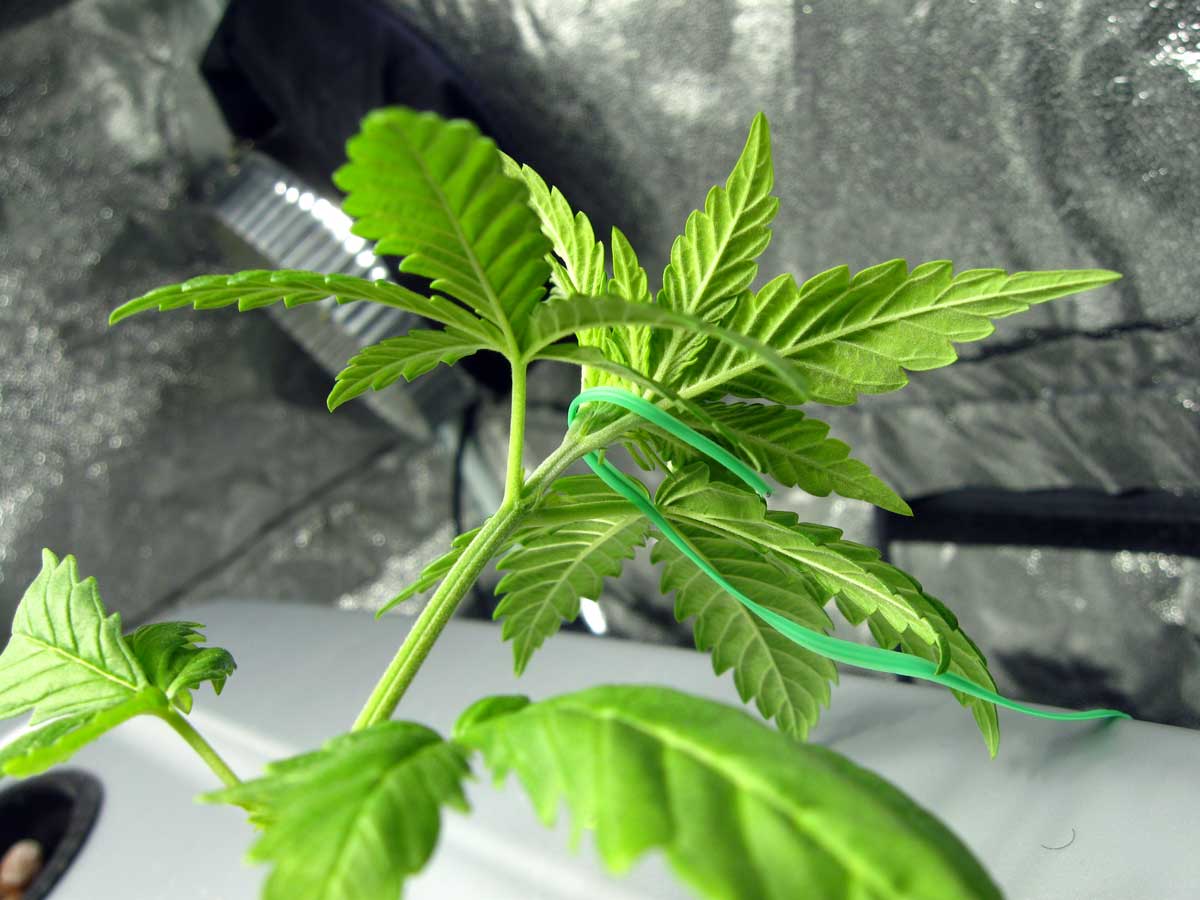
What’s a cola? A “cola” is an informal term used by cannabis growers to describe a main stem or “growth tip” that has made it all the way to the top of the canopy. These turn into bud sites.
In the vegetative stage, these just look like regular stems with growth tips at the end, but since they’ve made it all the way to the top we label those stems as “main” stems or colas. In the flowering stage, it’s these stems in particular that grow into the biggest and longest buds, which is why growers try to make many of them.
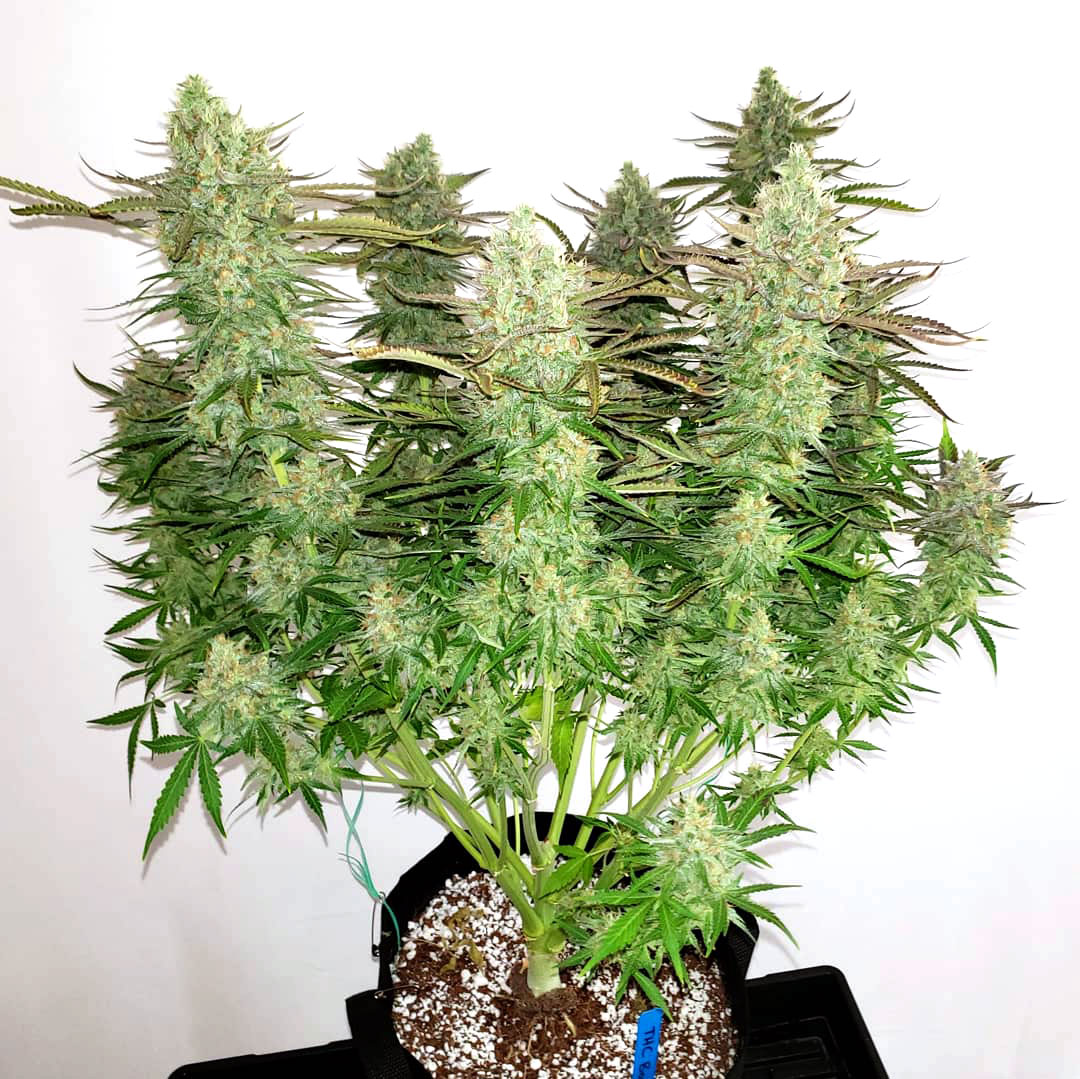
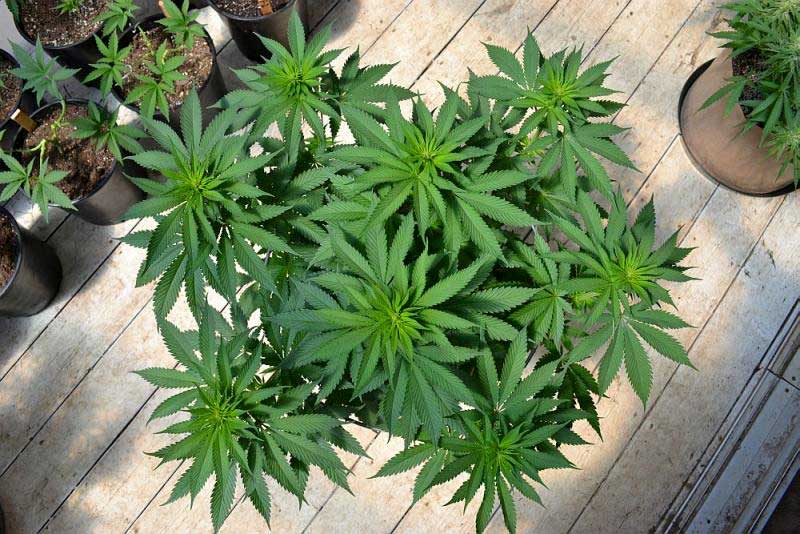
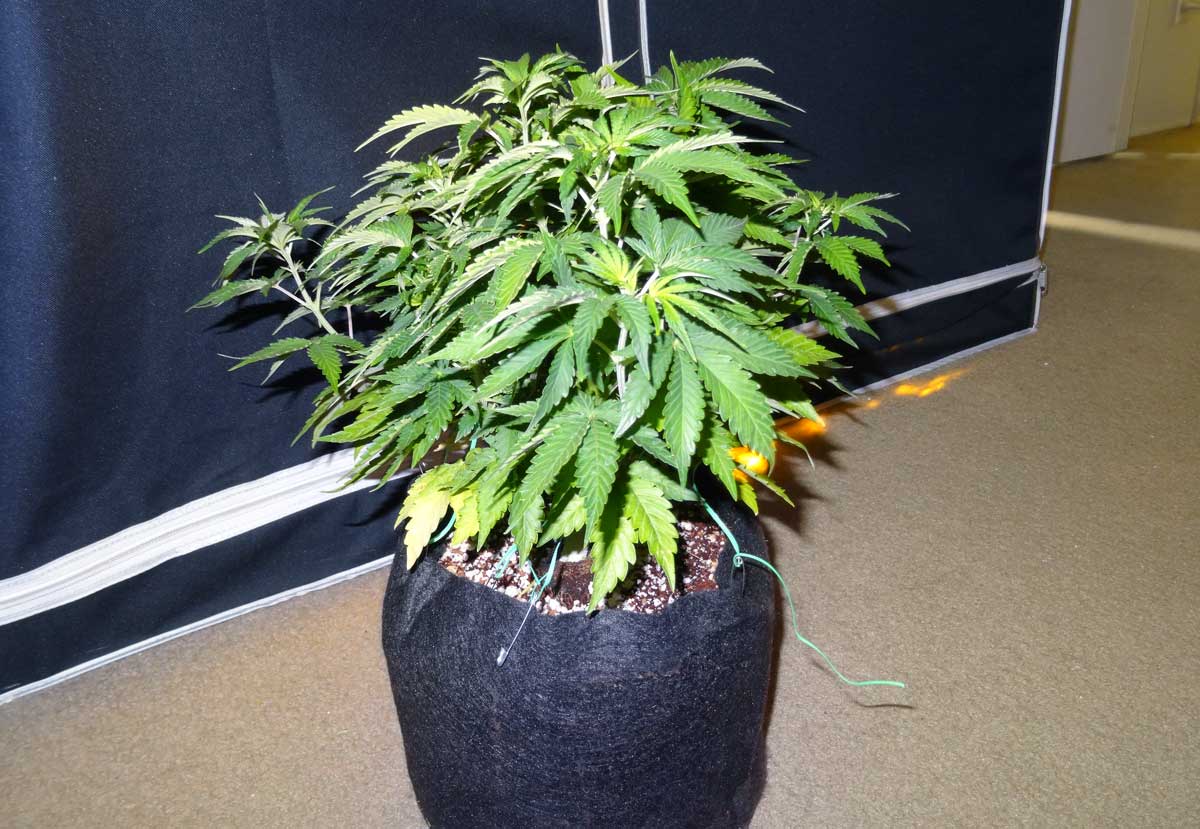
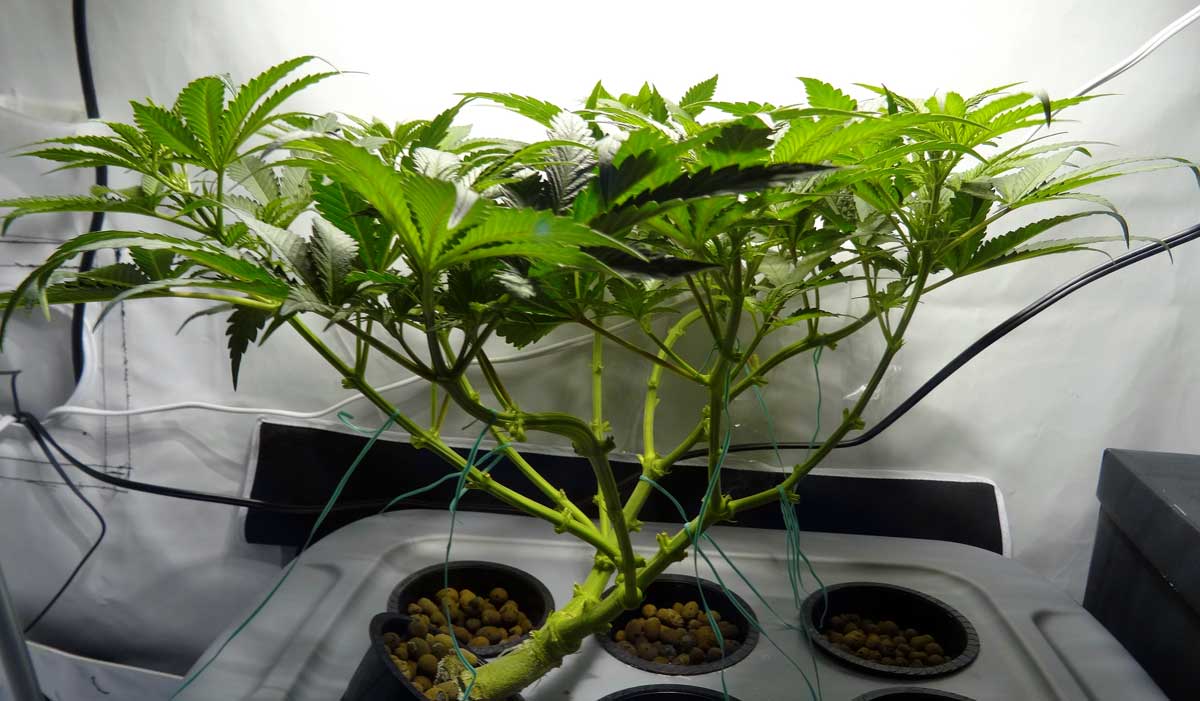
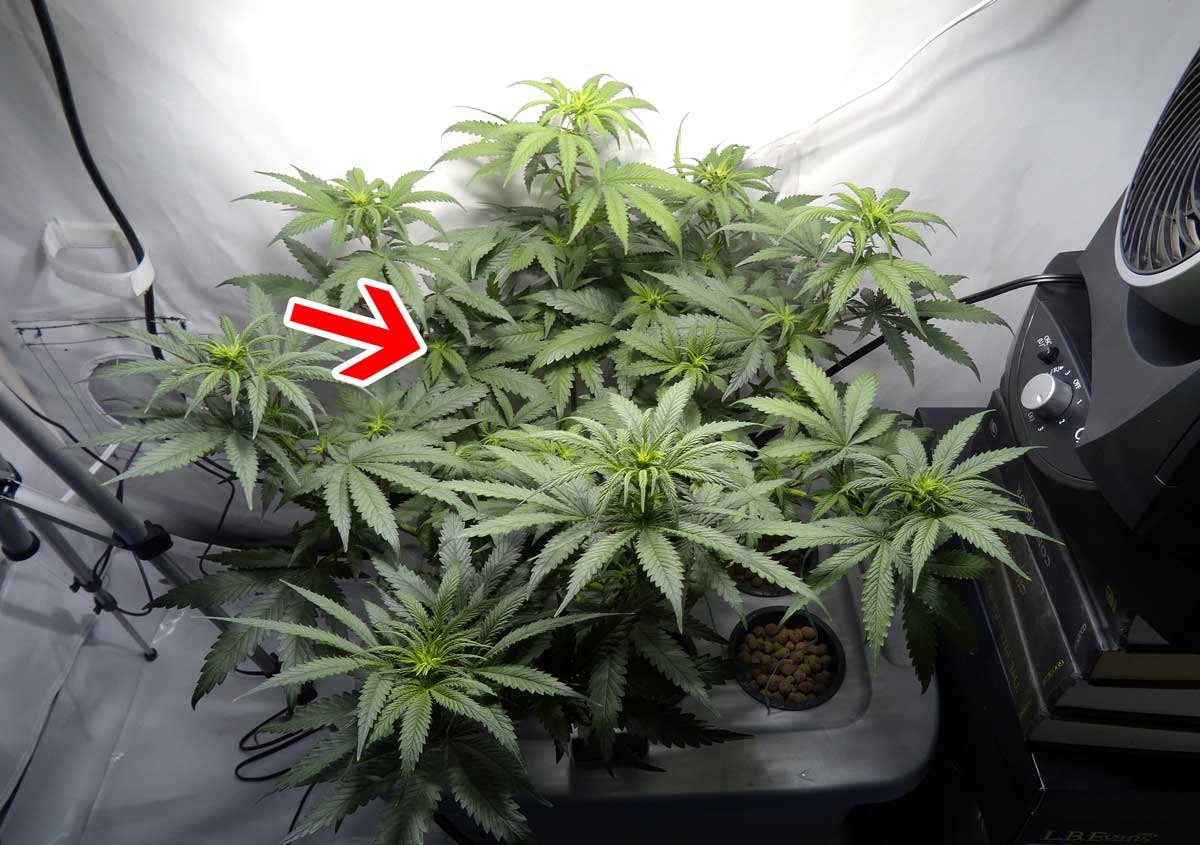
Each growth tip/cola looks a little like a “star” from above in the vegetative stage. Can you spot the 8 main colas on this plant?
Colas are sometimes called “mains” or “tops” because they’re main stems, and because they’ve made it to the top of the plant. They can originate from anywhere on the plant that has a growth tip.
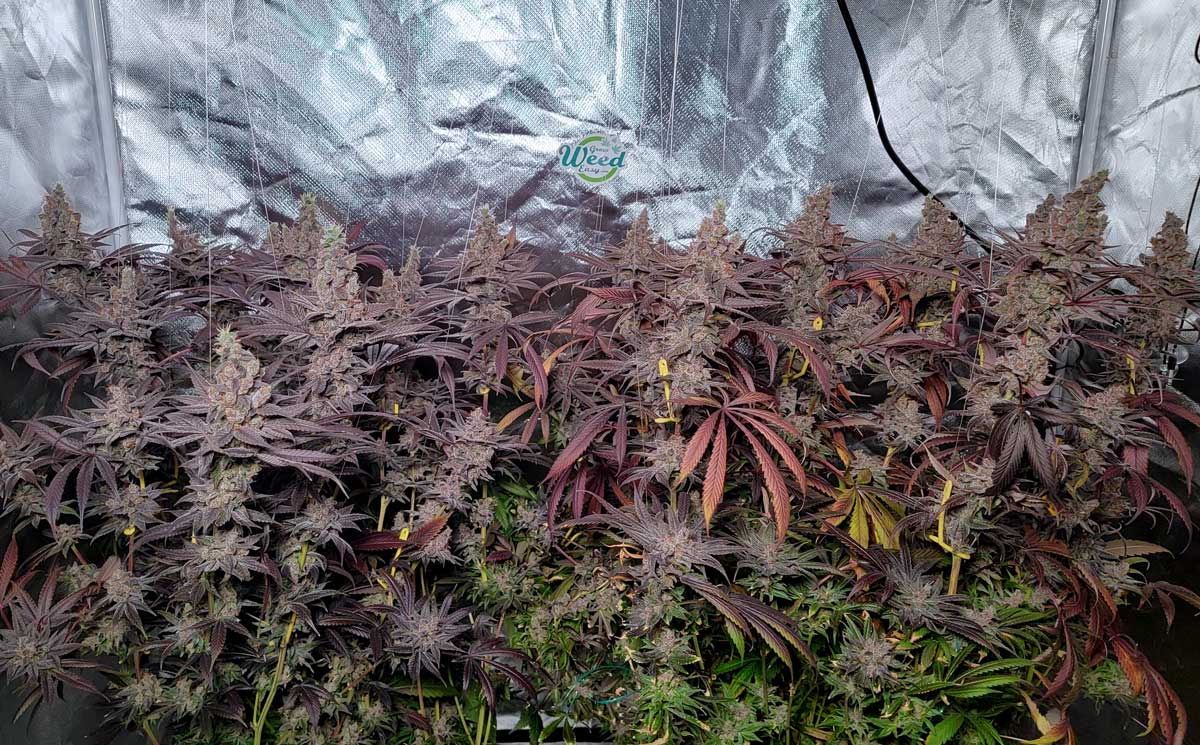
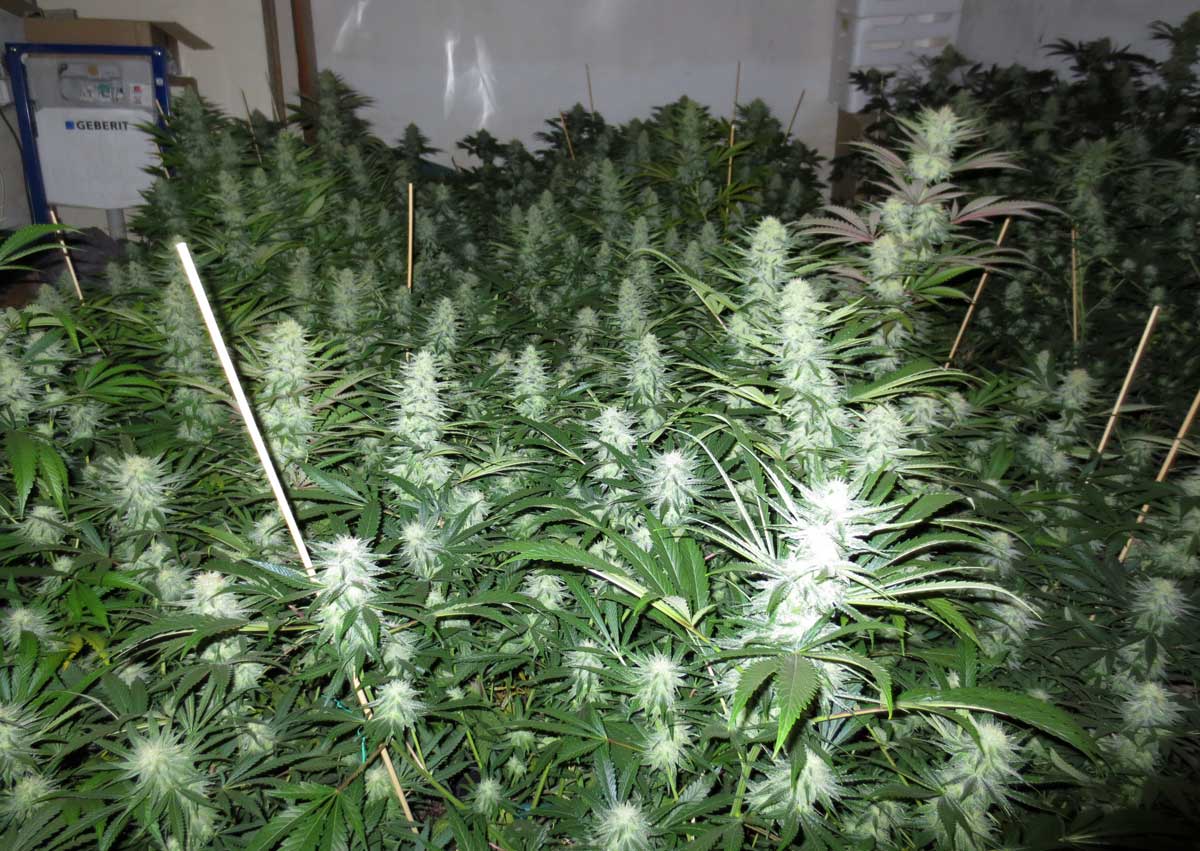
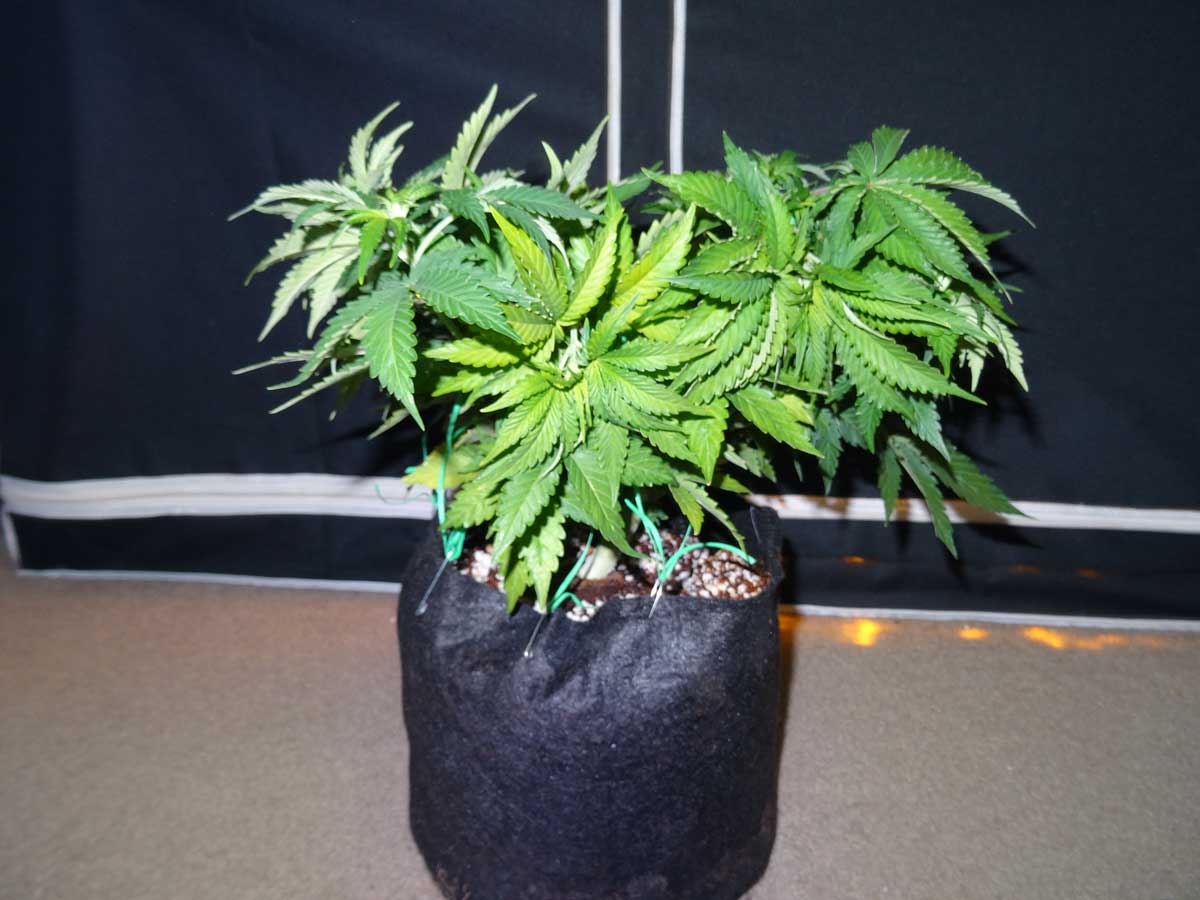
Nurture lots of colas for a “sea” of bud sites in the flowering stage!
Quick Fact: Where did the word “cola” come from? Cola is a Spanish term meaning “tail” and was originally used by Mexican cannabis growers. Back in the 70s when marijuana was mostly of the commercial brick variety, many growers would look for weed that had the biggest colas.
Now that you have a handle on what a cola is, let’s get to general ideas to keep in mind!
Idea 1: Pick prominent growth tips and nurture them into colas
Any growth tip can become a cola if given plenty of light and air.
Your goal is to nurture growth tips close to the base of your plant so many of them make it to the top canopy. You don’t need any special techniques to do that, because all you have to do to nurture a growth tip into a full-fledged cola is…
Make sure the growth tips you want are exposed to direct light and air!
In fact, it can actually make a surprising amount of difference just to bend and tuck your leaves out of the way so the growth tips are exposed directly to the light.

You’ll see that some growth tips tend to naturally grow bigger and be more prominent than the others, and you want to try to work with your plant instead of against it. If your plant seems to be “favoring” a particular growth tip, then that’s a really great candidate to nurture into a cola.
Some cannabis growers will actually cut off the top of their plant (“topping”) when it’s very young, to “split” the main stem into two main stems at the very bottom. This can help make it easier to spread out the plant as it gets bigger. But this is only a matter of preference and you will get great results just bending over your main stem without having to cut the plant at all.
Idea 2: Choose colas that start lower on the plant, near the base of the main stem.
When possible try to pick colas that start lower on the plant, near the base of the main stem. The best stems usually go all the way down to the bottom of the plant. For whatever reason the plant seems to put more energy into these stems and they tend to grow bigger buds than ones that originate higher up on the plant.
Note: This is the main idea behind techniques like manifolding where every cola originates near same place on the main base. But you don’t necessarily need to create a manifold to get the increase in yields.
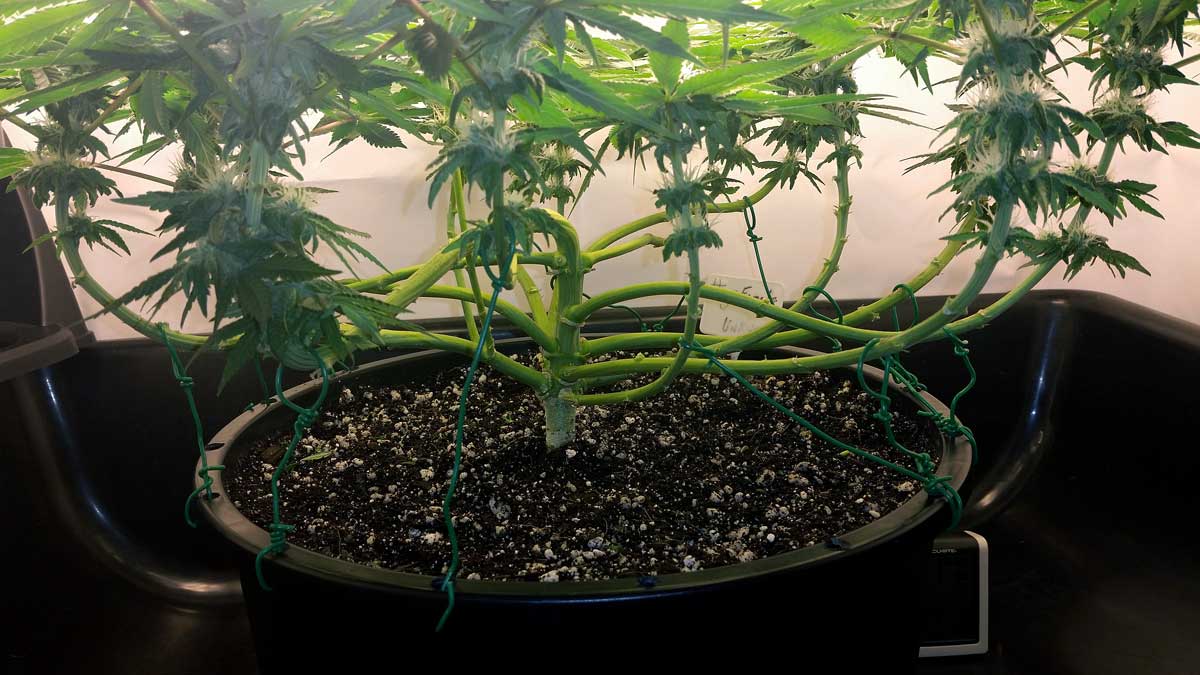
Notice how all the colas on this plant originate near the bottom of the plant. Not only does your plant tend to put more energy into these stems, it also gives you longer buds, further increasing your yields.
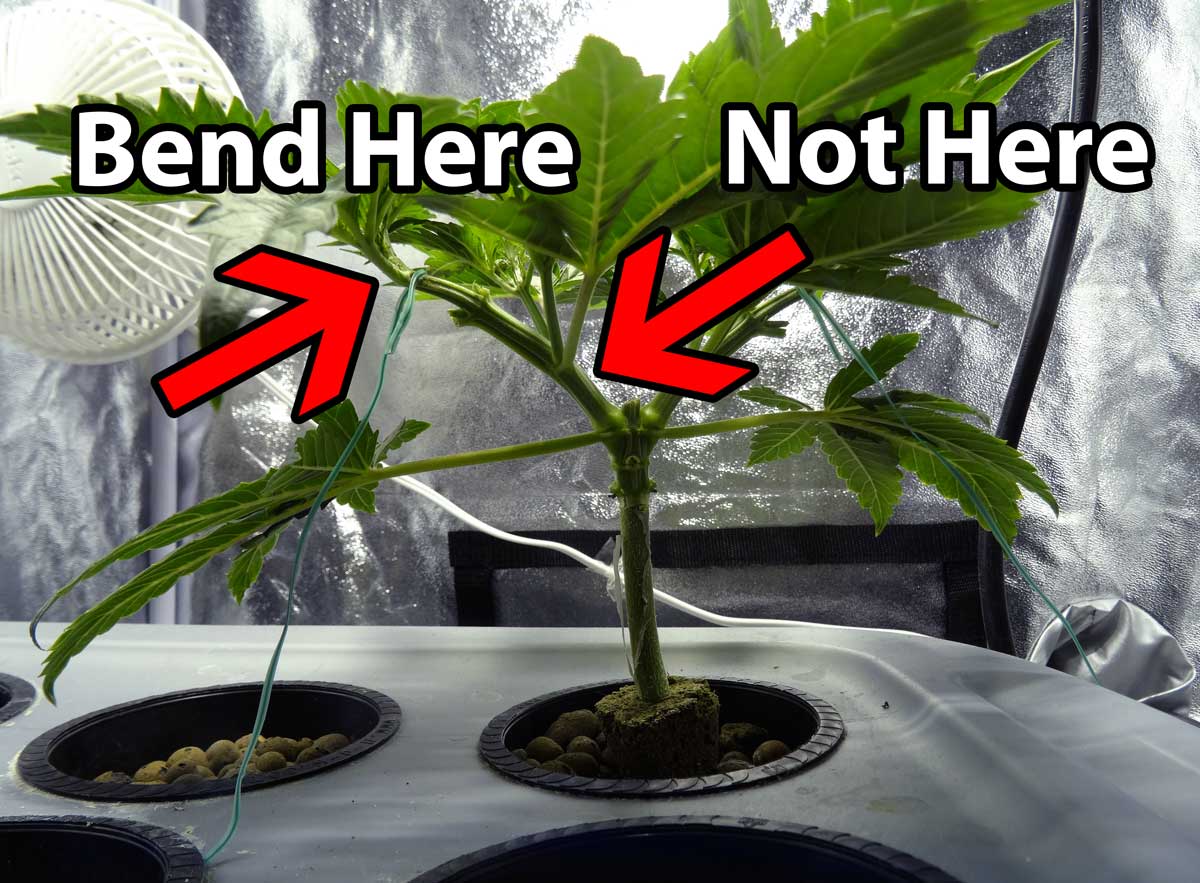
Idea 3: Bend Stems the Right Way
Whenever bending stems out of the way you want to try to bend only the flexible parts of the stem, which are usually located near the ends. Avoid bending any part that has already become stiff or woody, as these tend to snap.
Bending technique – try to bend only the flexible parts of stems, which are located near the tips
If for whatever you have to bend a stem that’s already become woody, you need to take a few extra precautions to prevent the skin of the stem from splitting.
How to prevent the skin from splitting: What you need to do is take the part of the stem you want to bend between your fingers. Squeeze it tight, and then slowly and gently wiggle it around, squishing the stem as hard as you can while you’re wiggling. The stem will start to become more pliable as the inside gets kind of crushed. You’re basically “crunching” up the inside of the stem without breaking the skin so it doesn’t offer as much resistance. Once the stem actually feels flexible, that’s when you try to bend it. Don’t try to bend it if it still feels stiff! Some people call this “supercropping” but basically it’s just a way to bend a stiff stem.
To bend a really stiff stem: Pinch the stem tightly between your fingers(not nails), then squeeze firmly while wiggling the stem gently back and forth where you want it to bend. Continue until you feel/hear crunching from the inside of the stem (may take several seconds of wiggling) and the stem gets flexible. At that point slowly bend the stem at the new joint you’ve made, and secure in place.

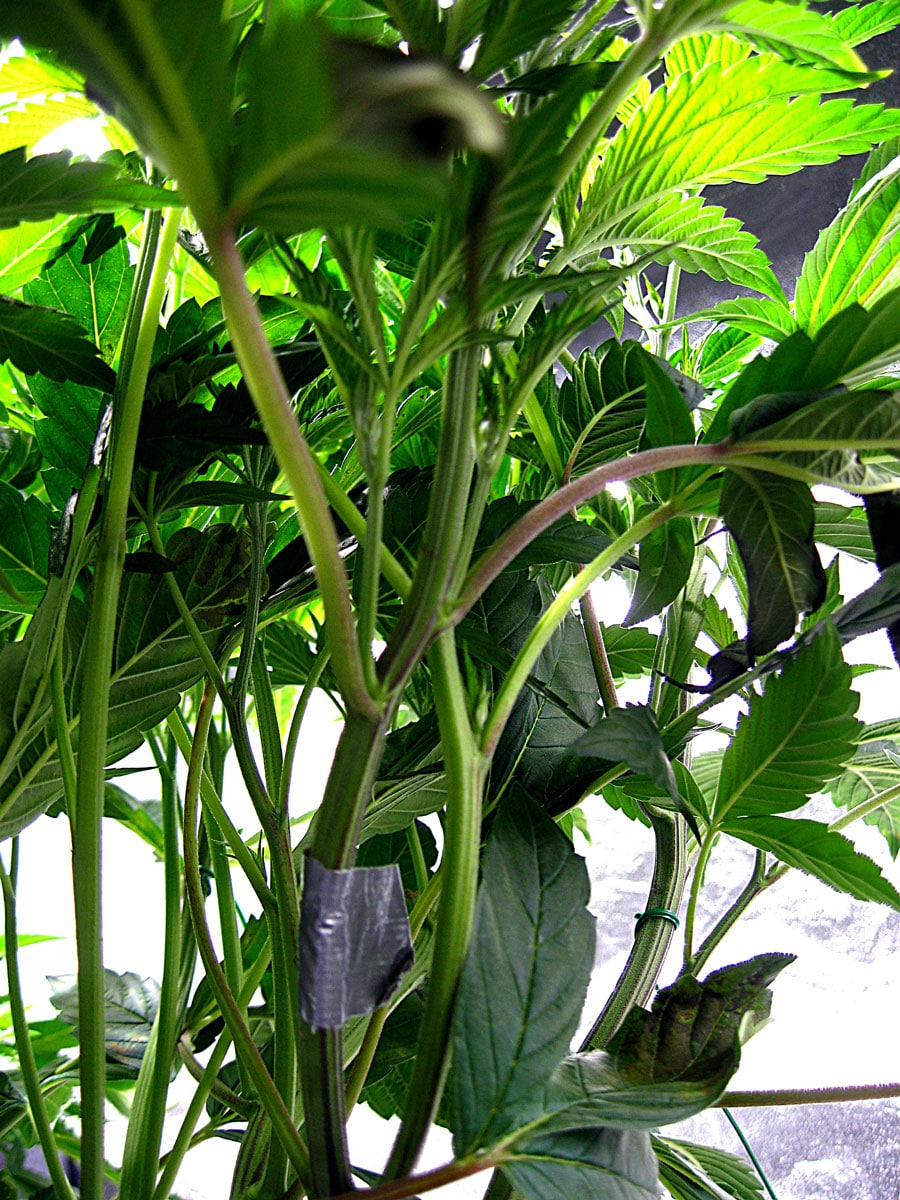
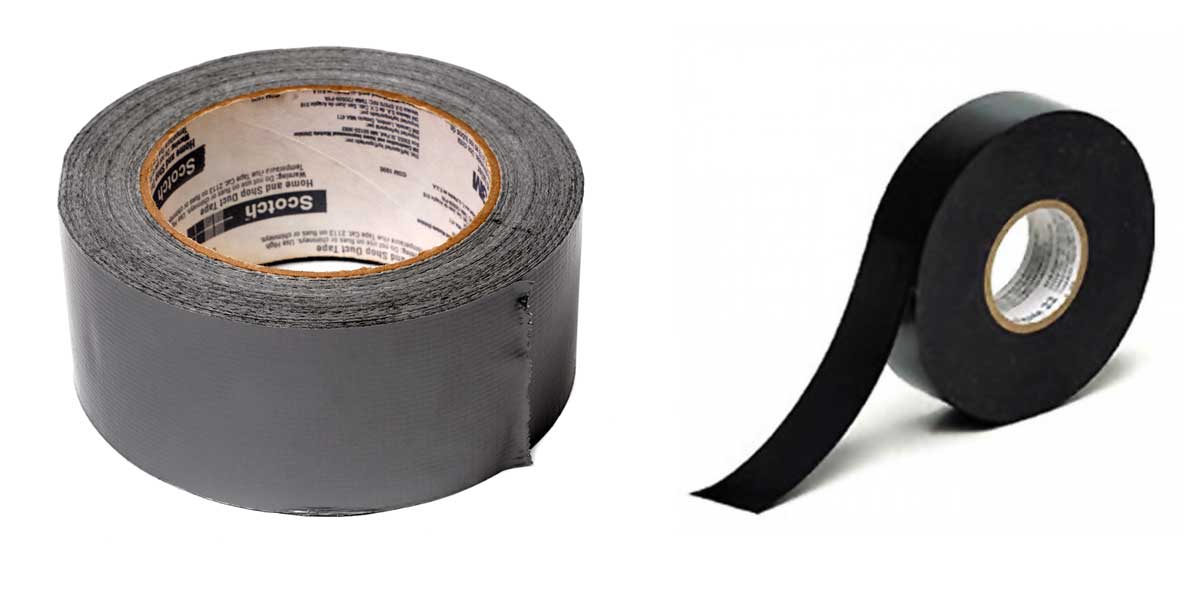
Recovering from bending/supercropping gone wrong: If you do accidentally snap a stem and break the skin while trying to bend it over, never fear! Vegetative plants can recover from a lot and if you quickly wrap up the injury with duct tape or electrical tape, like a “cast,” your cannabis plant will actually be able to repair the broken stem. After a week or two it will form a “knuckle” at the place that was injured, and you’ll be able to remove the tape. Good as new!
Idea 4: Bend over any colas that are getting taller than the others
When any of your main colas gets taller than the others, bend it down and away from the base of the plant, optimally towards a spot under the light that doesn’t have any other buds.
This works best if you’re checking on your plant regularly so you can catch the problem stem(s) early, before any one gets out of control and becomes difficult to bend over. Staying on top of it also gives you the ability to train that stem to fill up any “holes” in the canopy that are lacking a cola.
If some of the colas are getting taller than the others
Bend the tallest ones over until they’re all the same height as each other
Keep your plant flat as the stems grow out!
Idea 5: Secure stems in place
If you don’t secure your stems after bending, they’ll turn back up and grow right where they were, often overnight!
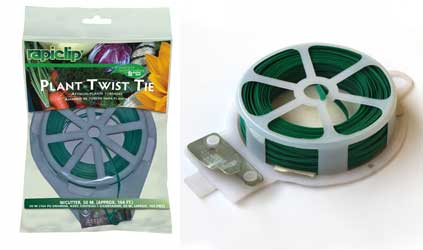
Use something soft yet pliable like plant twisty ties, as they’ve been particularly made to secure plants this way, and won’t hurt your plants or cut into the skin.
You can secure to anything, but the container of the plant works very well because if you pick up the plant, everything stays in shape.
In hydro I recommend attaching twist ties directly to the lid in some way. That way you can move the lid without disturbing the plant.
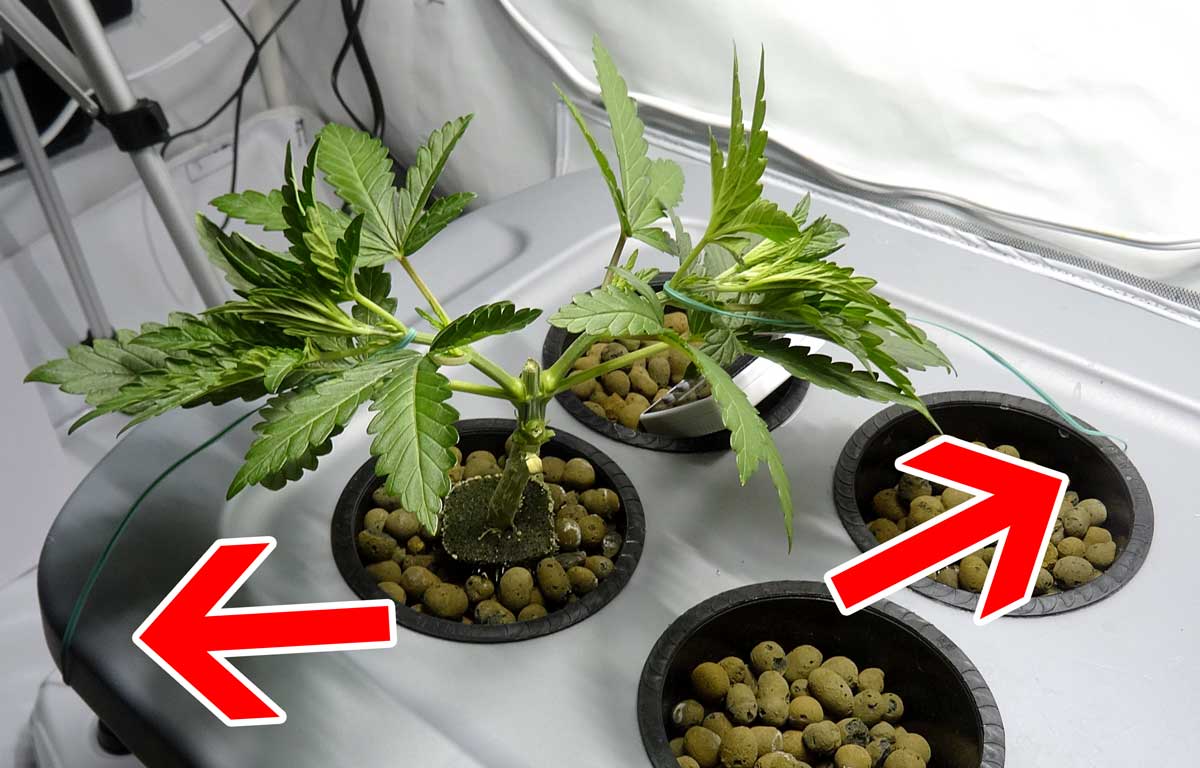
When growing in a container I recommend attaching your twisty tie directly to the lip of the pot because you’ll be able to pick up and move the plant freely.
You can find plant twist tie online or in the gardening section of physical stores (if you’re not sure what to ask for, plant ties are often used to secure vines)
Before you initiate the flowering stage, you want each cola to have at least 2-3 inches (5-8 cm) of empty space around it, so there’s a nice space between colas and they have room to grow. Other than that you want as many colas under the light as possible.
So as your plant is growing in the vegetative stage you want to look for “holes” or places under the light which don’t have any colas. If you do see one, find a cola from around the edges (or find a nearby growth tip) and nurture/train/bend it to fill in that hole. Filling up the whole space under the light is how you get the best yields!
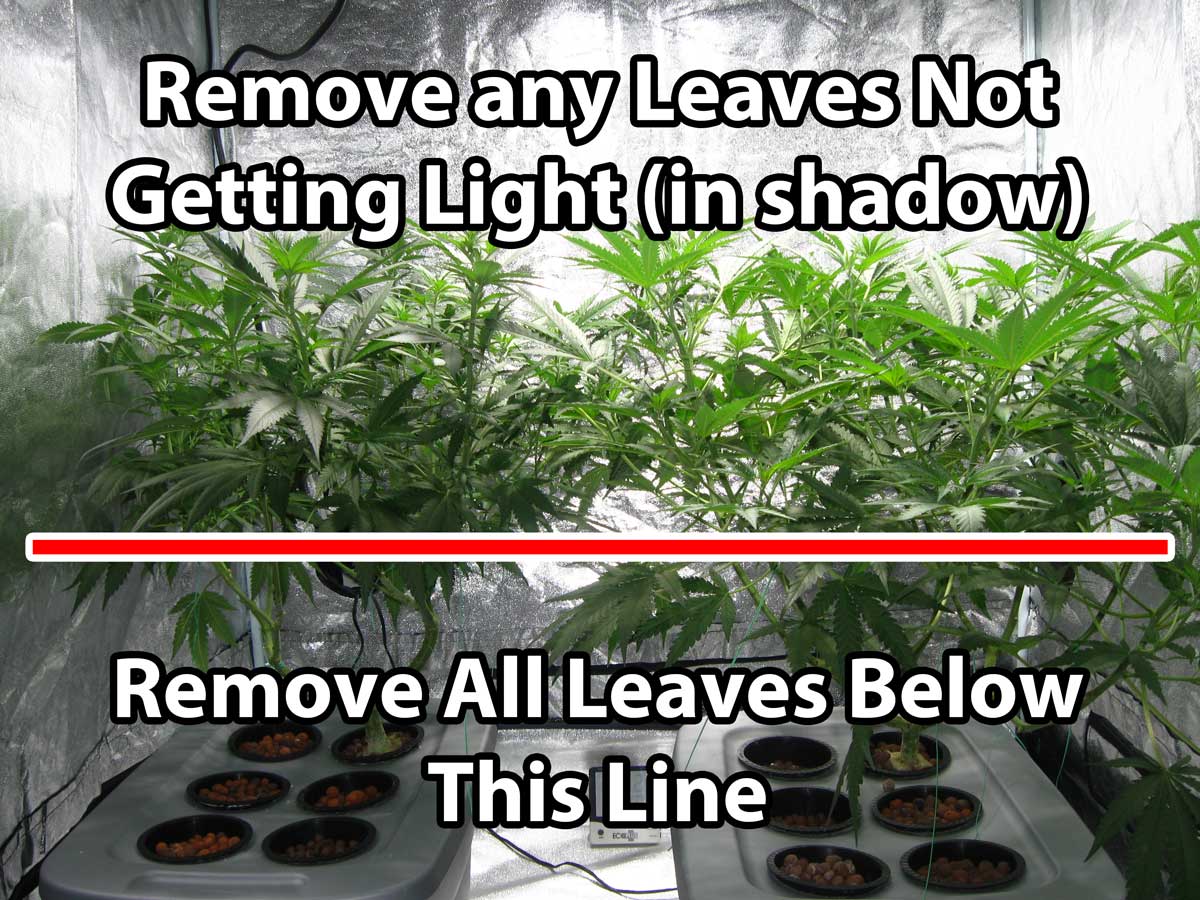
Fill up any “empty” spots in the canopy by bending one of the colas from around the edges down and into the empty spot. This arrow points to an empty spot in the canopy.
For example in the picture above, the top middle cola in the back (the ones that is already taller than the others and kind of crowded) is perfect to bend over and fill in that hole.
Idea 7: Before you flip to the flowering stage, remove most/all the stems that haven’t become colas (“Lollipop” your plant)
You definitely want to keep your main stems that you’ve arranged in the top canopy, but as your plant gets bigger and you start getting close to the flowering stage, you’ll see you have lots of smaller and less developed stems underneath the main canopy. Some people call these undeveloped stems “suckers” and they will definitely suck energy away from your bigger buds!
Remove “suckers” that are stealing energy from your main buds!
Remove some of those stems that won’t ever make it to the top – they’ll only make small, airy buds while stealing resources away from the main colas that you want your plant to focus on. No up-and-coming small stems should be competing with a cola for light and space. Advanced growers: For the best results, remove most/all of these underdeveloped stems.
Not long before you change your plant over to the flowering stage, remove stems that didn’t make it to the top of the plant and will never get any direct light. This is sometimes called “lollipopping” the plant. The parts of the plant in darkness will only steal energy away from your main colas, and would only produce small larfy buds so it’s better to get rid of them.
Now that you’ve done that, it’s time to care for plants until harvest!
- Water plants regularly – Use the same principles you have been using. However, you may notice that your plants drink A LOT at the beginning of the flowering stage, and this tends to drop off as time goes on. After the first 6 weeks of flowering, most cannabis plants start drinking significantly less. So just be aware of this and make sure to adjust your watering practices accordingly. Try not to underwater them at the beginning of the flowering stage, try not to overwater them at the end.
- Avoid nutrient deficiencies – Cannabis plants aren’t as hardy in the flowering stage as they are in the vegetative stage. Especially towards the last few weeks of bud formation, plants are much more prone to various leaf symptoms like yellowing, spots, brown splotches, etc. Most nutrient deficiencies are caused by incorrect pH at the roots, so that’s always the first thing to check. Otherwise, use our plant doctor tool to figure out what’s wrong with your plant.
- React quickly if you notice bugs – Don’t wait even one day. At the very first sign of bite marks or bugs, use our cannabis bug guide to identify the bug quickly. Most cannabis pests are relatively easy to get rid of if you catch them immediately, but tend to get harder and harder to treat as they settle and make a home on your plants.
- Watch out for bud rot – If you’ve followed the instructions in this article, you will likely have a lot of really big buds. These can be prone to rotting or growing mold from the inside, known as bud rot. The first sign of bud rot is you’ll notice random leaves on your big buds get discolored or start dying. When you look at the base of the leaf, you’ll notice that the place it attaches to the bud is dark, brown, moldy, or otherwise unhealthy. If this happens, it’s typically recommended to harvest the whole plant and save what you can, as bud rot quickly spreads from bud to bud after it gets started.
- Make sure buds get direct light – Buds that don’t get light won’t fatten up properly, and tend to be lower potency. So make sure to remove or tuck away any big fan leaves that are hiding your buds from the grow light.
- Pay close attention to the environment – Most importantly, try not to let buds get hot during the last few weeks before harvest. Warm air is fine and actually preferable during the beginning of the flowering stage. This is because warm air helps plants grow faster and make bigger buds during the first 6ish weeks of flowering. Warmth increases the plant’s overall metabolism and a good metabolism helps plants produce more energy from light. But metabolism and growth rates are not the only things that matter when it comes to growing buds. As cannabis plants approach harvest time, cooler air helps buds develop a tighter structure with more trichomes and higher THC/terpenes (greater potency and smell). Cool air also tends to bring out purple colors in buds. It’s not always possible to control the temperature, but it will increase your bud quality if you can keep the temperature experienced by the bud under 75°F/24°C for the last few weeks before harvest. Cool air also helps reduce the chance of pests and bud rot, because bugs and fungus/mold grow much faster and easier when it’s warm. So cool air at the end of the flowering stage doesn’t just help buds develop better, it helps protect your big fat buds from bud rot or a last-minute pest infestation. Learn how the environment affects cannabis bud quality.
Learn how to avoid the 7 most common flowering stage goofs.
Get ready to harvest a ton of dense potent smelly weed!

One Last Tip…
When it comes to becoming the most effective at plant training, the best thing you can do is check on your cannabis plant regularly, especially for the first few grows, so you can really get a solid understanding of how the plant and stems respond to input from their grower… you!
But if you just keep the above simple plant training guide in mind, you can achieve yields that are just as good as any special training technique! Or you can combine them with training techniques, as these principles work great no matter how you’re training your plant!
Ready for more? Learn more about the science behind indoor plant training.
Jump to…
5 Ways to Increase Yields Indoors (with any strain)
10-Step Quick Start Grow Guide
Regular vs Autoflowering Strains
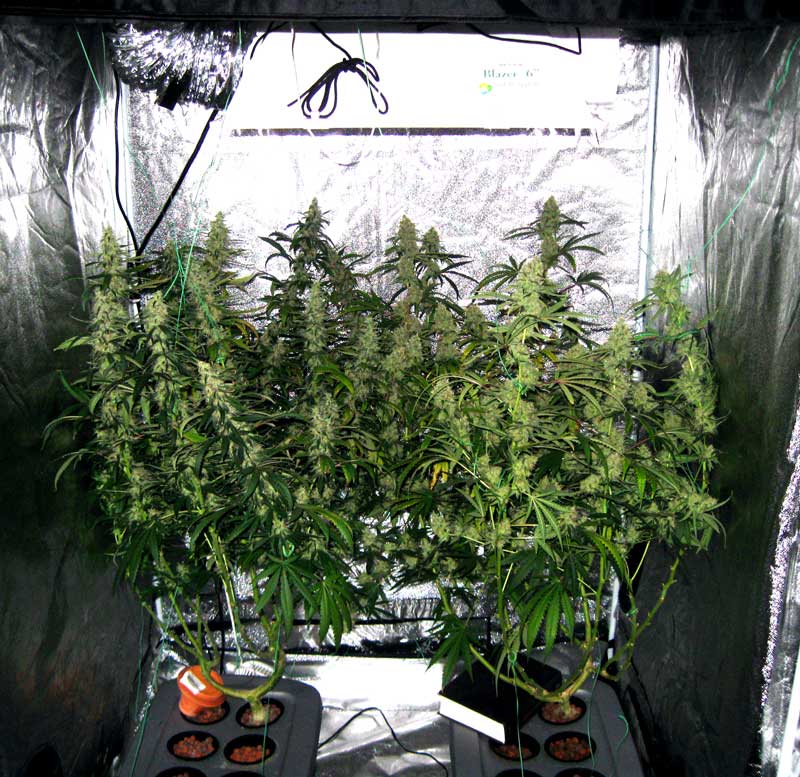
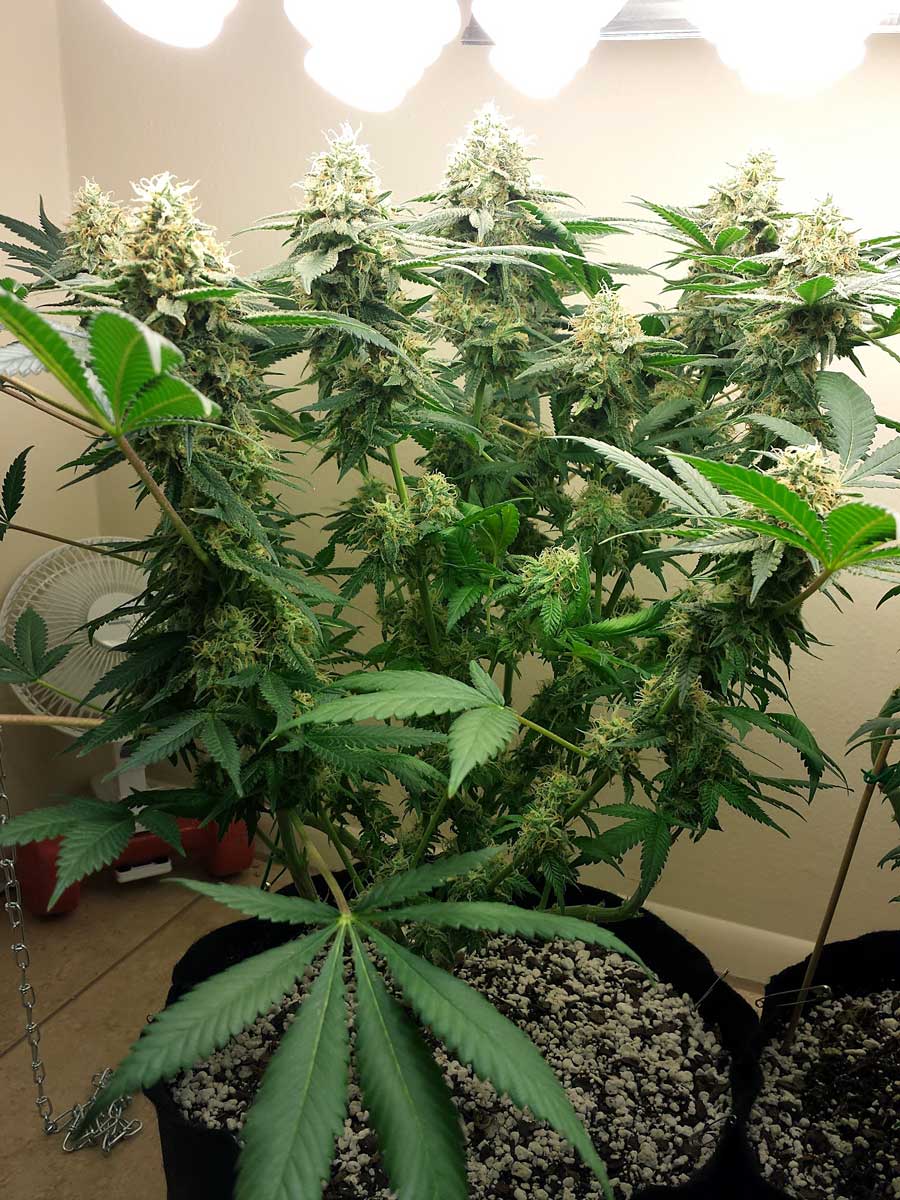
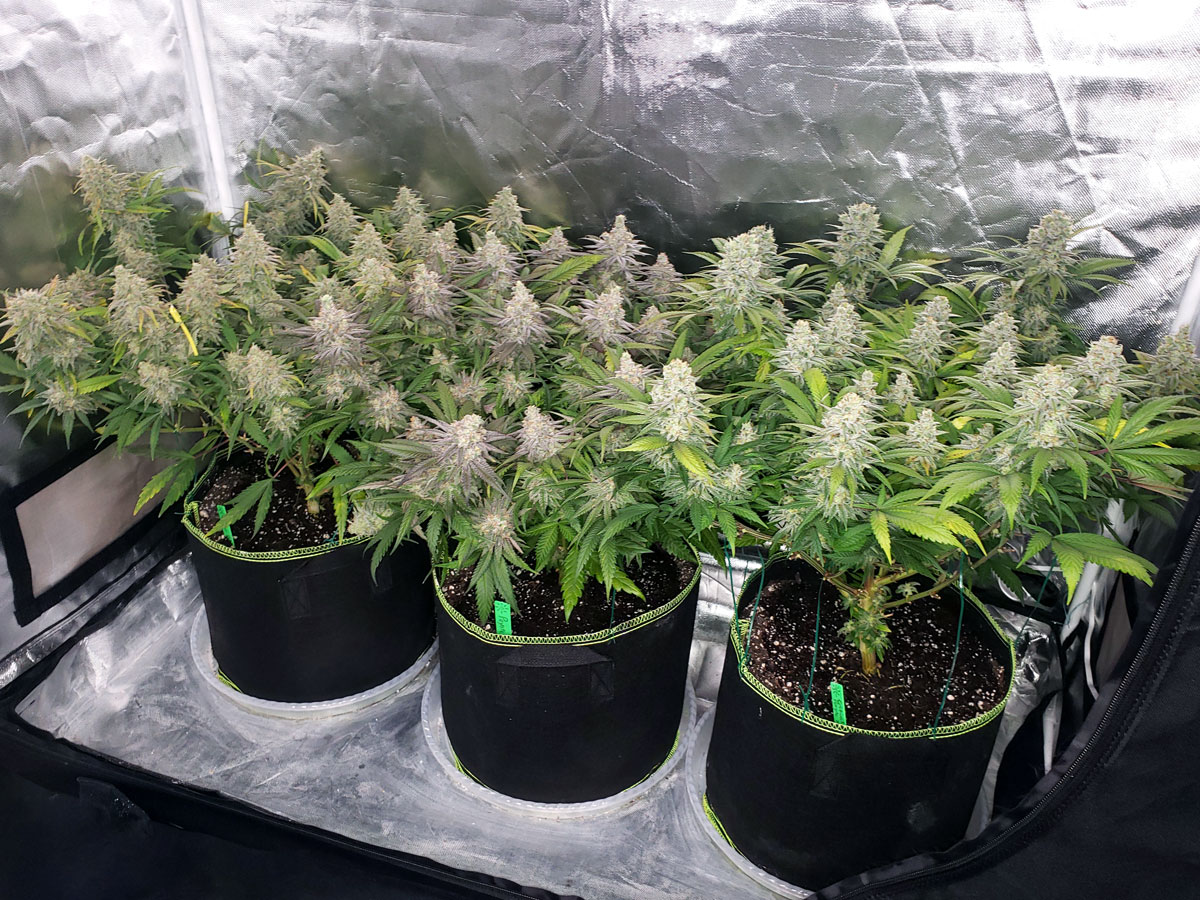
These two Papaya plants were trained to produce many fat, thick colas!