by Nebula Haze
I recently received an email from a GrowWeedEasy.com reader. The message had only six words. It was a simple question, yet surprisingly hard to answer.
“What’s the best cheap grow light?”
I remember being obsessed with that question when I first decided to grow cannabis at home in 2008. I was on a shoestring budget to say the least. I understood I needed a grow medium like soil or coco, plant containers, nutrients, and water, just like the potted plants I had on my balcony. I wanted to grow at least 5 ounces of weed at a time but I wasn’t sure which grow light could do that on a small budget. The sun is free, but grow lights certainly aren’t! Trying to determine the best cheap grow light online was confusing. It seemed like there were a thousand different opinions and no clear answers.
I was able to find a high-yielding grow light setup for under $200 back then, and you still can. In fact, today you actually have far better grow light options in that price range than I did. Yet a new cannabis grower faces so many choices it may actually be harder to sift through all the conflicting information now than ever.
Which of these cannabis grow lights under $200 produced the best yields and bud quality?
That confusion is what inspired this grow journal in the first place. I’ve tried just about every grow light for cannabis over the last decade, and there are clear winners and losers (the 315 LEC may be my favorite so far, though next, I’ll be pitting a 315 LEC against an HLG 300 Quantum Board LED and I’m really excited to see which one performs better).
I’ve learned that a high price tag on your equipment doesn’t necessarily mean you’re going to get good results (and vice versa). I’ve tried expensive grow lights that got poor growth and results, and cheap grow lights that produced stellar density, yields, and smell. I’ve always wanted to do actual side-by-sides with different grow lights so you can see the differences for yourself, and I finally have the space to do it!
This grow journal focuses on cheaper grow light options, featuring two popular cannabis grow lights that cost under $200.
- ViparSpectra makes popular yet relatively inexpensive LED grow lights (there are cheaper brands, but ViparSpectra is one of the most established of the “cheap” LED cannabis brands)
- HPS lights have been used by cannabis growers since the 70s. Initially, HPS bulbs were used mainly for street lights and weren’t available to individual consumers. There were actually cases of people stealing HPS street lights and using them to grow weed! The technology has been honed for growing plants over the last half century, and HPS grow lights are now one of the cheapest grow light options for cannabis growers.
I decided to do a comparison grow between these two “cheap” grow lights and share the results with all of you.
The good news is that both types of grow lights produced stellar buds. I can say as someone who’s been smoking these buds over the last few weeks that every single plant produced great weed.
But was there a clear winner?
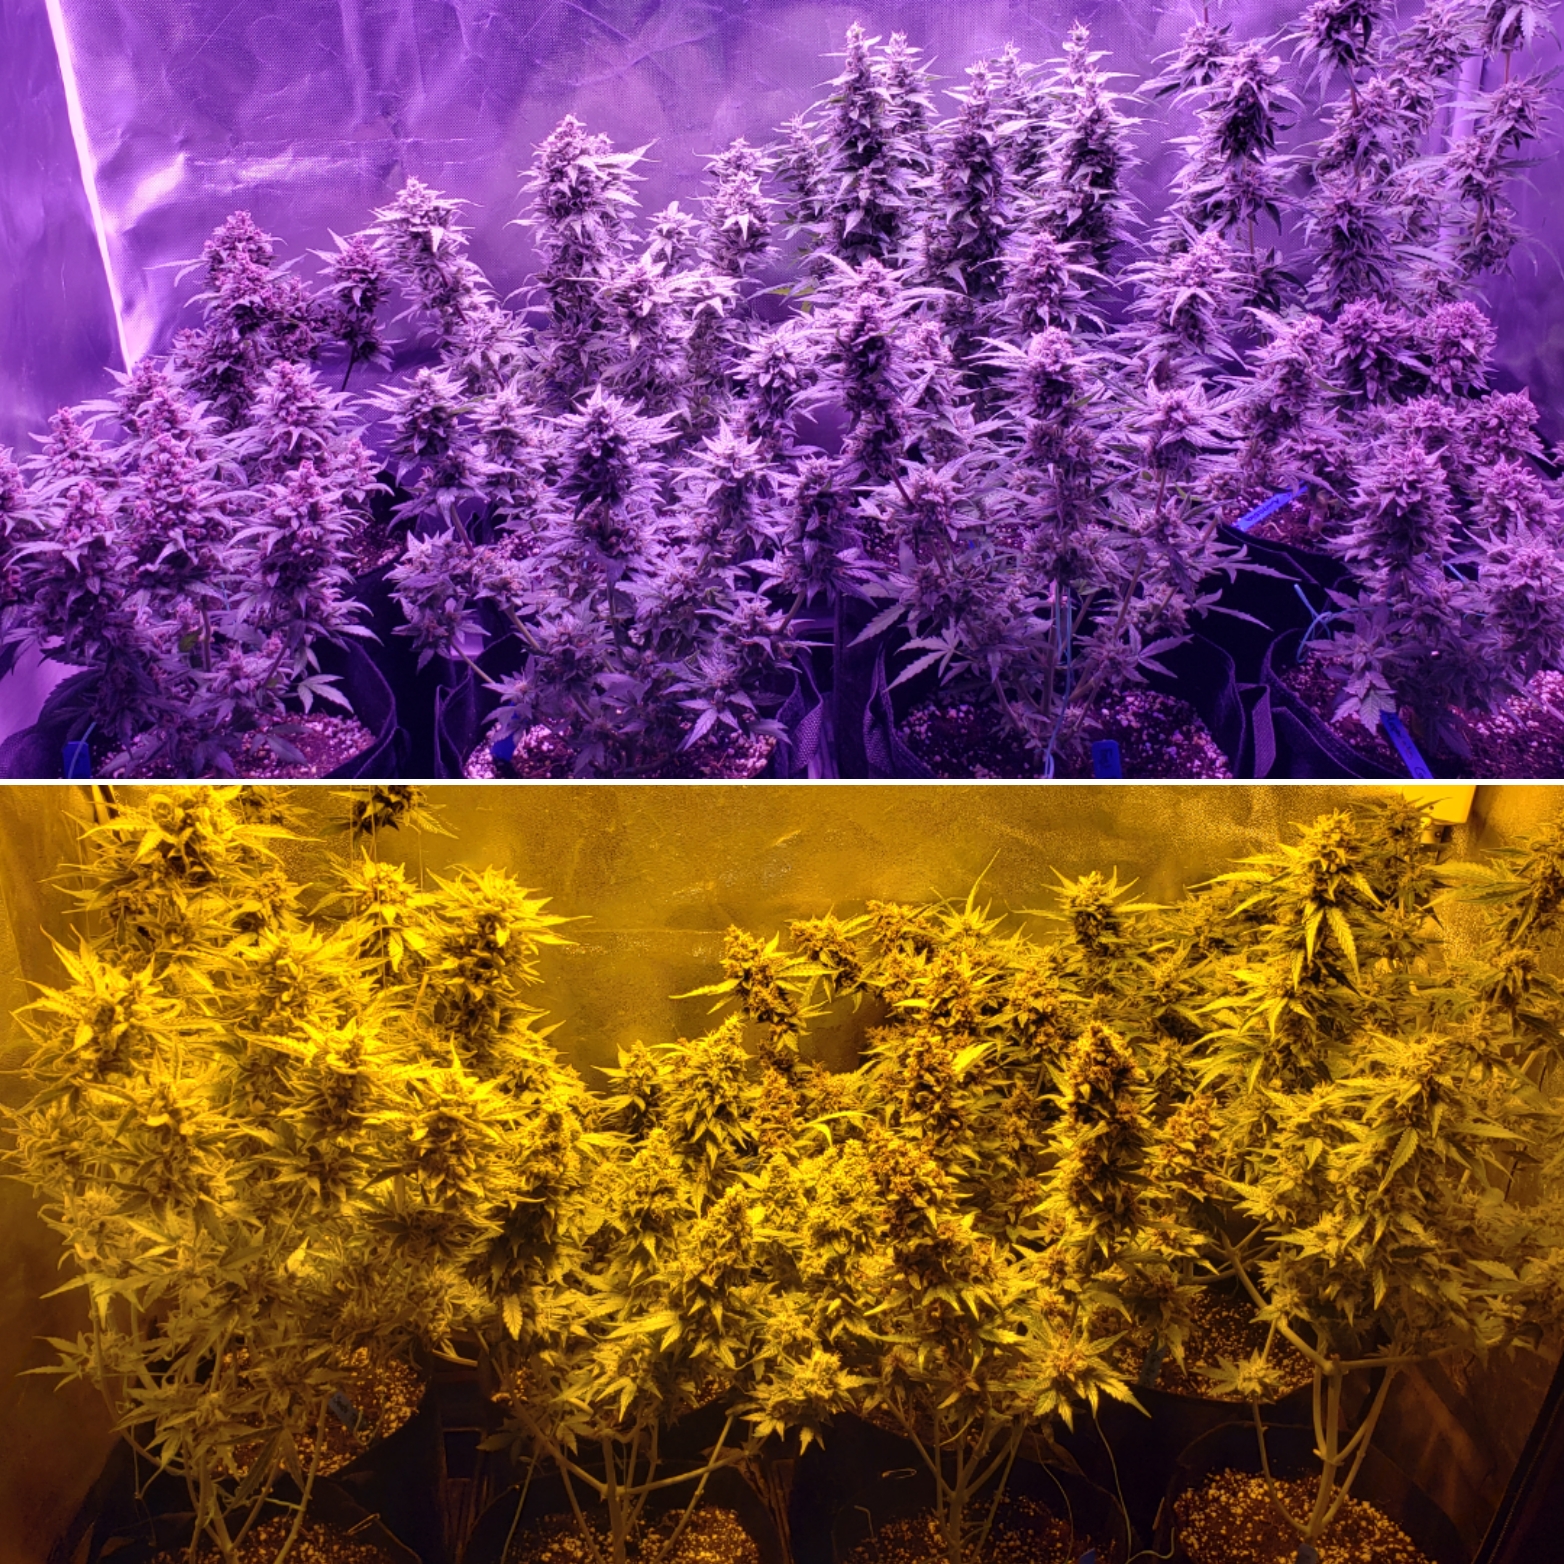
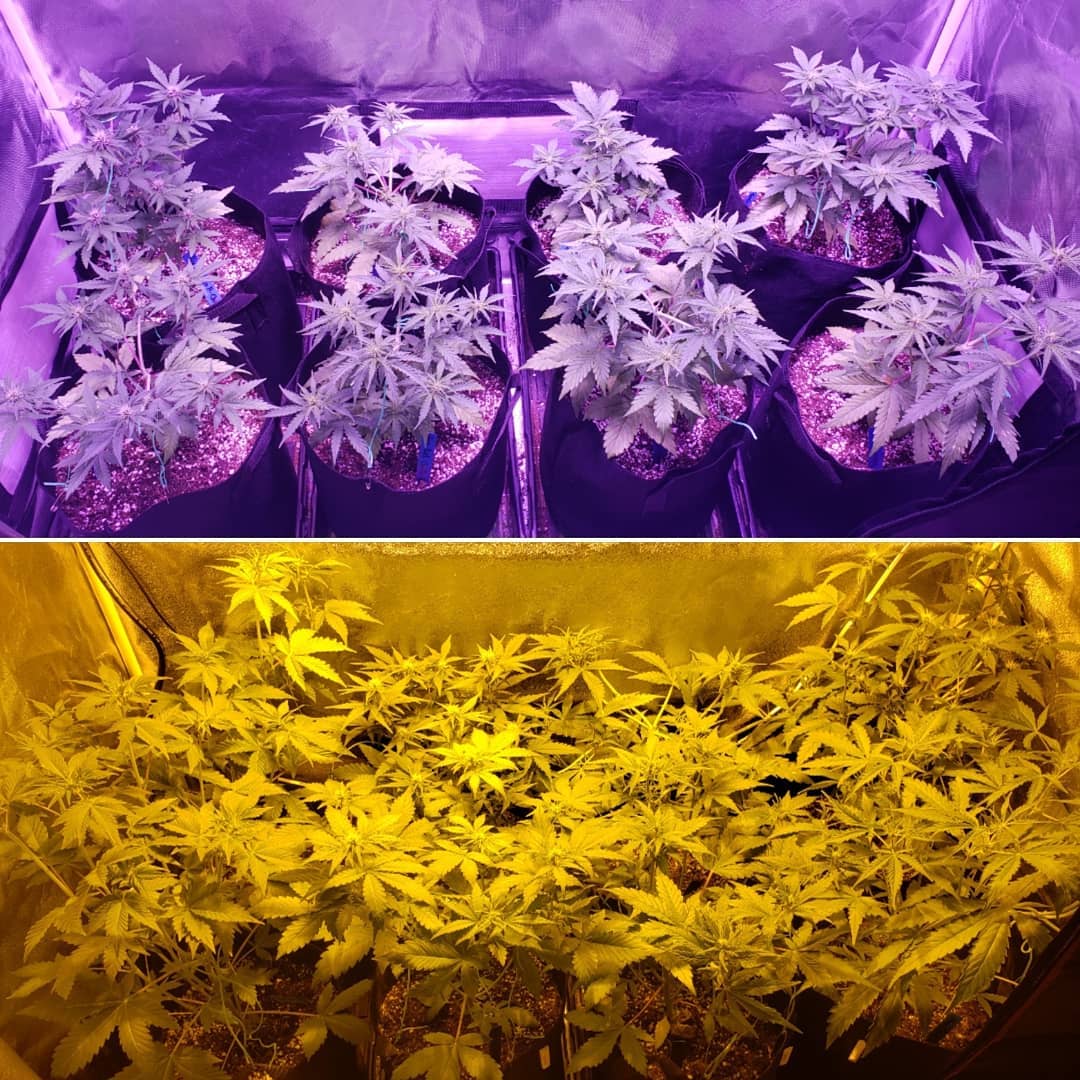
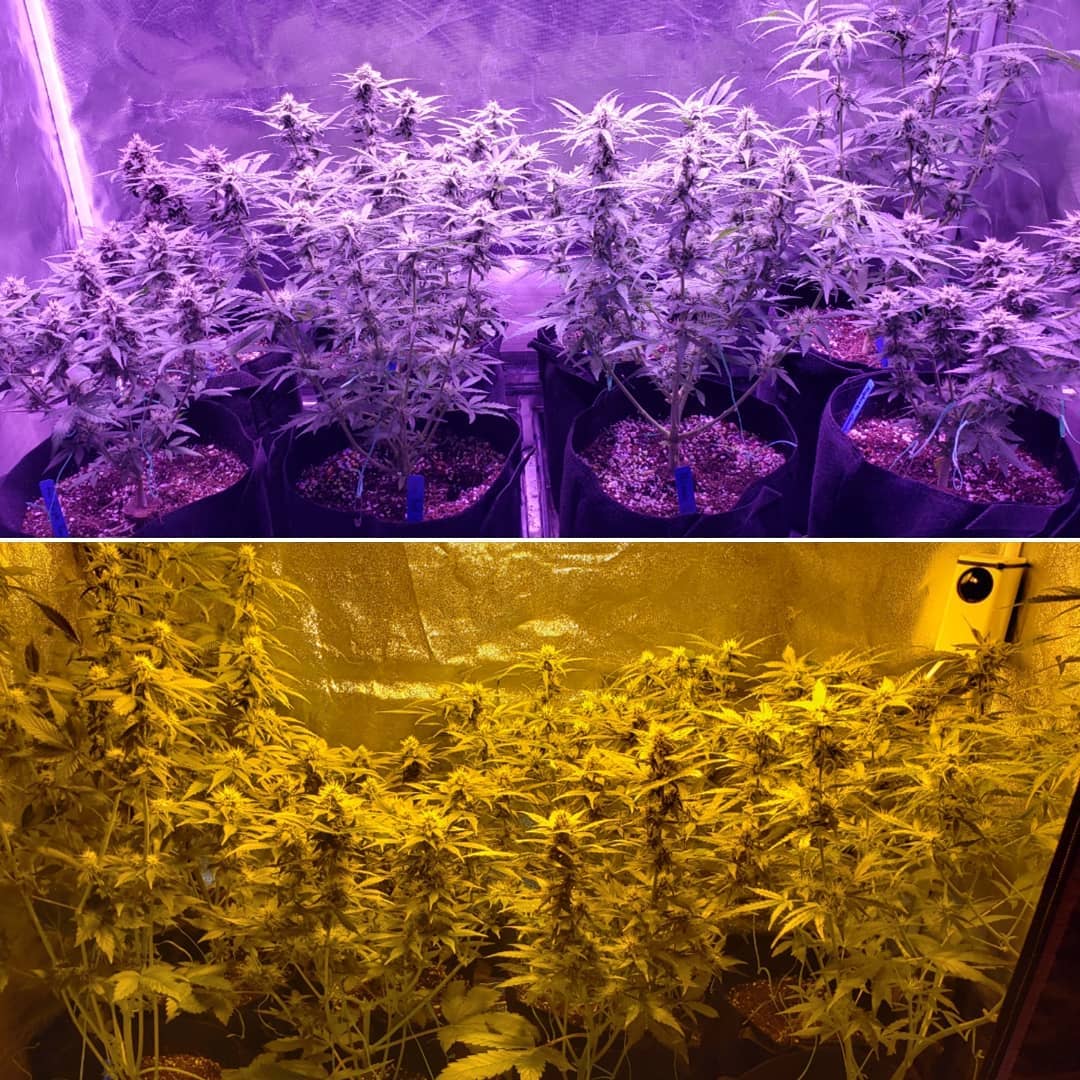
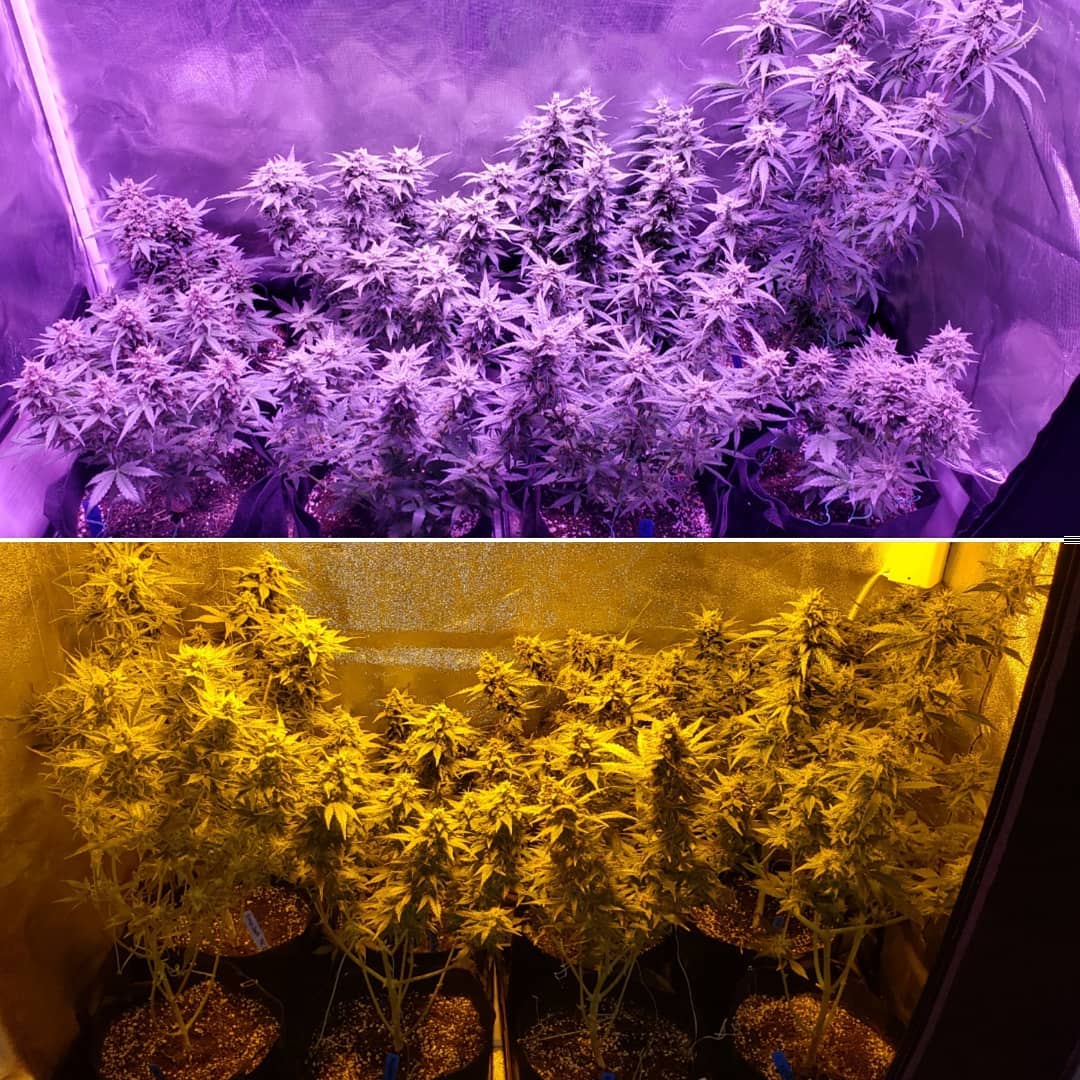
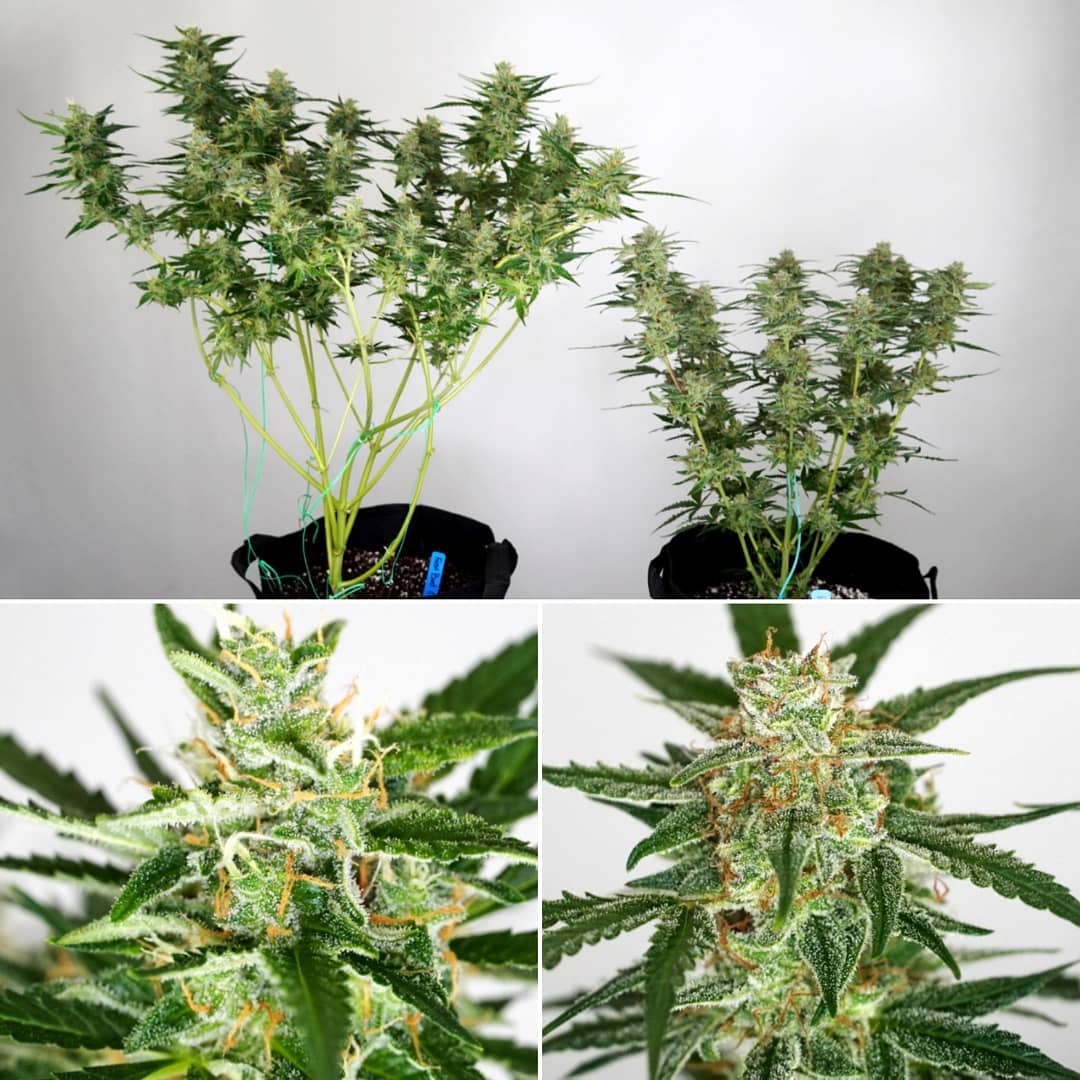
ViparSpectra LED plants before harvest
250W HPS plants before harvest
At the bottom of this grow journal, I’ll give a summary of the results, as well as share which one is really the best grow light. You may be surprised how it turned out! I know that I was.
Quick Summary of the “Experiment”
- 2 grow tents (2’x4′ grow tents)
- 8 autoflowering strains per tent (matched strains but not clones, more info below in the details of the experiment)
- Two different grow lights – One with 250W HPS, the other with a ViparSpectra 300 + 450 (total power draw around 300W)
- Everything else is the same (care, training, grow medium, nutrients, etc.)
Details of the “Experiment”
I decided it was time to test ViparSpectra LED grow lights for the readers of GrowWeedEasy.com who are looking for budget grow light options. I’d been experimenting with more expensive grow lights like LECs and Electric Sky LEDs, which was exciting and cutting edge, but I wanted to conduct a grow journal specifically for people who didn’t have as much money to invest into growing right now.
I decided to grow 8 different autoflowering strains to see how the plants would react to the ViparSpectra LEDs. I germinated 2 seeds for each strain, just in case some didn’t germinate. All 16 seeds ended up sprouting! I didn’t have the heart to throw away 8 healthy seedlings, so I decided to buy a cheap 250W HPS grow light and do a side-by-side “experiment” to see which grow light under $200 performed better.
Since this wasn’t planned from the beginning and these plants were all grown from seed and not clones, it’s more “for fun” than a totally scientific experiment. After seeing how much you all loved this side-by-side on my Instagram account, I’ll be doing more grows like this in the future, but with clones. I think it’s interesting to see the average of differences between both tents in this ViparSpectra vs HPS grow tents even though the plants were grown from seed, but it’s hard to know how much natural genetic variation affected the results. Results should definitely be taken with a grain of salt, but I hope you enjoy the journey as much as I did!
The Cookies n Chem buds became a fan favorite. This limited edition strain made vibrant purple nugs in both tents!

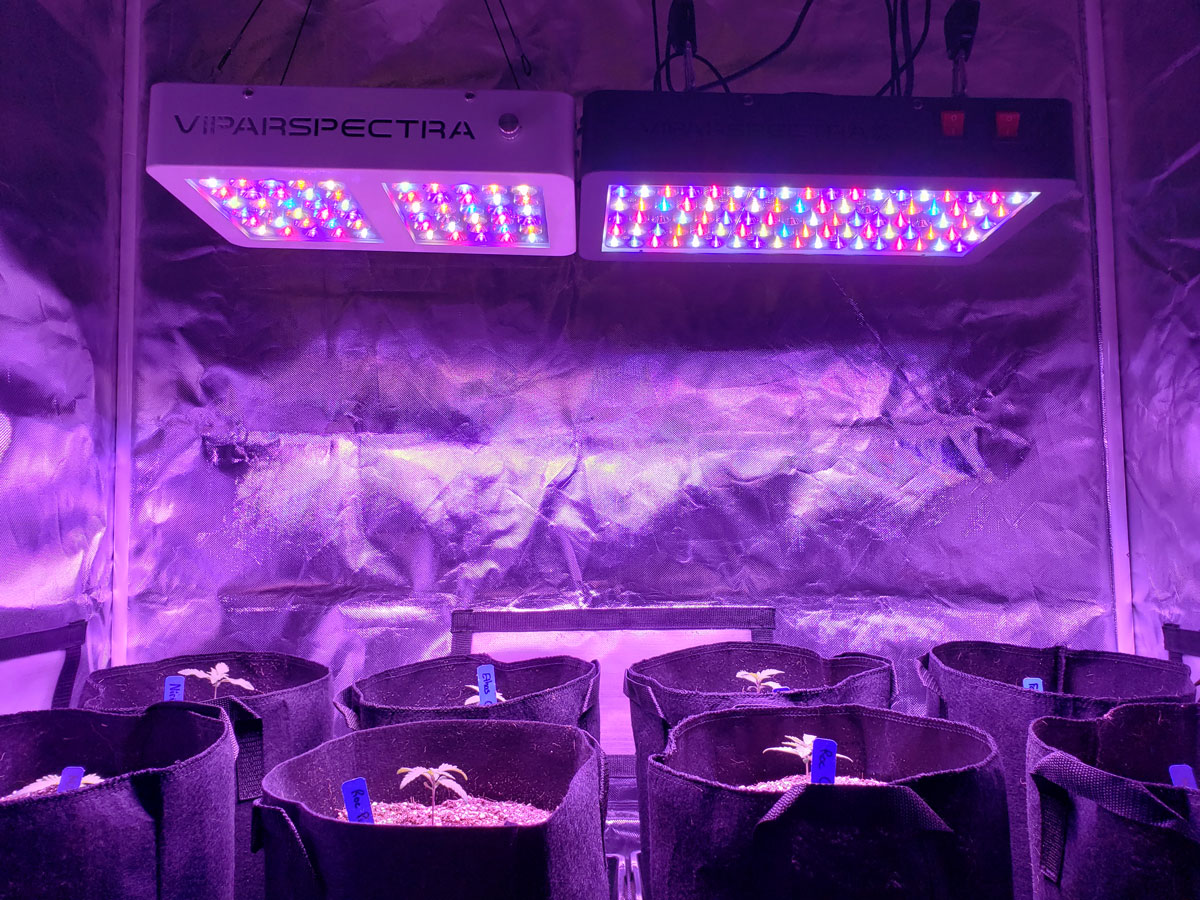
ViparSpectra LEDs
- 1 x ViparSpectra 300
- 1 x ViparSpectra 450
- Cost: ~$190
Note: You could substitute one ViparSpectra PAR600 for the two smaller lamps. It costs an extra $30 but comes with additional features that may produce better results with less worry about interactions between the grow lights. It also uses about 50W less electricity. I’ve talked to a lot of ViparSpectra LED growers since I started this grow journal last summer, and the PAR600 seems to get some of the best reviews across the board. If I was going to repeat this experiment again, I’d use a PAR600. More hints about getting the most from your ViparSpectra LEDs at the bottom of this page.
250W HPS Grow Light
- Ballast – Yescom 250W MH/HPS Digital Ballast
- Bulb – 250W Super HPS bulb
- Reflector – iPower Gull Wing Reflector
- Cost: ~$160
Grow Medium + Containers
- 16 x 3-gallon Fabric Pots by Vivosun – I use fabric pots because plants grow faster than in traditional hard-sided pots. The trade-off is you need to water your plants more often, so it’s a matter of what’s most important to you: faster plant growth rate vs watering frequency. I like how the Vivosun fabric pots come with handles. They’re significantly cheaper than the brand name 3-gallon Smart Pots which cost $5-6+ each. There are even cheaper 3-gallon fabric pots available on Amazon than Vivosun, which I’m sure would work just as well, but I haven’t tried them myself (yet).
- 3 bags of Mother Earth Coco Plus Perlite Potting Mix – Coco is made of ground coconut husks while the perlite looks like white rocks mixed in. I love coco + perlite potting mixes for growing cannabis. As long as you use coco-friendly nutrients, plants tend to have faster growth, fewer bugs, and greater heat resistance than plants grown in soil. I used a little less than 3 of these bags for the 16 x 3-gallon fabric containers. I filled each container to an inch below the top of each 3-gallon pot and pressed the coco gently down without packing it in. Learn how to grow weed in coco.
How many gallons will each 50L bag of Mother Earth coco/perlite fill? Each Mother Earth bag contains 50 liters of coco so for 16 x 3-gallon pots you would expect to need 48 gallons or 181.7 liters of potting mix. However, due to a weird convention in the USA, plant containers usually hold less than the listed gallons. That’s how I was able to fill all these pots with just 3 bags (or 150 liters) of Mother Earth mix. When in doubt about how much grow medium to get, just get the full gallon amount and you’ll always have enough or too much. I just wanted to explain why the conversion between liters and gallons doesn’t match up 🙂
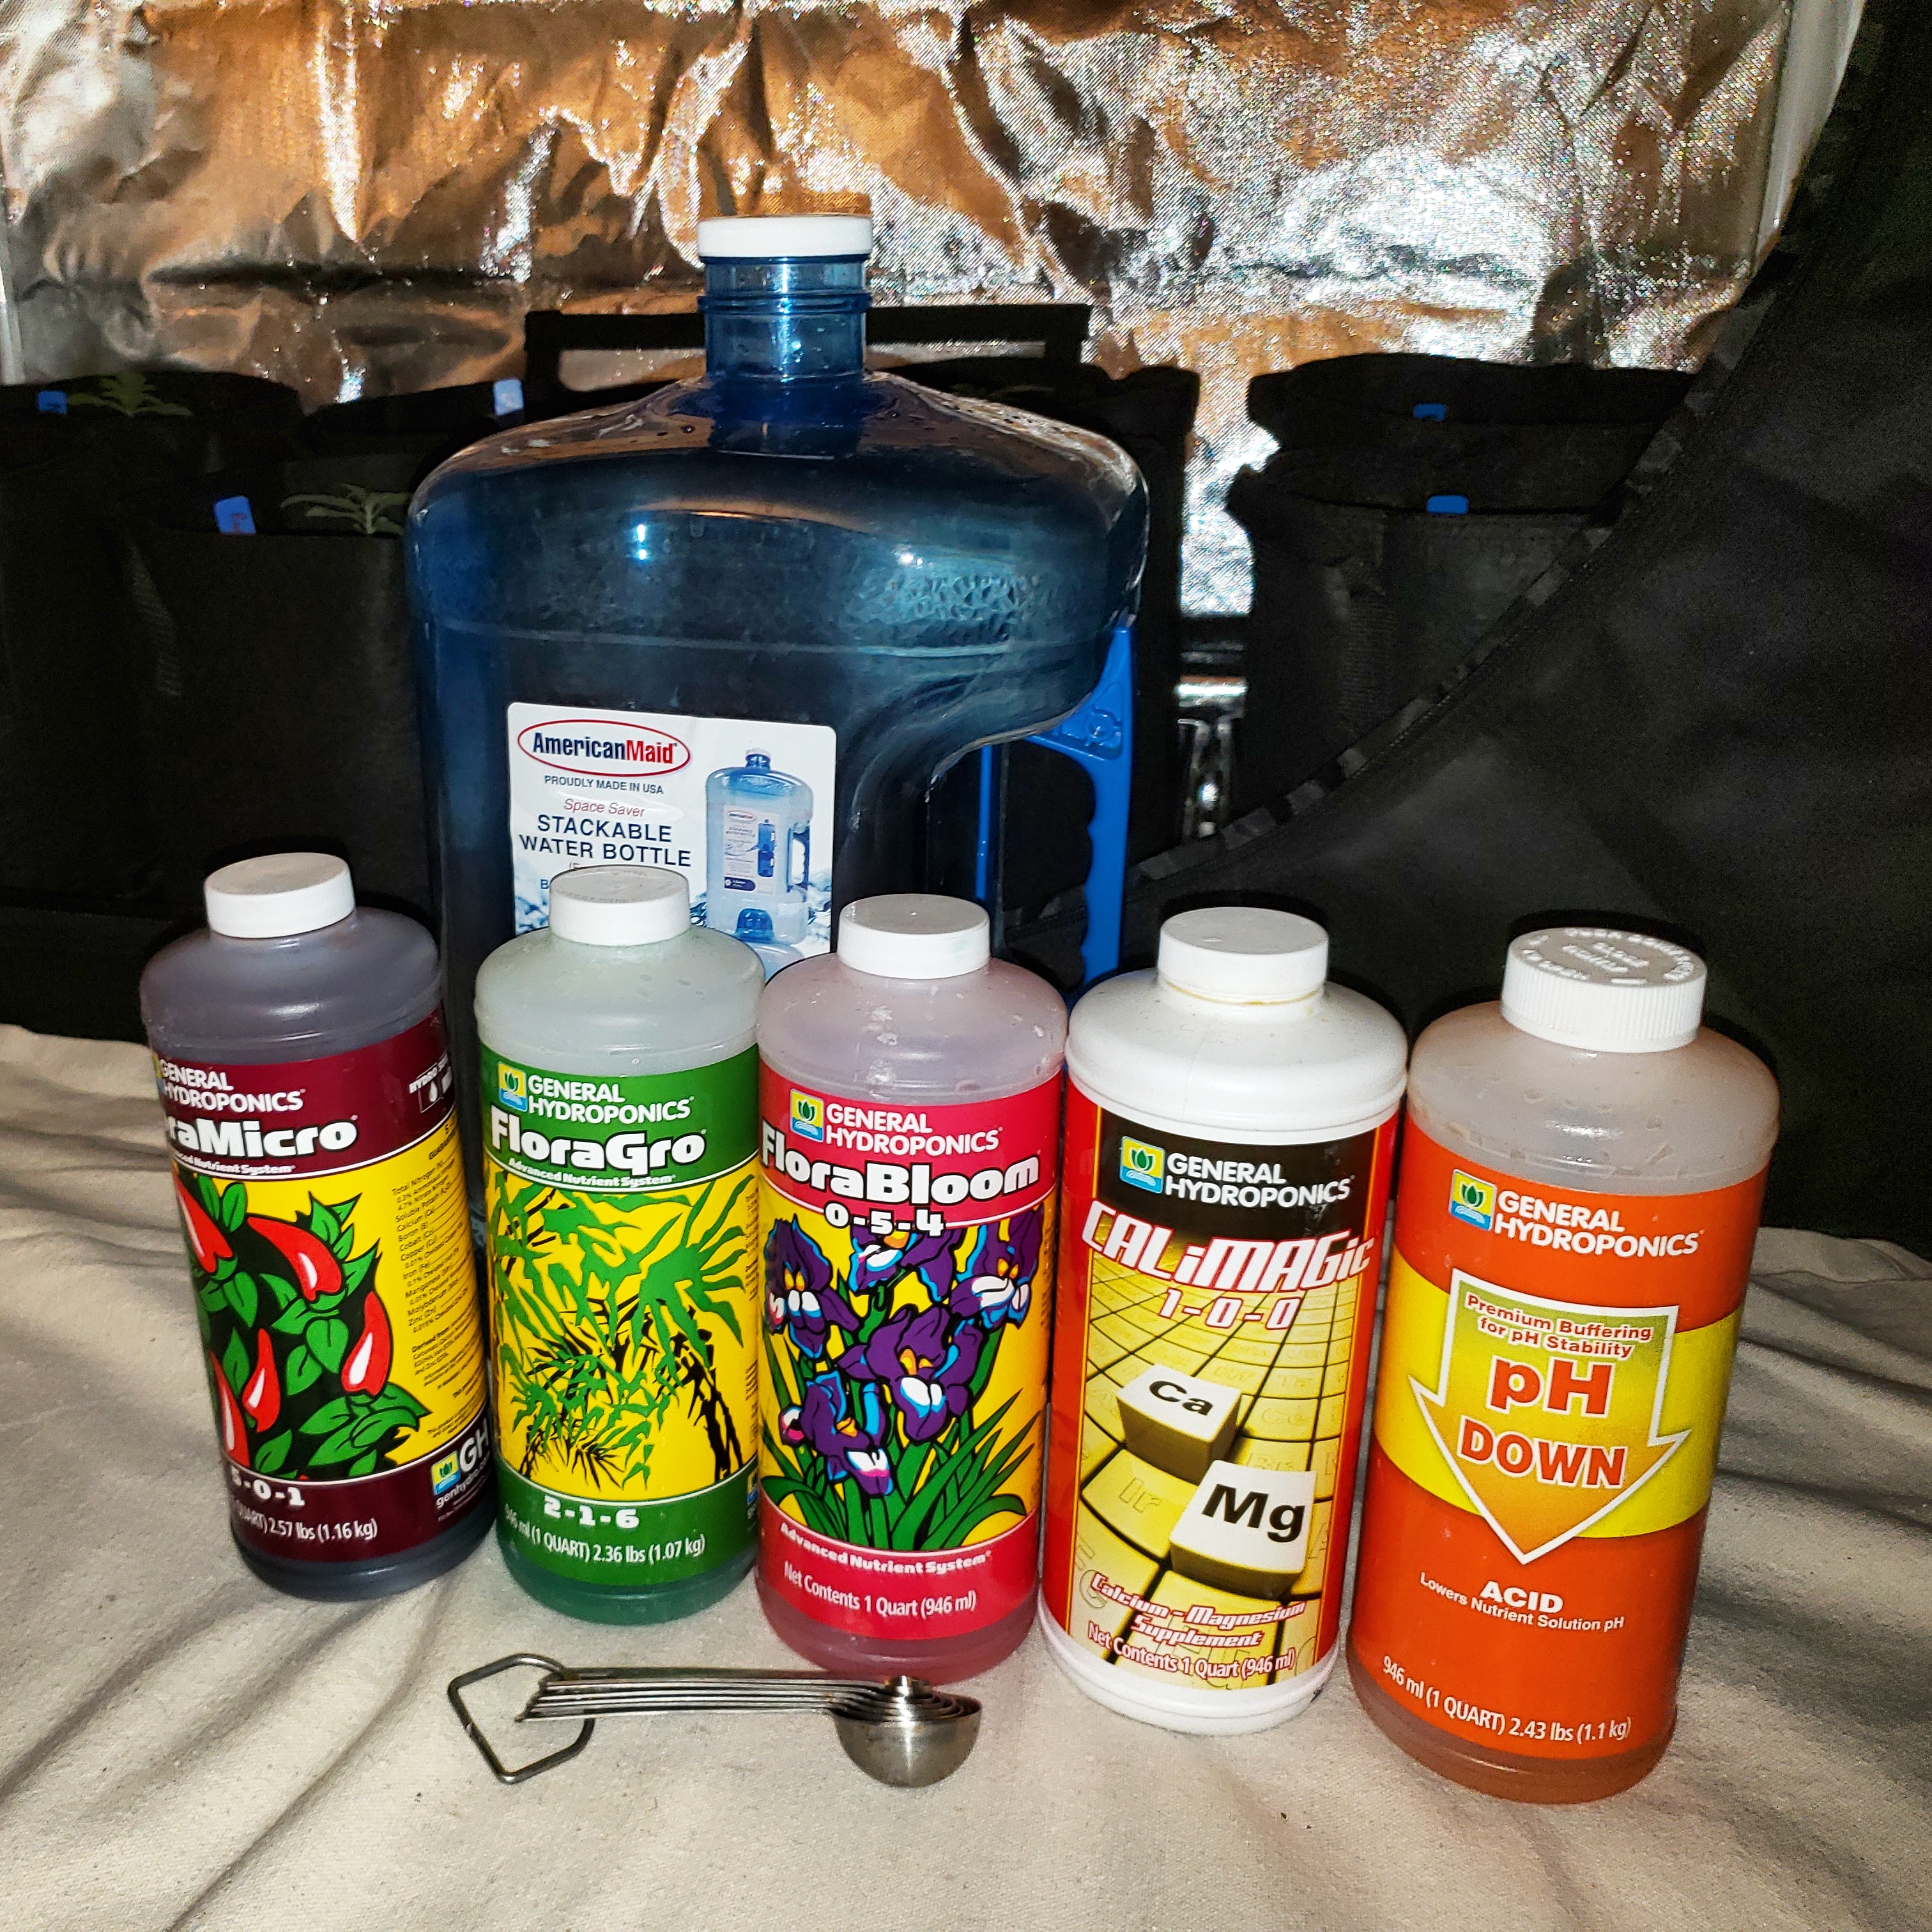
Nutrients & Supplements
- General Hydroponics Flora trio at about half strength of what’s listed on the bottle
- CaliMagic at 1 tsp/gallon (always use some sort of Cal-Mag supplement when growing in coco)
- PH Down (to lower the pH because my tap water pH is too high)
This is everything I used for nutrients and supplements
Grow Environment
- Grow space: Each set of plants was grown in a 2’x4′ grow tent.
- Smell control: 6″ x 16″ carbon filter (attached to fan with 6″ ducting)
- Exhaust Fan: AC Infinity CLOUDLINE S6
- Basically they’re both this setup with different grow lights
Why a grow tent? If you’re really on a tight budget and don’t mind the smell, these plants could conceivably be set up in a closet. However, a grow tent creates a “pop-up” perfect plant environment. A place to hang lights, an easy way to control heat/smell, reflective walls, waterproof floors, and easy light-proofing all make a grow tent a great cheap option for first-time growers. I used the linked tent by the company Topolite, which is a generic/knockoff brand. There are definitely higher-quality grow tents out there but this one is a great size for small-scale growing, does the job well, and the price is right at around $85. If you’re looking to save money, I would not invest in a brand-name grow tent. They offer upgrades like more industrial zippers, viewing windows, and storage pockets, but none of that is going to help your plants grow any better. The one downside to using cheaper grow tents is you may see “pinhole” light leaks where some light leaks through the places where threading was used around the edges. Usually, this can be quickly remedied with a little duct tape and/or creativity.
Grow Journal
Germination
July 1 – Started germinating seeds in paper towels then Rapid Rooters (full tutorial on my germination method)
Week 1
July 3 – Seedlings sprout
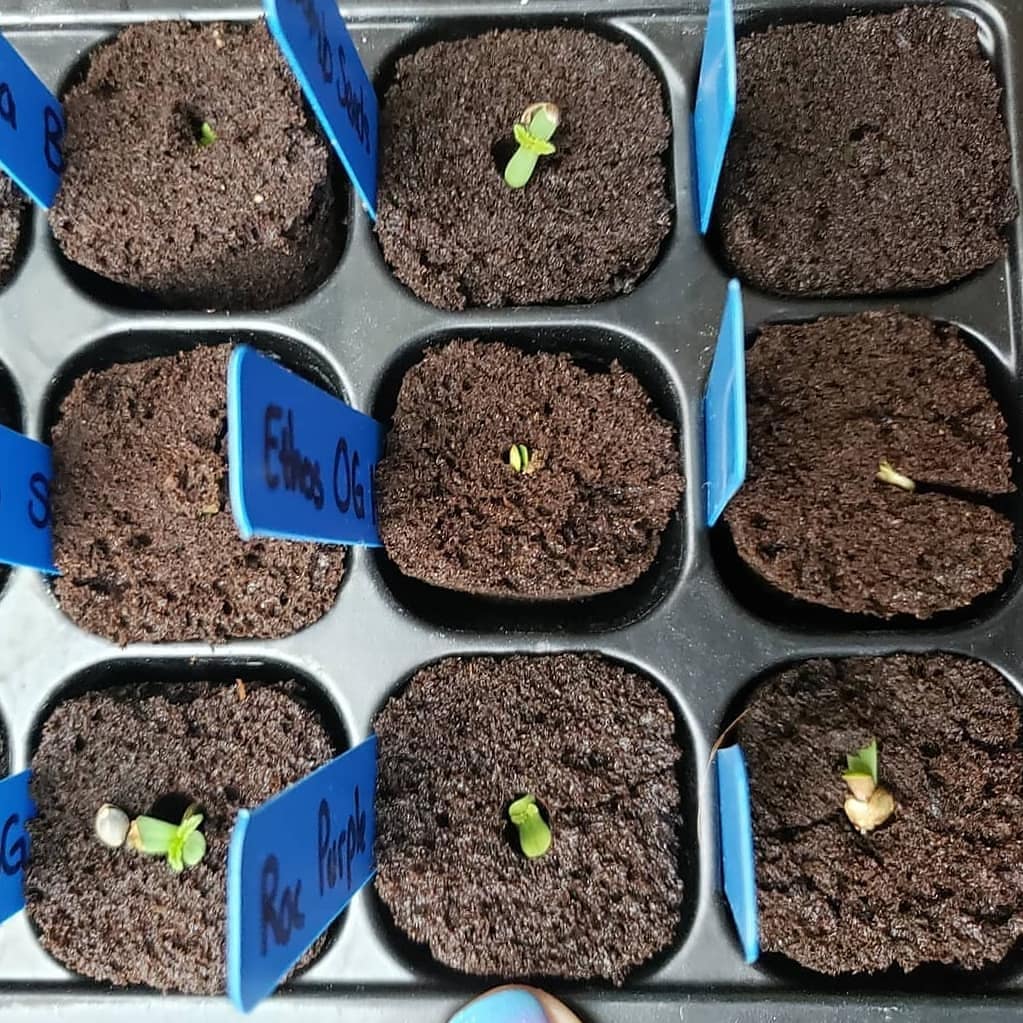
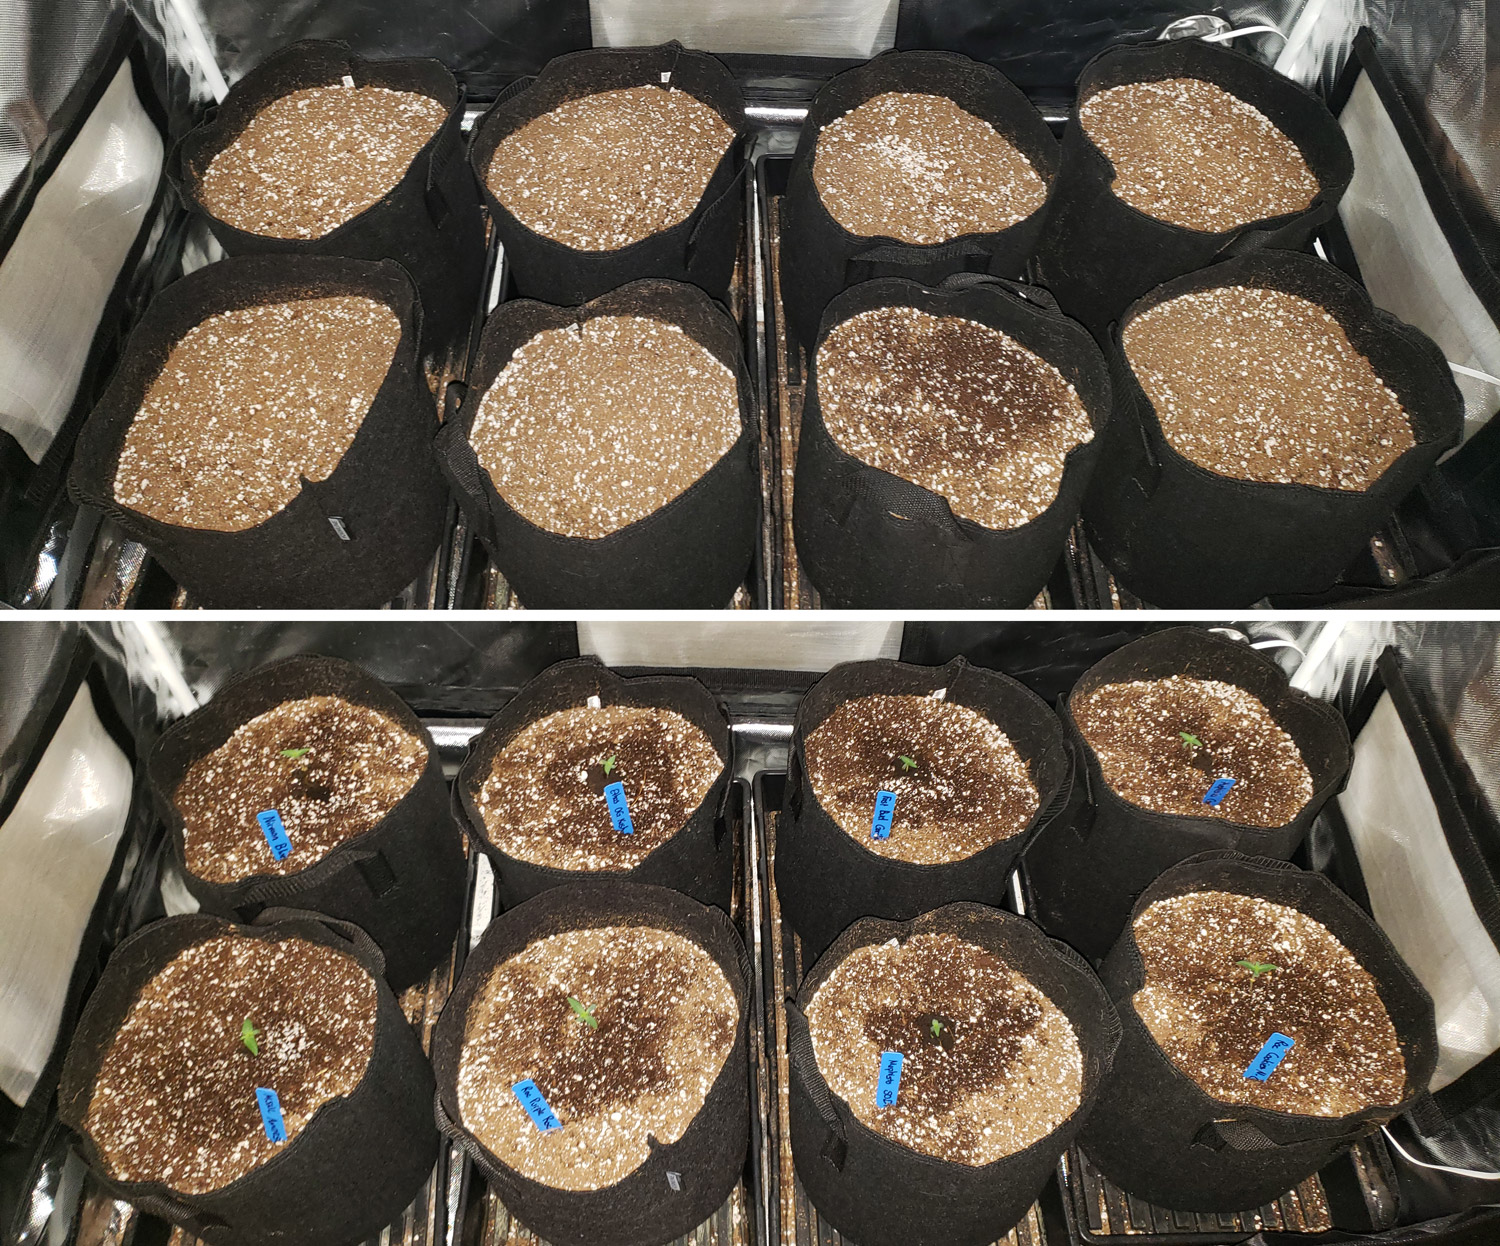
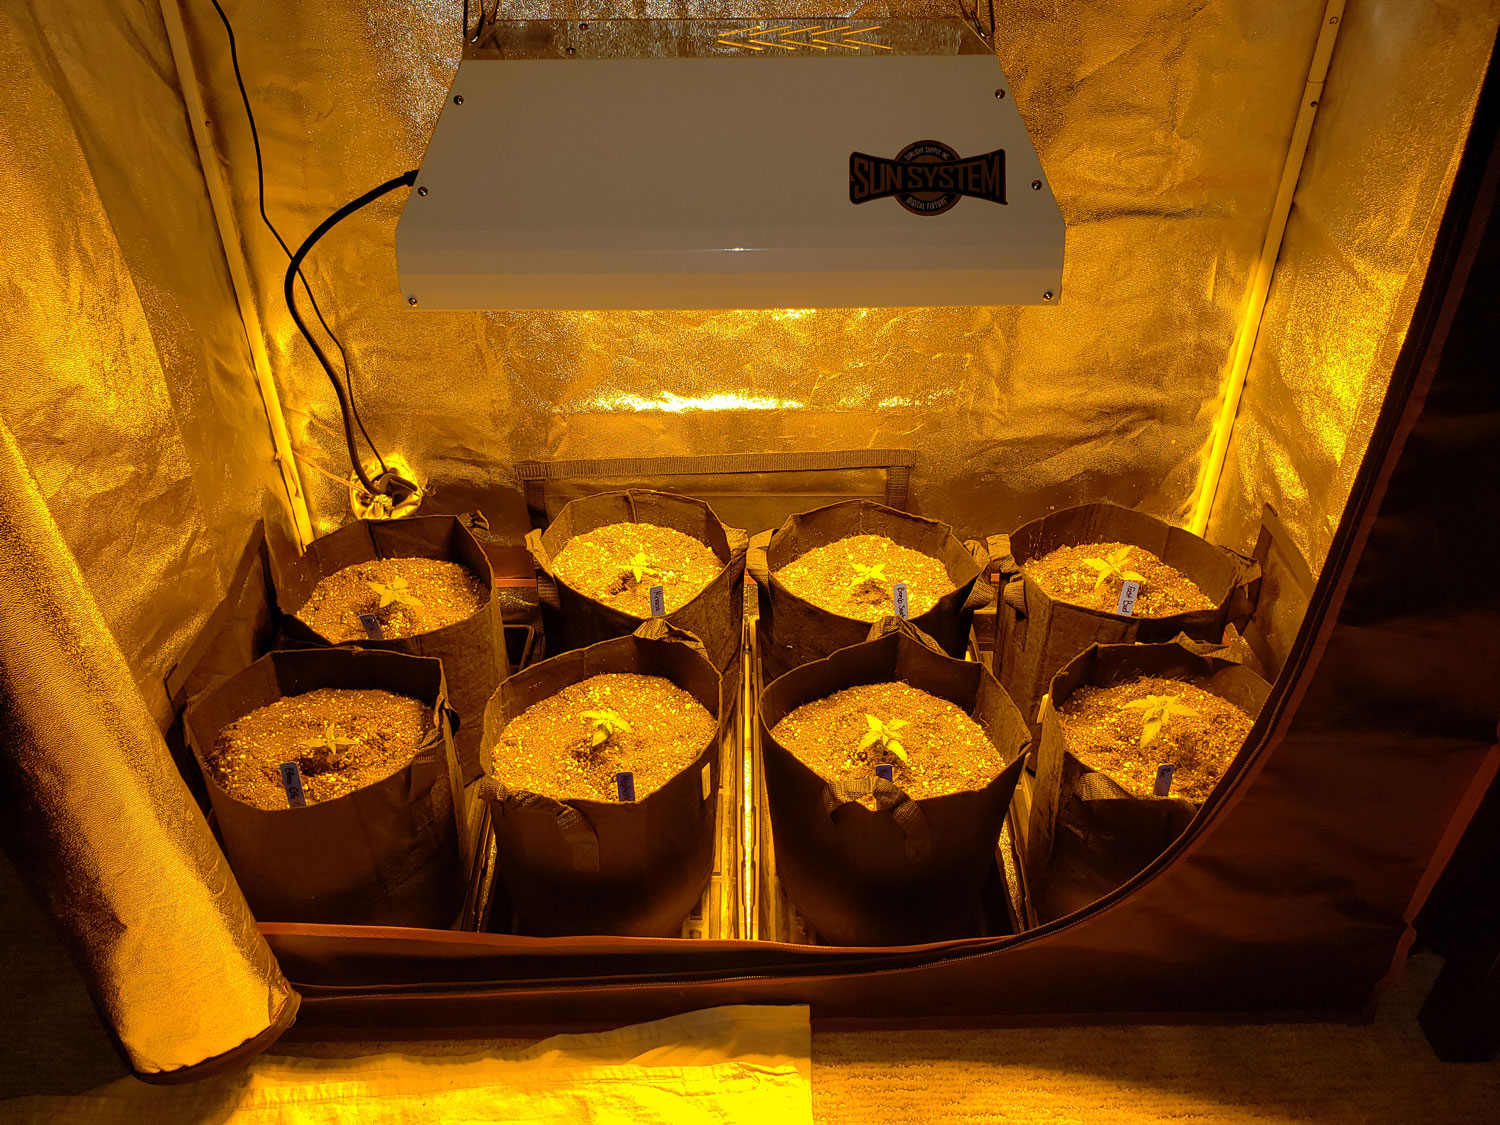
July 7 – Seedlings were put into their final pots in each tent and placed under their grow light. Viparspectra LEDs are 24″ away, and the 250W HPS is 18″ away (the recommended starting distance for each)
The top shows the empty 3-gallon fabric containers of coco, and the bottom picture shows what everything looked like after adding the seedlings and watering. I repeated this for both tents.
Week 2
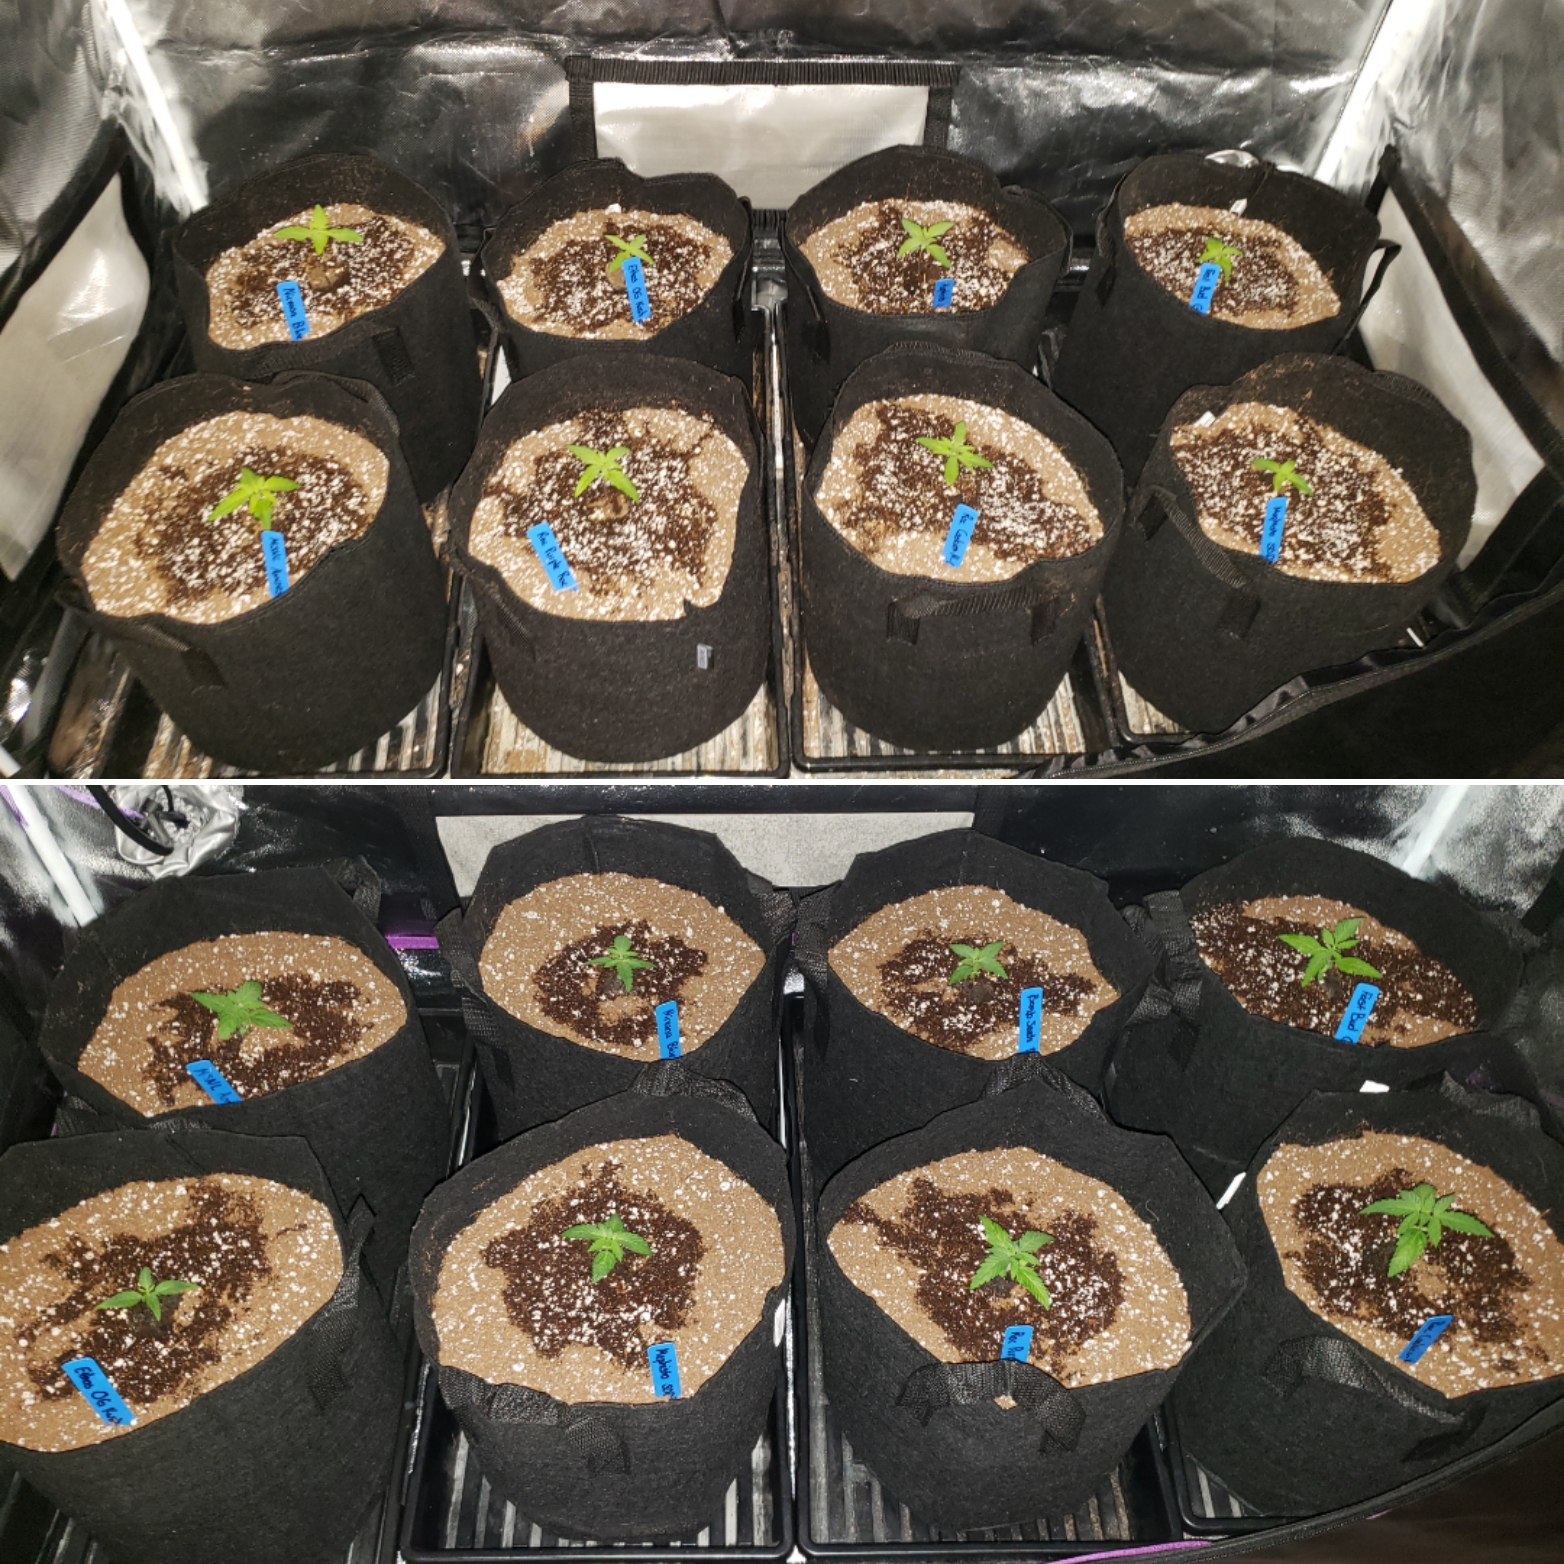
July 15 – So far the seedlings look neck and neck as far as growth rates.
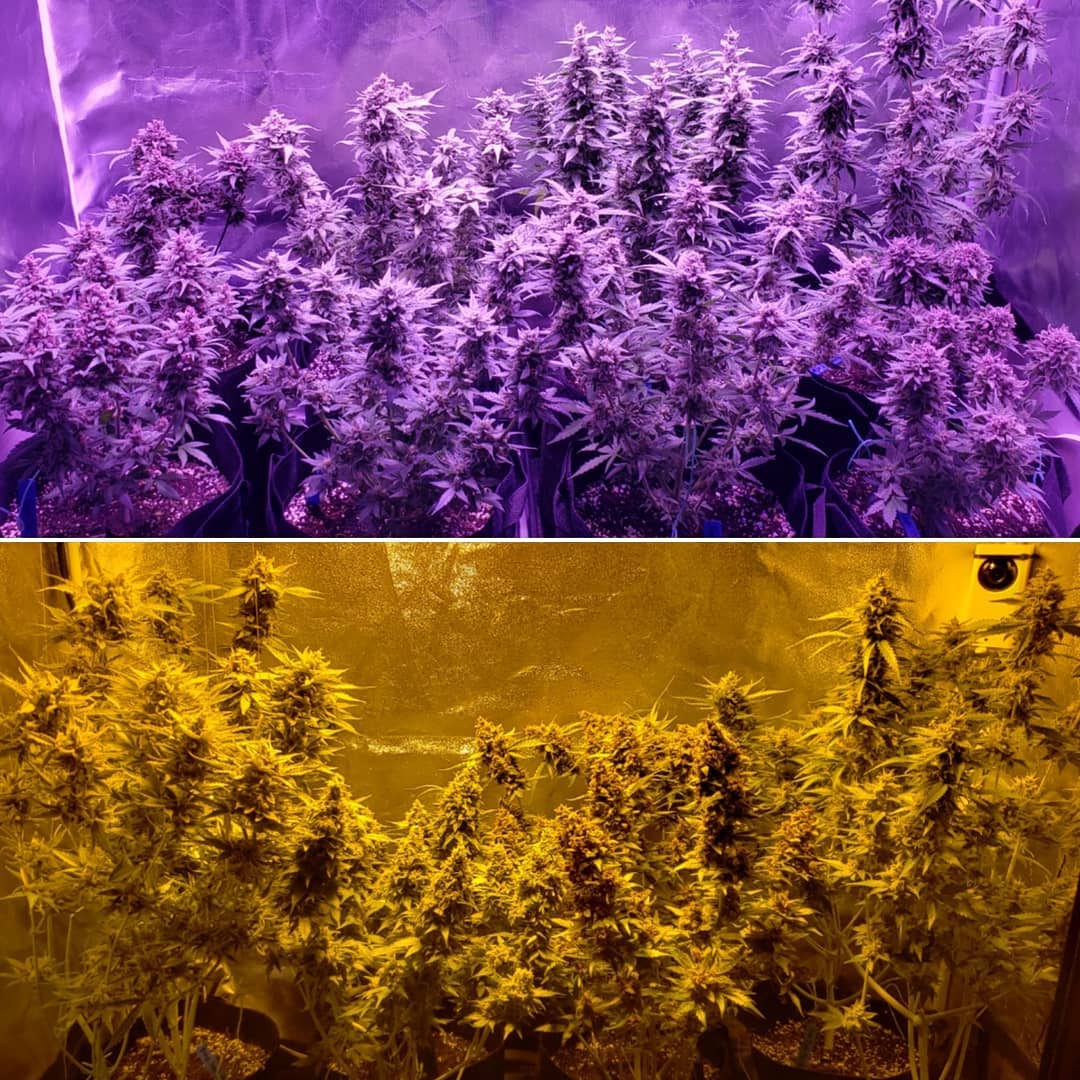
Top of each picture shows the ViparSpectra LED tent (purple), and bottom shows the HPS tent (yellow)
 So far the seedlings look about the same size
I dropped the ViparSpectra lights from 24″ to 18″ away and plan to keep them that distance as long as plants don’t show signs of stress.
I moved the 250W HPS from 18″ to 15″ away. I plant to let them grow up to 12″ away and maintain that distance.
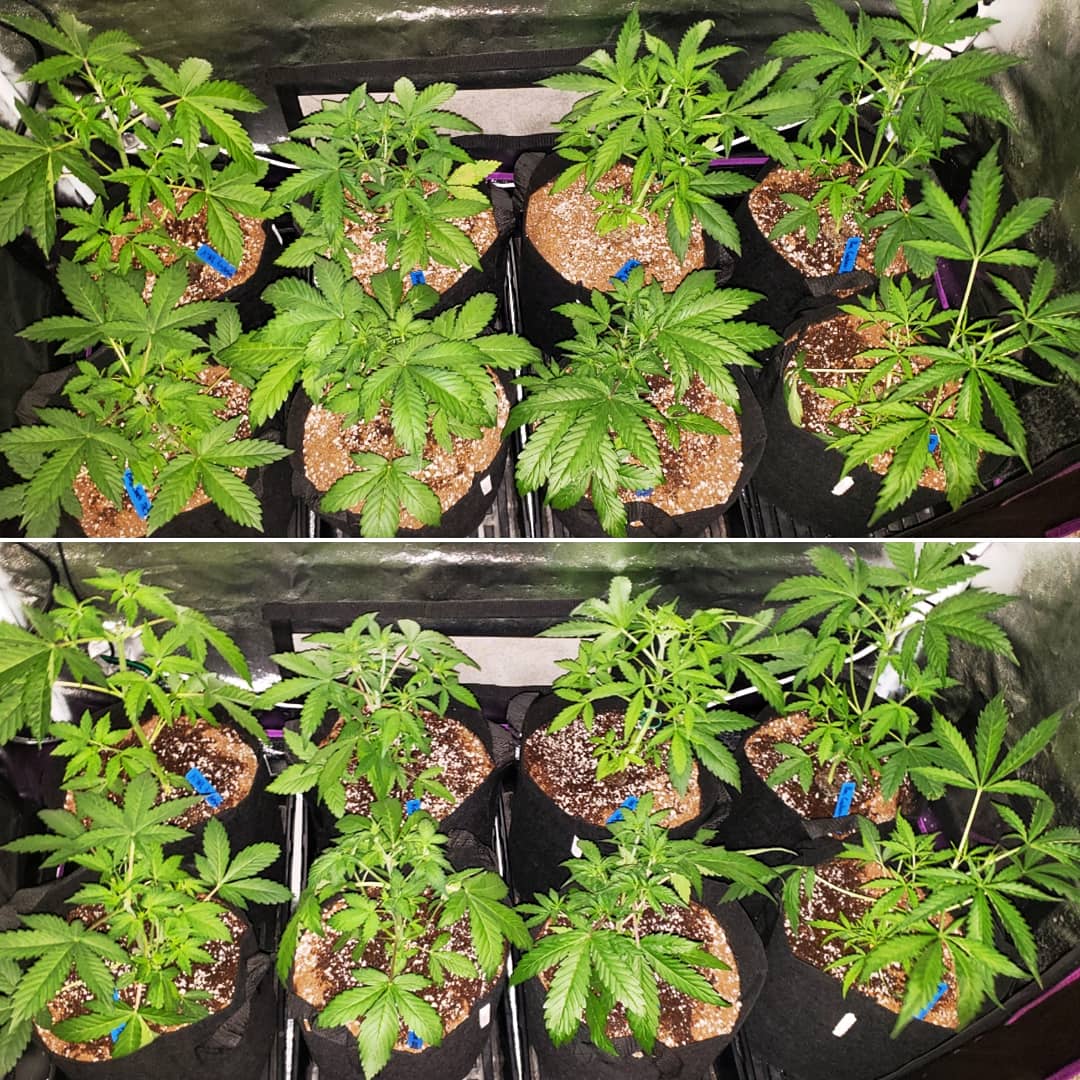
Week 3
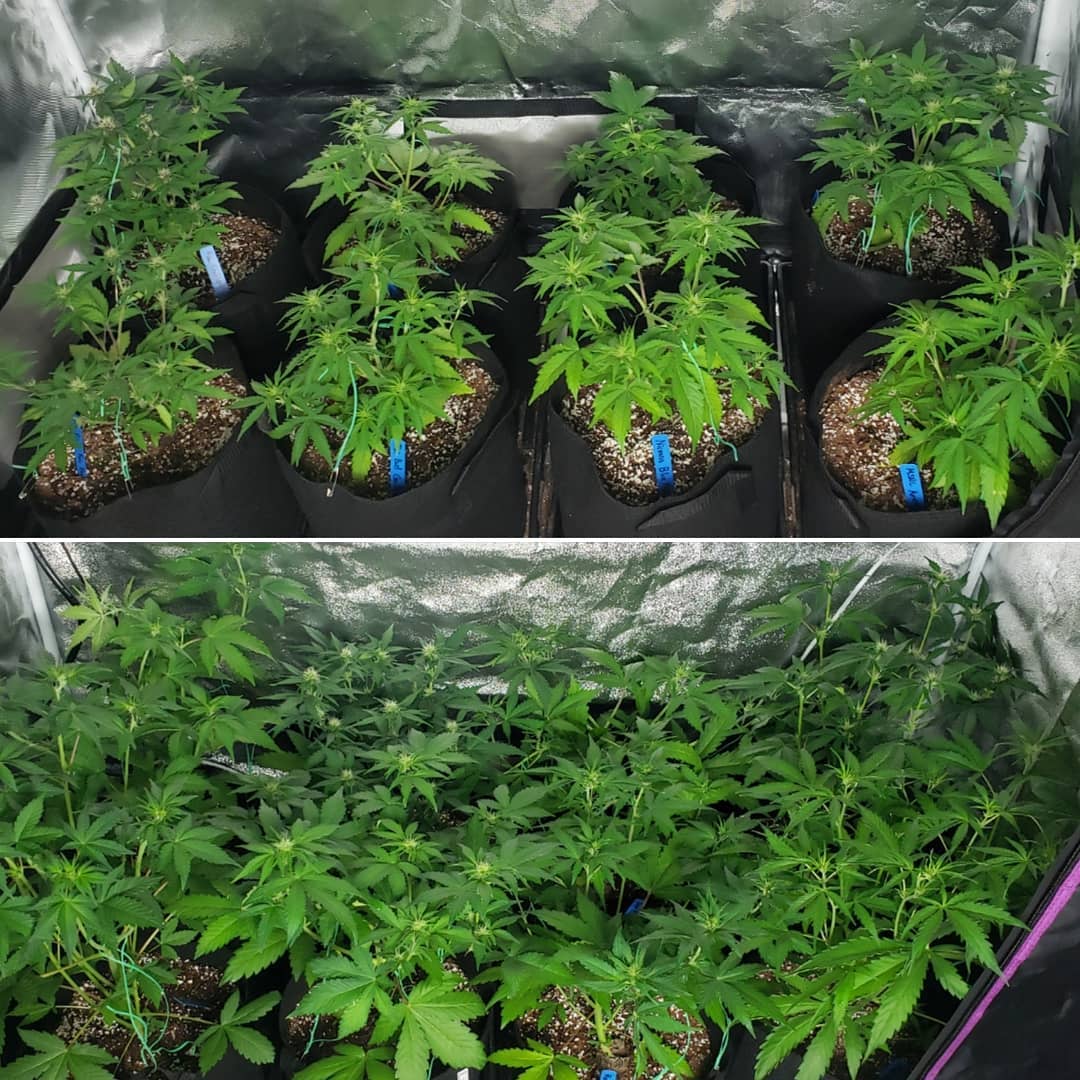
July 23 – By the end of week 3, the plants have grown a lot!

At this point, the plants have different growth patterns but seem about even as far as total development. The HPS plants are taller and wider, but many of the LED plants have an extra node (set of leaves) compared to their HPS sisters.
I don’t see any pistils yet (the first sign of buds/flowers), so I’m going to wait a few more days to “top” them (cut off the tops). I like to remove the tops above the 5th node so that each plant grows multiple big buds in the flowering stage, and some of these still need one more node. However, you need to top auto-flowering plants before they start flowering to prevent stunting so I’ve got to do it soon.
Week 4
July 29 – Today was a major “plant training” day. I’ll show you what the plants looked like, then I’ll explain exactly what I did and why.
Here’s a “before and after” of what the HPS plants looked like today. I did the same training in the LED tent.
First I topped the plants above the 5th node to break the apical dominance and force the plant to grow two main stems instead of just one.
Example of “topping” a plant above the 5th set of leaves
After topping, I tucked the leaves to expose the lower growing tips. I’ll continue to do this every few days for the next week or two. This causes the plant to naturally branch out and those lower tips will rise to the top of the plant (yields are increased dramatically if there are lots of growth tips at the top of the plant exposed to the light in the flowering stage). Tucking works really well with topping to create a sea of buds in a small space. Check out several videos I posted which show exactly how I “tucked” each of these plants. It was too many videos to put in this grow journal, but I thought you might find it interesting 🙂
Within the next week or two, all the lower stems should have reached the top of the canopy and you won’t need to worry about tucking any more.
Week 5
July 30 – By the beginning of week 5, the plants are growing an inch or two every day.
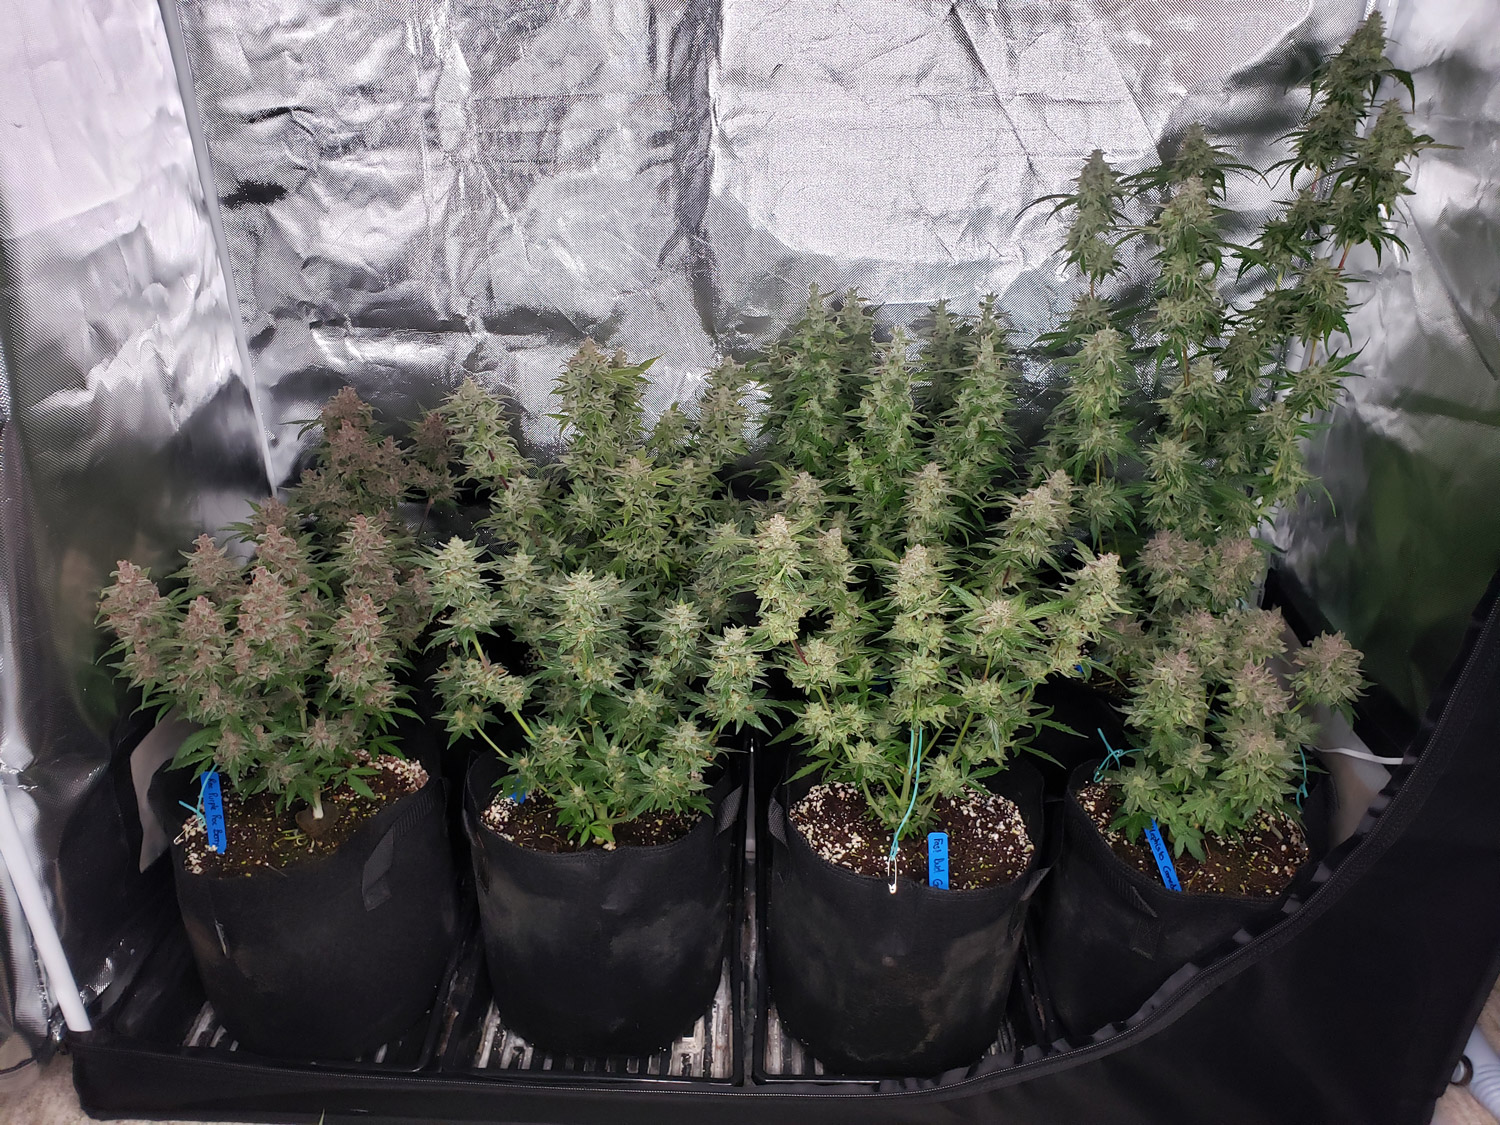
The plants at the beginning of week 5. The purple tent has the ViparSpectra LEDS, and the yellow tent has a 250W HPS.
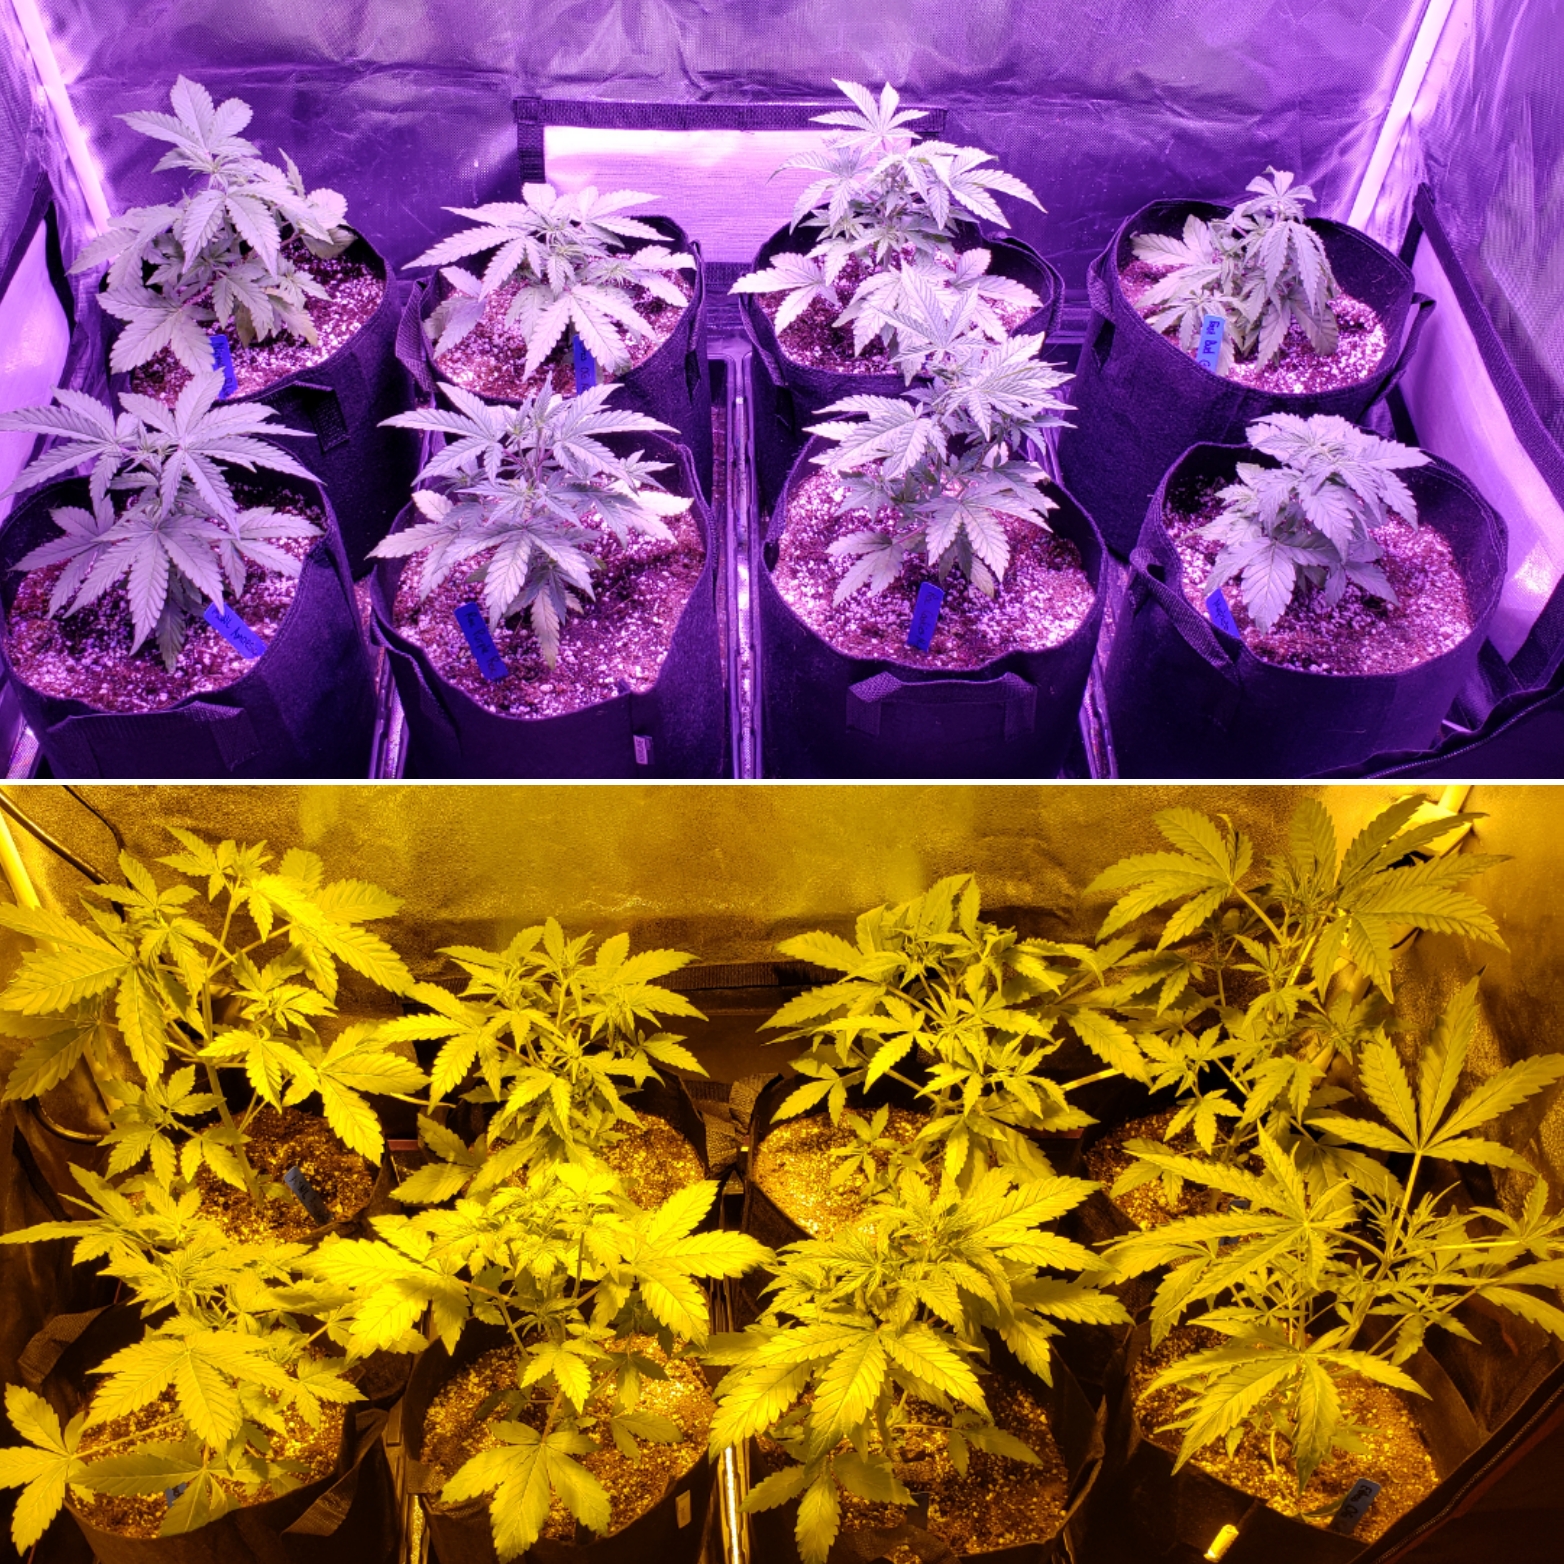
Isn’t it crazy how different the plants grow under different lights? I already knew HPS makes stretchy growth in the vegetative stage, but it’s pretty cool to see that in action compared to the LEDs, which are making very squat symmetrical growth.
The HPS plants seem to be pulling ahead as far as size and are drinking more. All the plants in the HPS tent look healthy and happy.
Here are the two tents in natural lighting. Top is ViparSpectra, bottom is HPS.
Although the HPS plants are green from top to bottom, I have two problem plants in the ViparSpectra tent. The back right Gorilla Glue plant is perpetually droopy and has stayed smaller than the others. It’s just not drinking. I’ll give it 2 cups of water and a few days later you can still see the wet spot, while the others all are guzzling through 4 cups of water in the same amount of time. I’m not sure that has anything to do with the LEDs. It could just be a runty plant.
The other problem plant is the Purple Roc Berry in front-left-center of the ViparSpectra tent. Some of the lower leaves have what looks like a calcium deficiency. I’m already giving a Cal-Mag supplement and checking pH, so I know it’s not a “real” deficiency. My guess is the lights were too close as symptoms are worst on the leaves directly under the LEDs. I moved the LEDs from 17″ away to 24″ away, so hopefully, that will stop spreading.
It reminds me of when I first started growing in 2008. I initially bought an eLoofa LED grow light and I remember my plants kept getting nutrient deficiencies. I tried different nutrients and supplements and tested the pH but I couldn’t figure out what was causing the deficiencies. I remember how frustrated I felt. I later realized it was the LEDs causing light stress from being too close! Since LEDs run cool it’s tempting to move them closer and closer, but once I moved them further away, my leaves grew green and healthy. Modern LEDs like ViparSpectra are waaaaay better for growing cannabis than those were, but I wonder how many growers blame themselves for grow problems when the true cause is their LED grow light being too close?
Week 6
August 7 – By the beginning of week 6, there is a clear difference between the growth patterns. The ViparSpectra LED plants are squatter and further along into the flowering stage. The HPS plants are long, stretchy and most of them are just starting to flower. I’m surprised the LED plants flowered sooner. It must have something to do with the light or spectrum because it’s across the board when you compare the same strain in different tents. I’m not sure if flowering early is what’s keeping the LED plants so small, or if they just are growing slower.
The tents at the beginning of week 6
Here they are in natural lighting
Lessons learned so far:
1.) Keep the ViparSpectra at least 24″ away if you notice plant stress. Several of the plants were getting deficiencies and yellowing when I had them closer. Since I moved the ViparSpectra LEDs to 24″ away last week, the plants all seem to have greened up again. I may try lowering it slowly again and watch how plants react.
2.) If using an MH/HPS switchable fixture like I am, start with a MH bulb then switch to the HPS bulb once the plants all have started growing buds. I wanted to have one spectrum from seed to harvest like the ViparSpectra tent, but part of why the HPS plants are all so stretchy is because they’ve been under HPS from seed (which is known to cause tall stretchy growth in the vegetative stage). An MH bulb will keep plants much shorter and squatter in the vegetative stage That being said, since the branches are all willowy and easy to bend, it’s been a pleasure to train/bend/LST the HPS-grown plants.
Week 7
August 16 – Things really changed in the last week.
The HPS plants are obviously taller and stretchier. I was pretty amazed just how lanky they grew. I definitely should have started them under MH or CMH to keep short and switched to HPS around week 5. LED plants are more squat and symmetrical, though the Auto Amnesia by MSNL Seeds almost tripled in height in the last few days (back right of LED tent). That strain is the tallest plant in both tents.
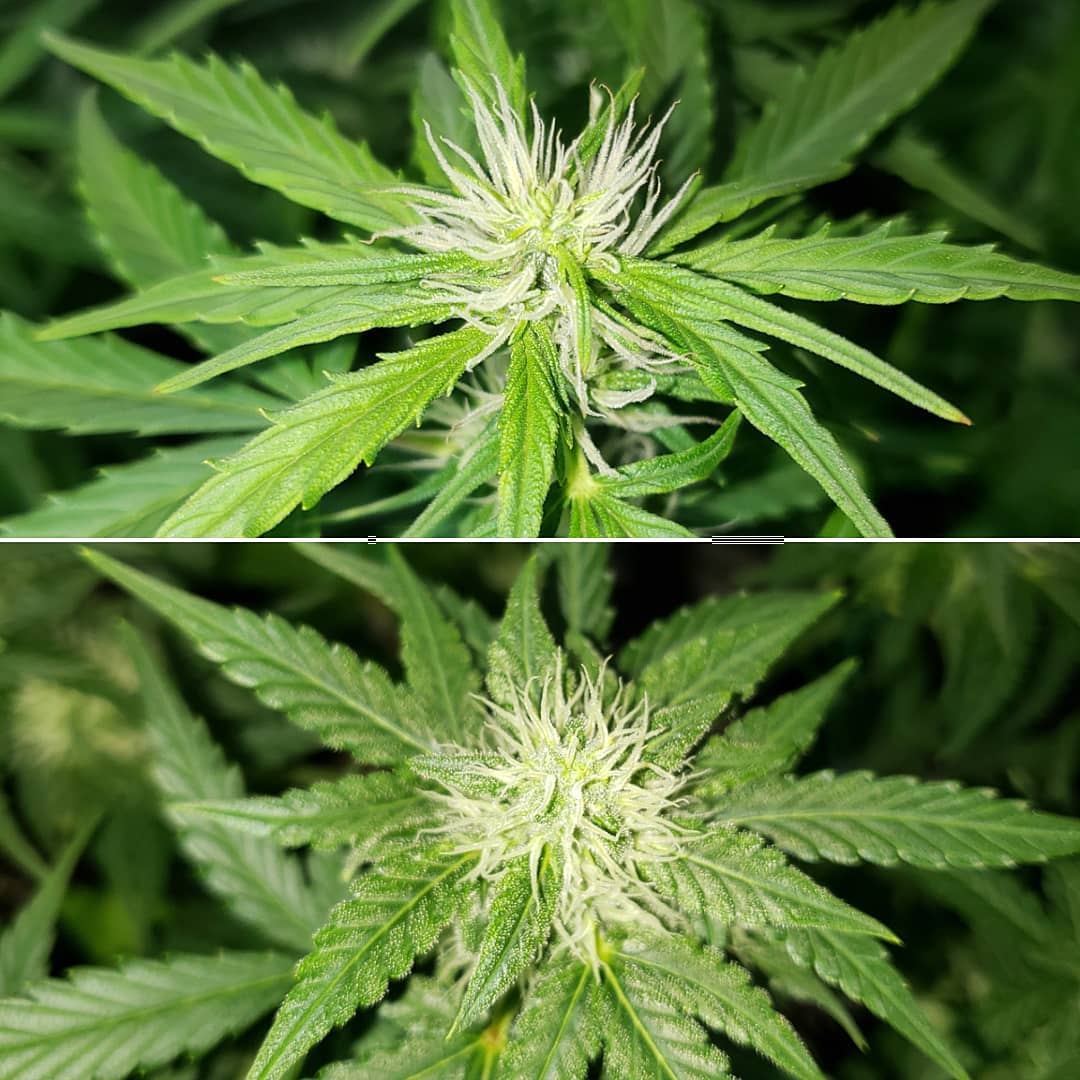
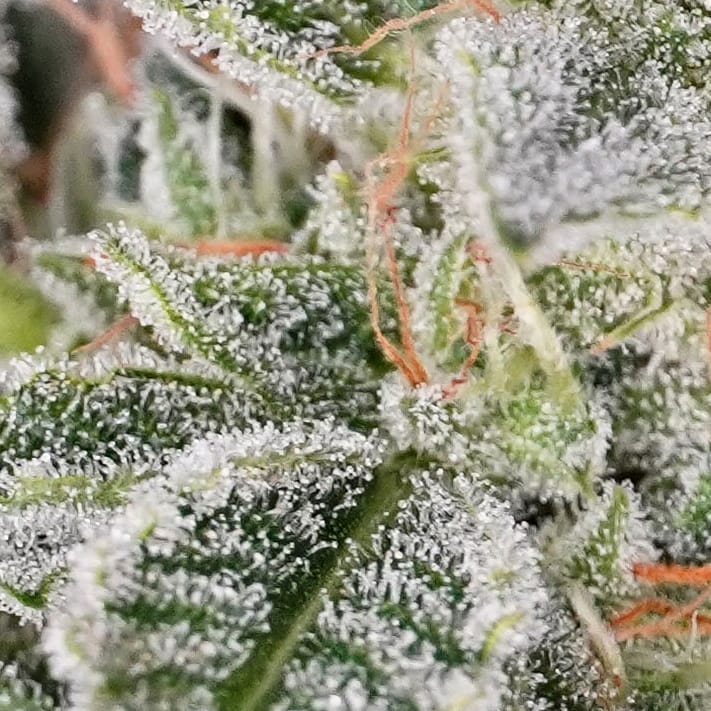
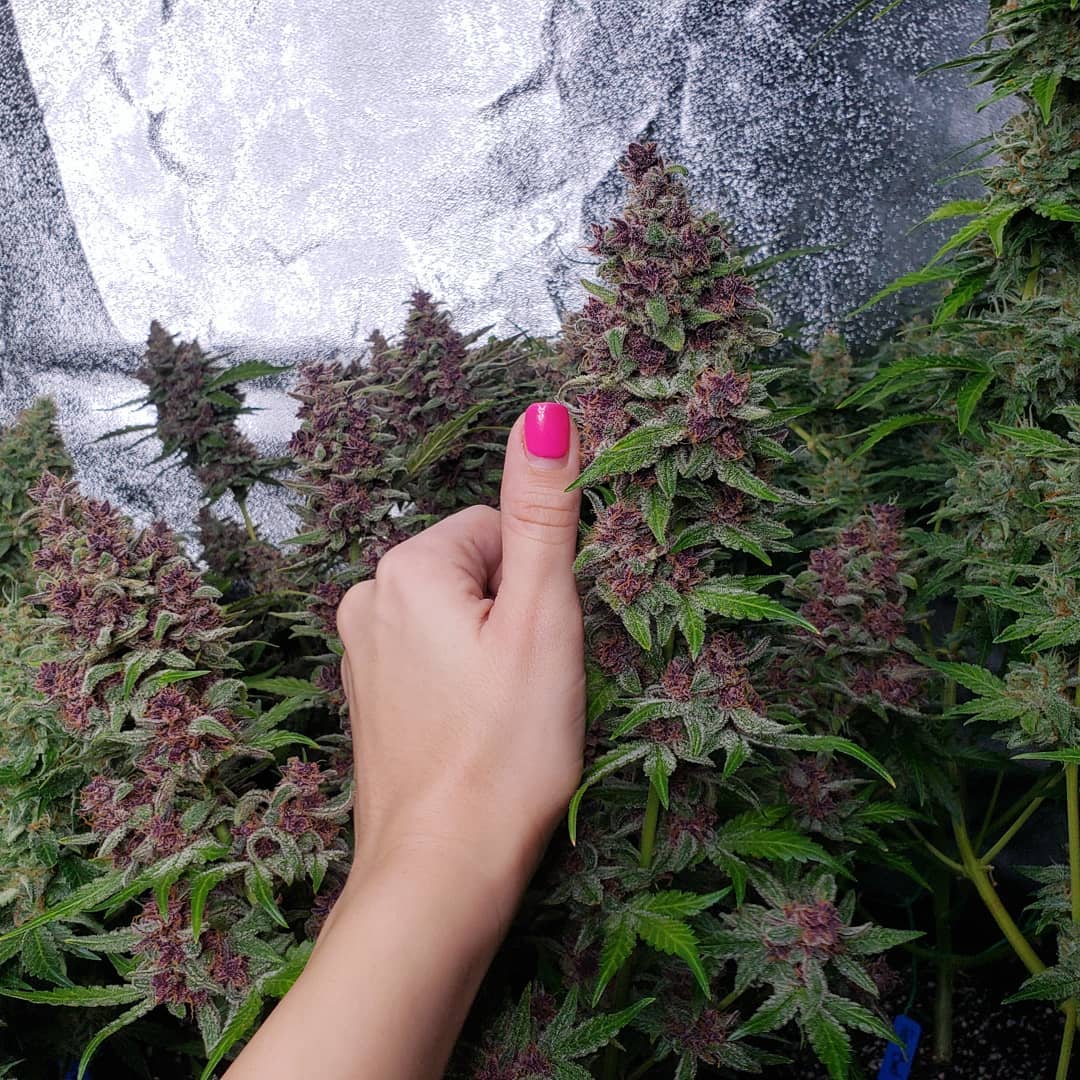
The nicest looking and most developed buds so far are definitely in the ViparSpectra tent. The Cookies n Chem has made beautiful purple flowers that are easily twice the size of any other buds in either tent. Those buds are also much more sticky and covered in trichomes.
Here are a few pictures of the Cookies n Chem in the ViparSpectra tent.
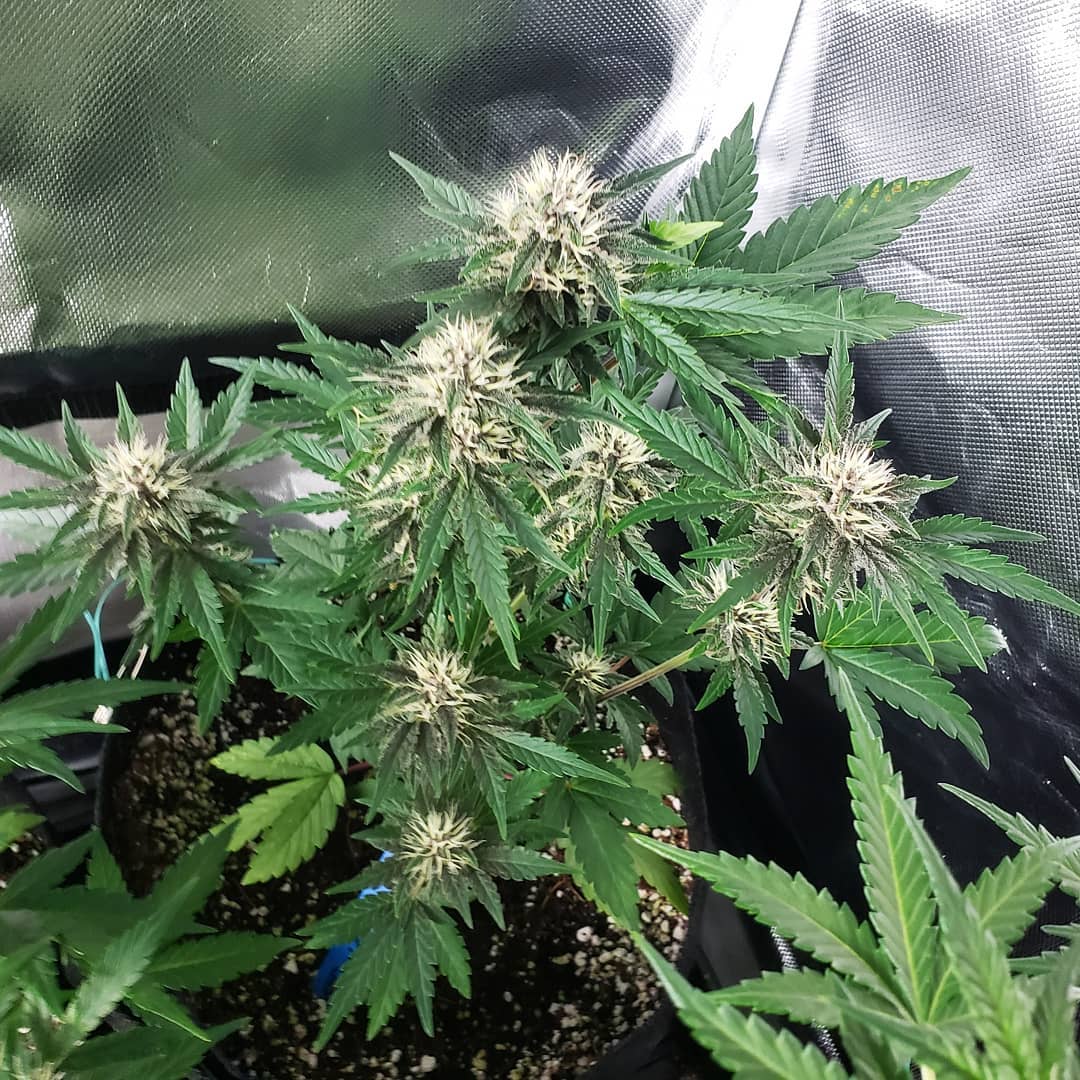 These pictures don’t do the flowers justice. The buds are an intense purple.
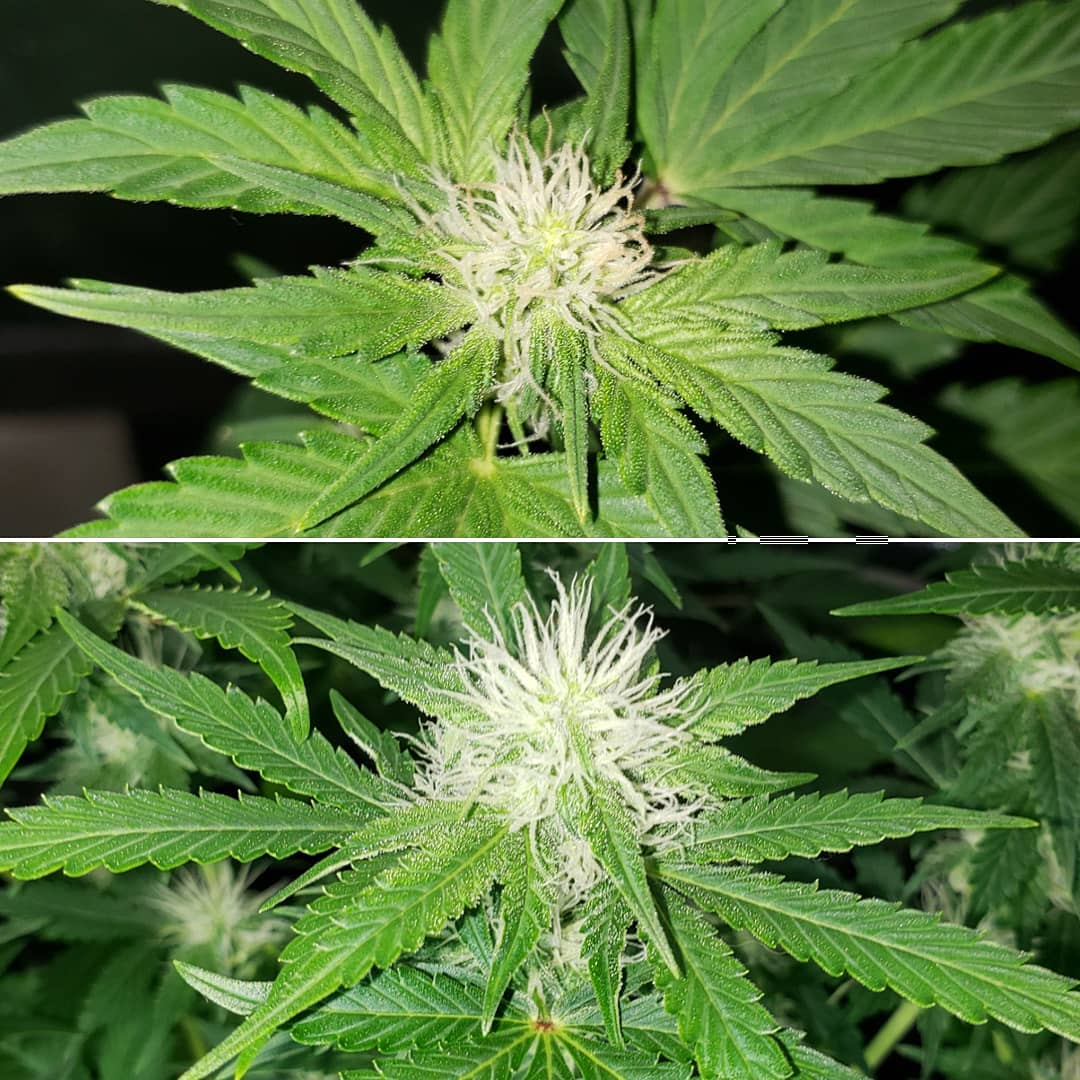
The Cookies n Chem buds in the other tent are not nearly as developed. The HPS plants started flowering about a week later, and as a result, all the HPS buds are still purely white hairs. On the flip side, the ViparSpectra buds are actually starting to form solid buds under the hairs.
So far, the ViparSpectra buds are more impressive, though it’s hard to say whether it’s because of the lights or just that they’ve been flowering for about a week longer than the other ones.
August 18 – Bud comparison time! Each of these pictures shows the same strain, but the top bud is from the ViparSpectra LED tent while the bottom bud is from the HPS tent.
LED buds on top, matching strain from the HPS tent on bottom
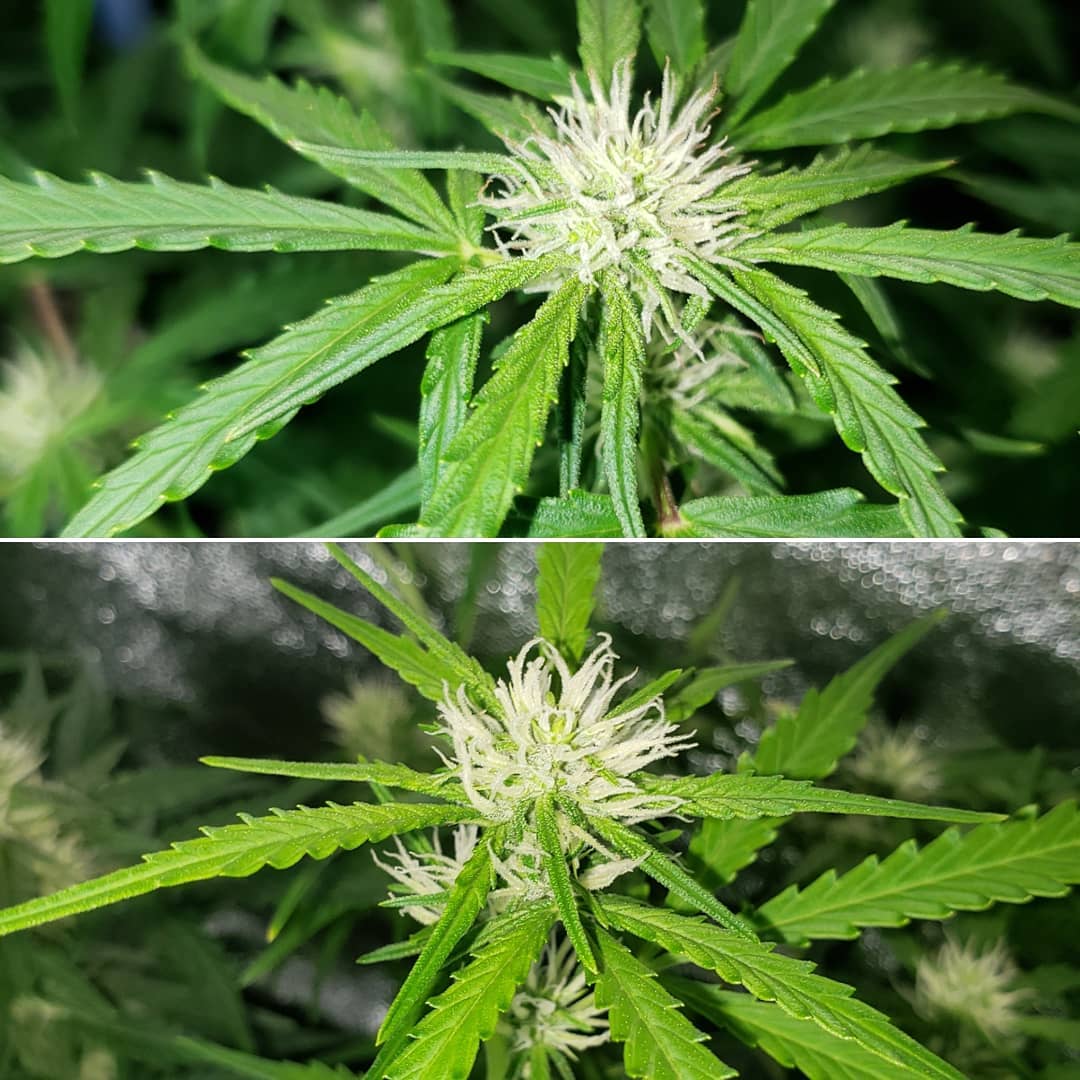
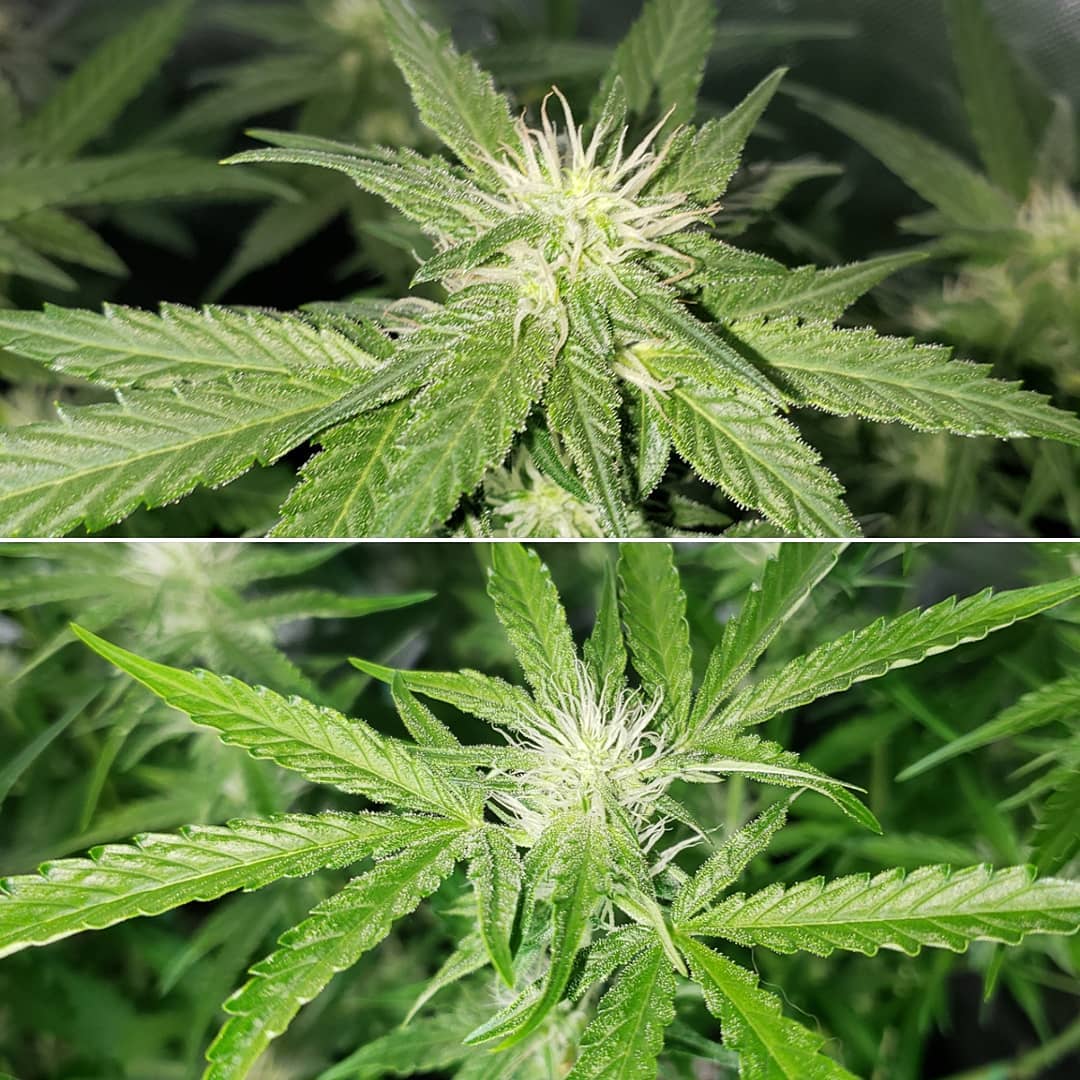
Over the last few days, the HPS buds have developed quite a bit and seem to be catching up. Right now some of the ViparSpectra buds are bigger, and some of the HPS buds are bigger. Trichome development seems similar. Still neck and neck!
The smell is divine ?
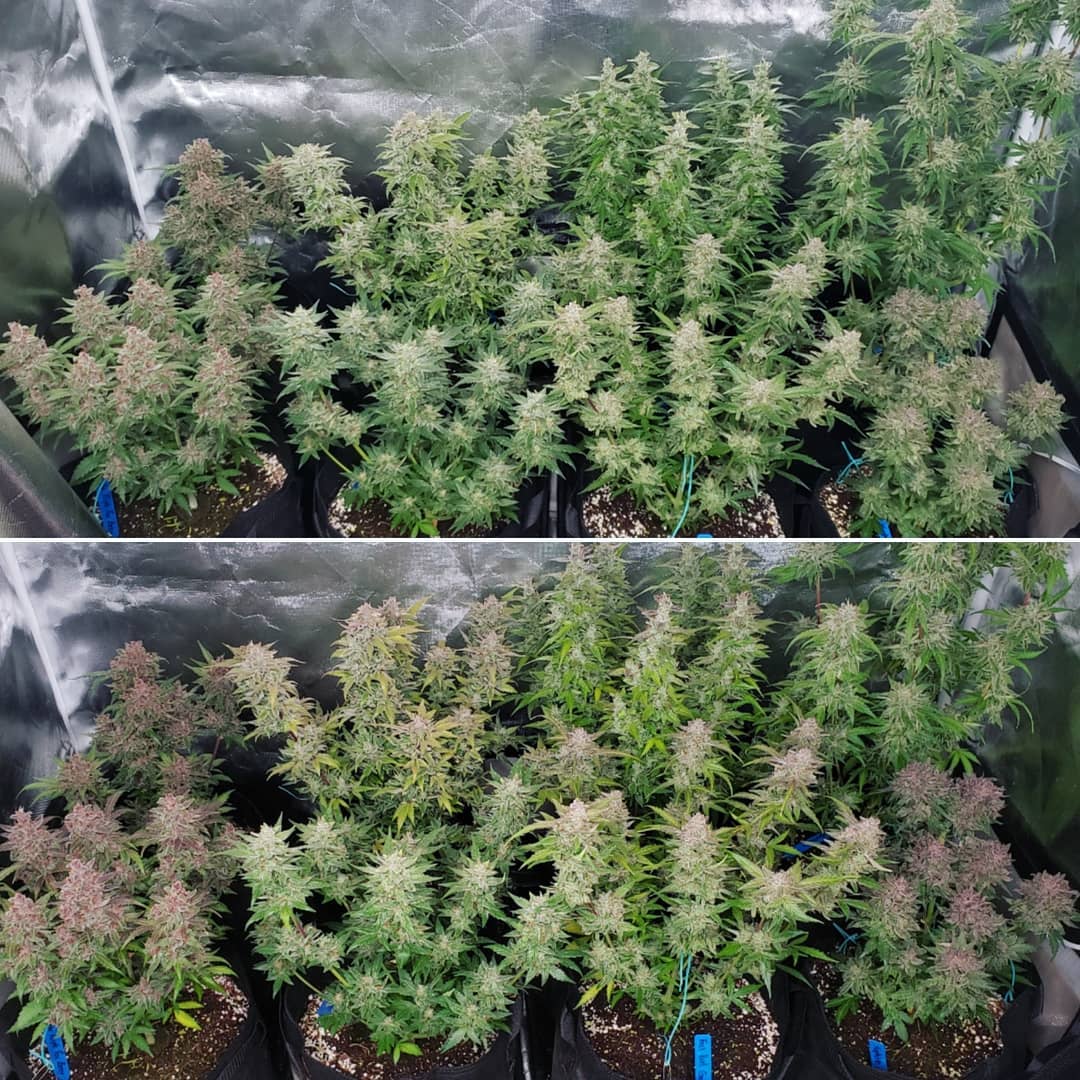
Week 8
August 23 – At this point, the plants aren’t really getting any bigger or taller. The only thing that’s changing is the bud development and size. On the one hand, after the excitement of the last several weeks, it’s kind of boring that the plants don’t look different every time I open the tent in the morning. On the other hand, it’s exhilarating because the buds are developing beautifully and harvest is approaching!
Here are the plants at 8 weeks old
Here they are in natural light. Look at all those beautiful buds developing!
Week 9
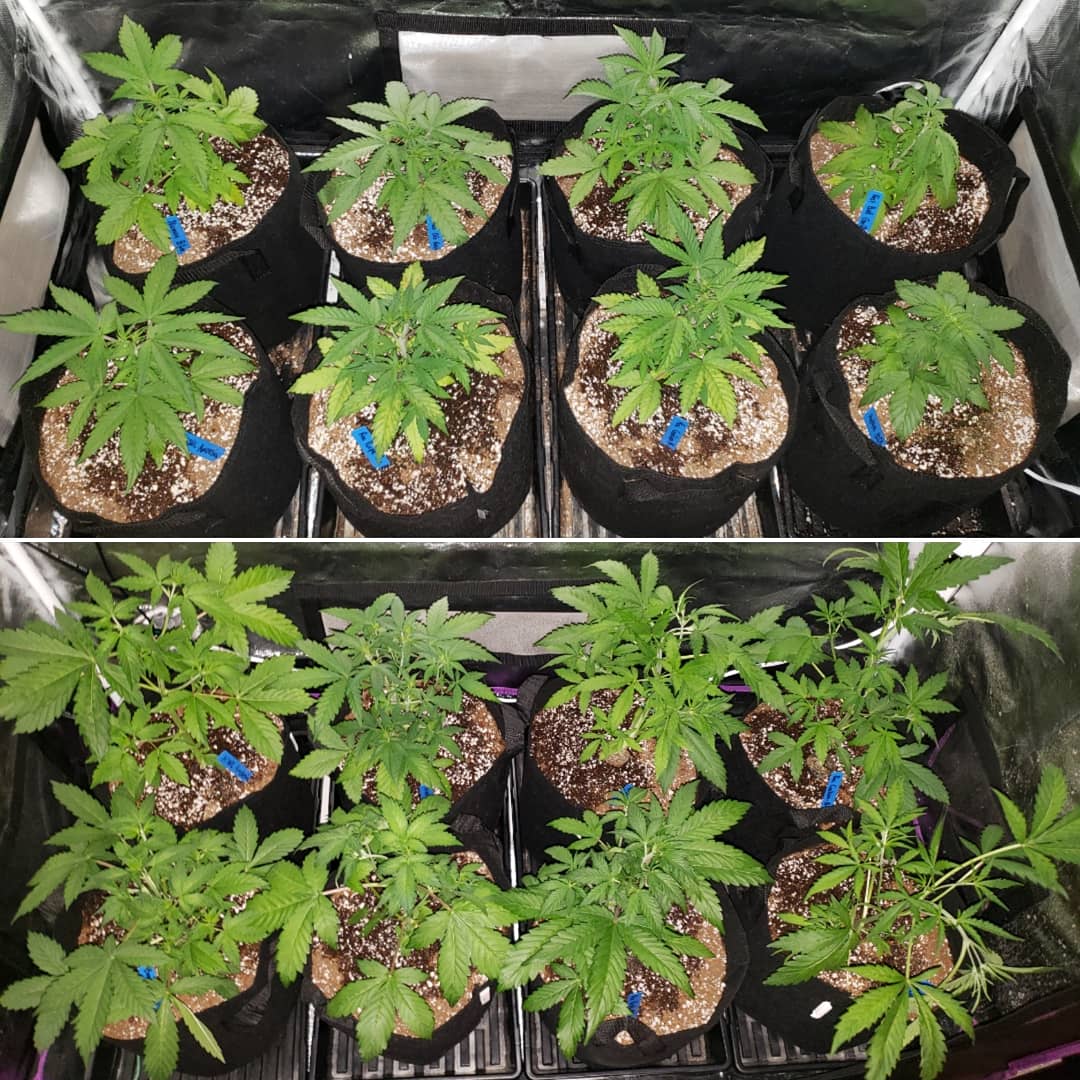
August 31 – Not much has changed since last week. Here’s a quick update:
Plants in week 9

Week 10
September 7 – At this stage, I’m watering the plants, adjusting the grow lights to keep them the right distance away, and otherwise just waiting until harvest. Getting closer every day!
Plants at week 10
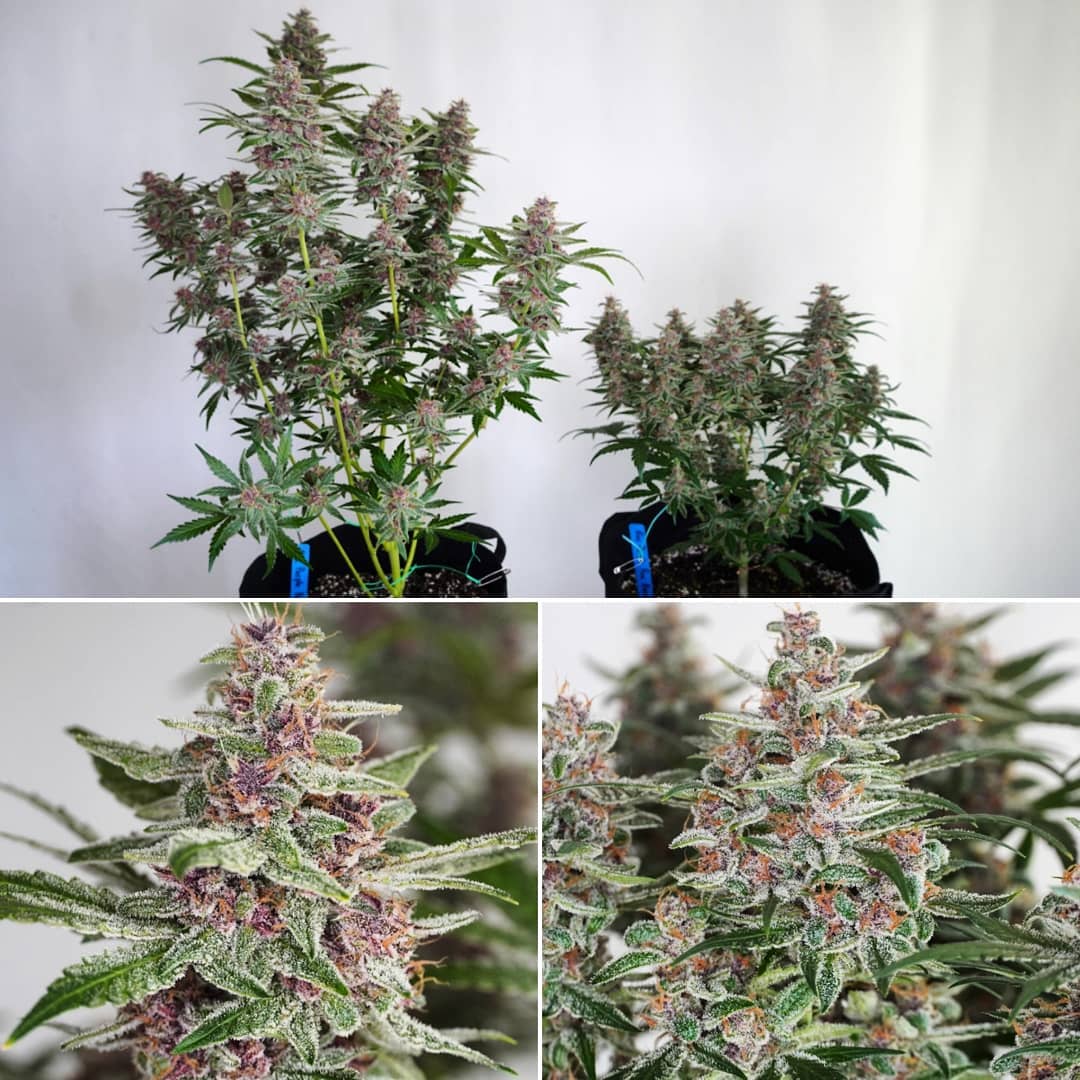
I also wanted to show you a closeup of one of the plants so you can see how the topping we did in week 4 (plus tucking the leaves to expose growing tips so they’d rise to the top) caused the plant to grow multiple branches, which have now turned into multiple big buds.
This bushy shape with many big buds is the result of topping the plants in week 4
Week 11
September 11- What are those yellow things on clear strings? The branches of this plant were falling over and needed extra support, so I used plant yo-yos to hold them up.
Plant yo-yos are specially made for growing cannabis plants. They come on adjustable nylon strings that can be easily set to the height you desire
They have a hooked end that holds onto cannabis stems without disturbing buds
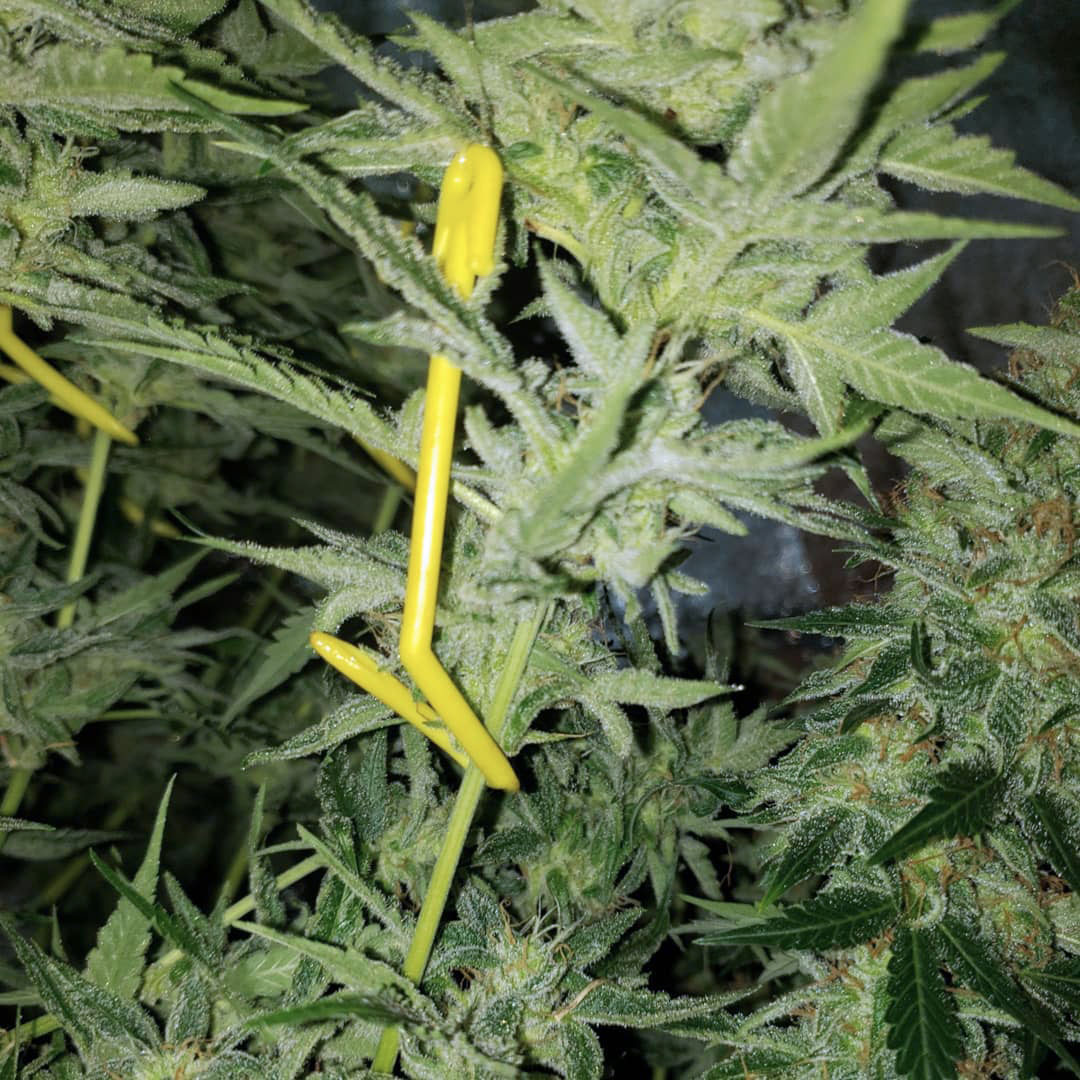
I attached mine to the top of the tent with twist tie but a lot of growers attach string or thin nylon rope across the top of their tent, which these yo-yos easily hang from.
Some growers recommend using a silica supplement like Silica Blast or Armor Si to strengthen stems as they grow to prevent them from falling over, but I’ve heard other growers say silica can affect the taste/smoothness of your buds. I tend to be very simple with nutrients and supplements. If there’s something I can do to solve a problem without a supplement (in this case I know I can deal with weak stems using yo-yos) then I usually choose to do that as opposed to adding something that can possibly remain in the plant after harvest.
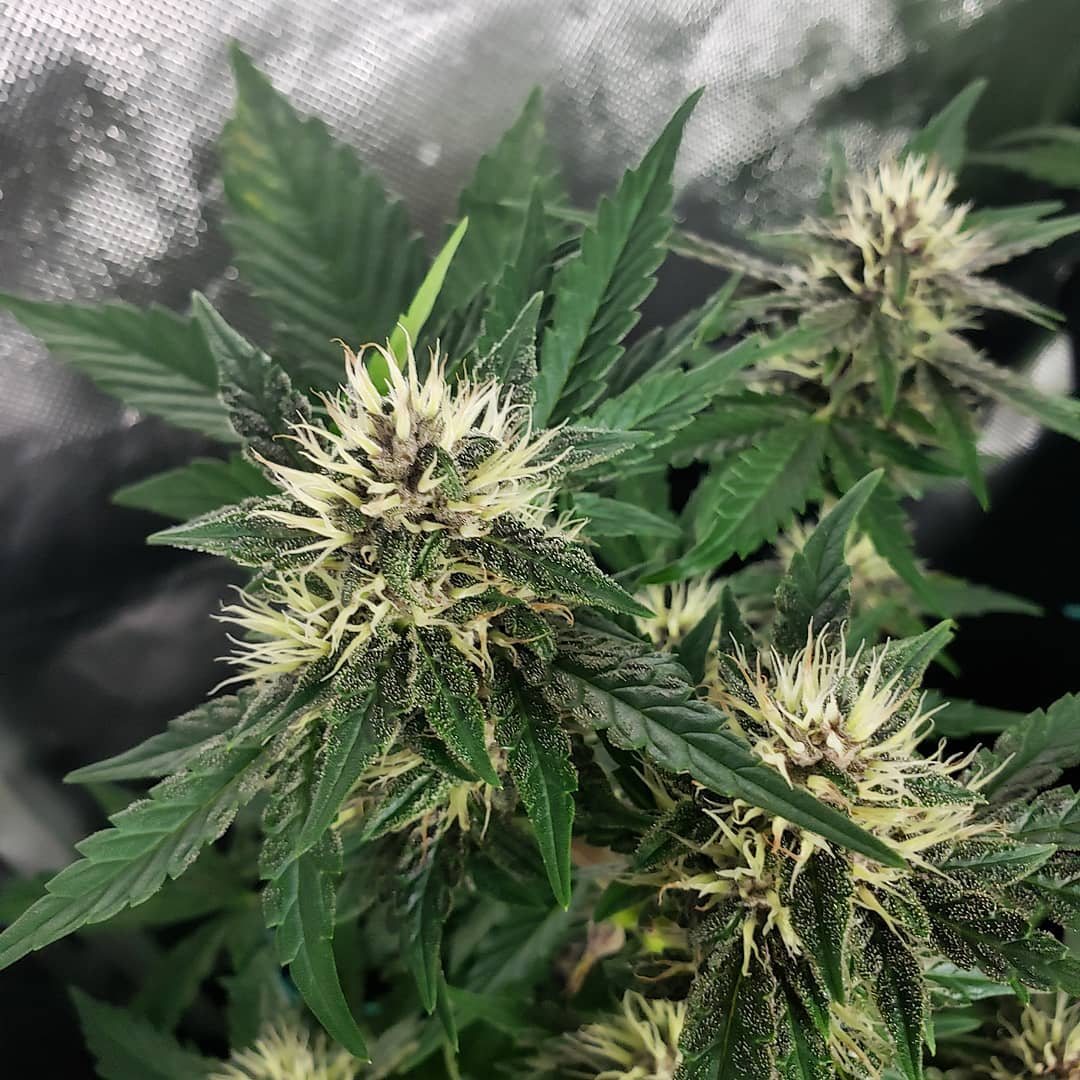
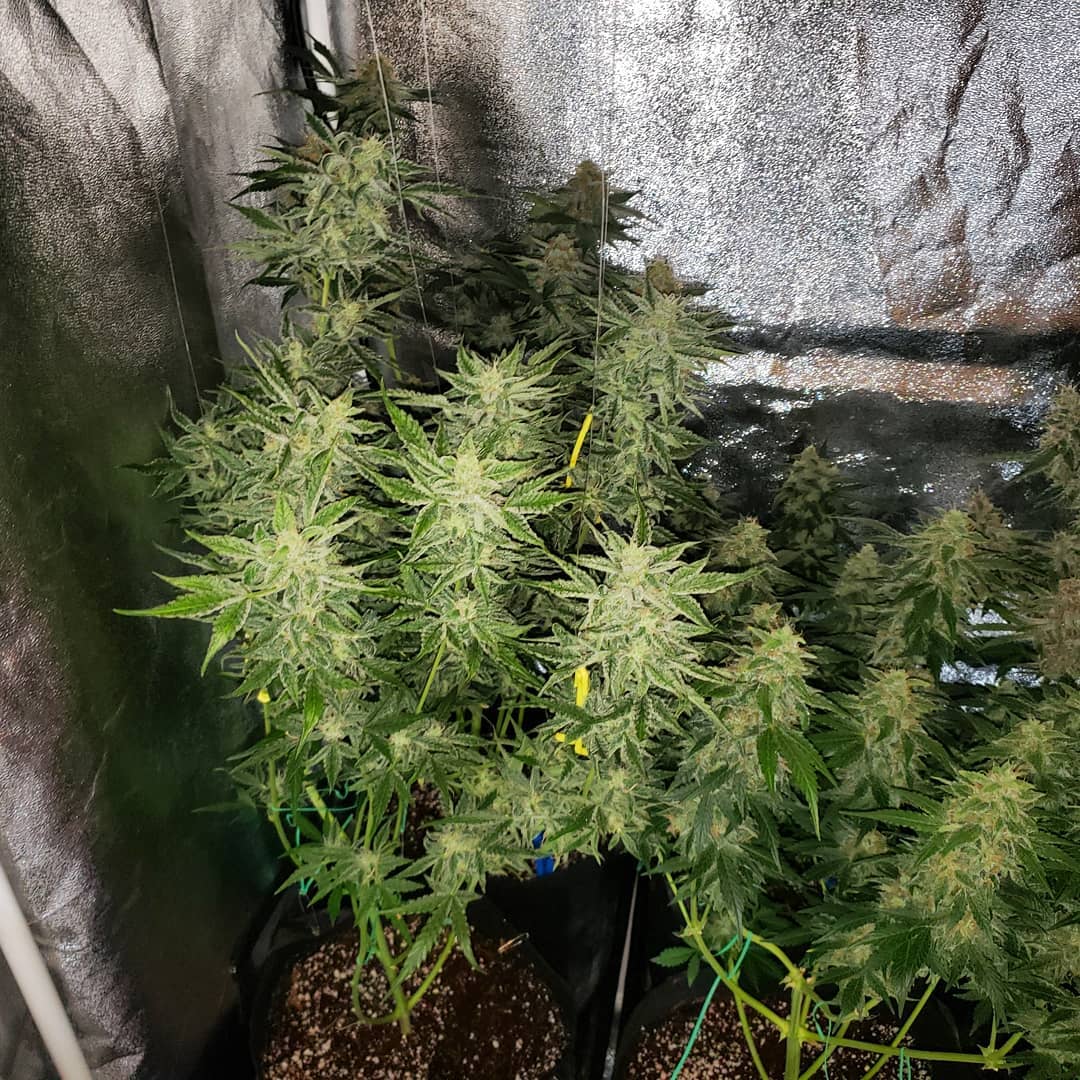
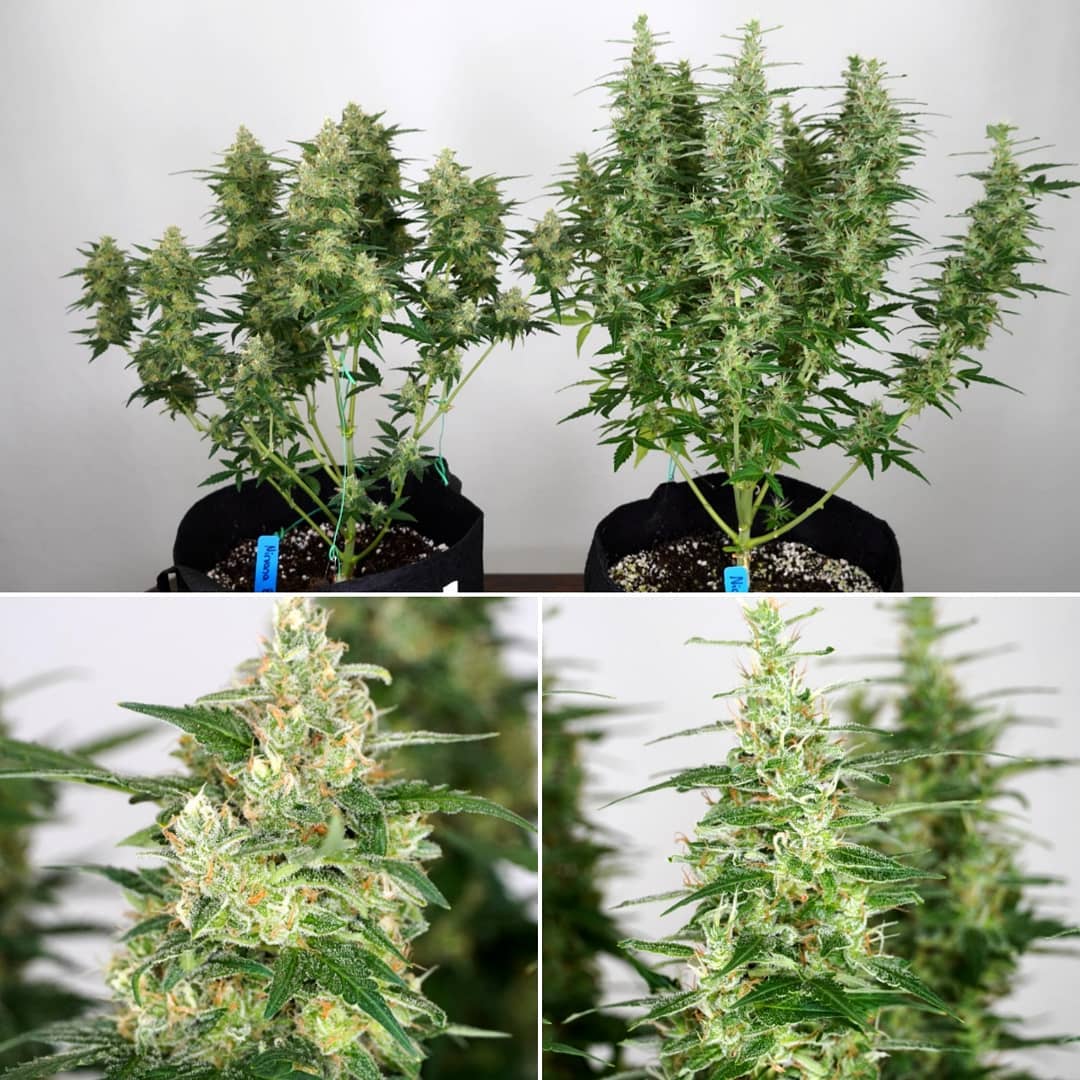
September 16 – The buds are really starting to get bigger!
Plants at week 11
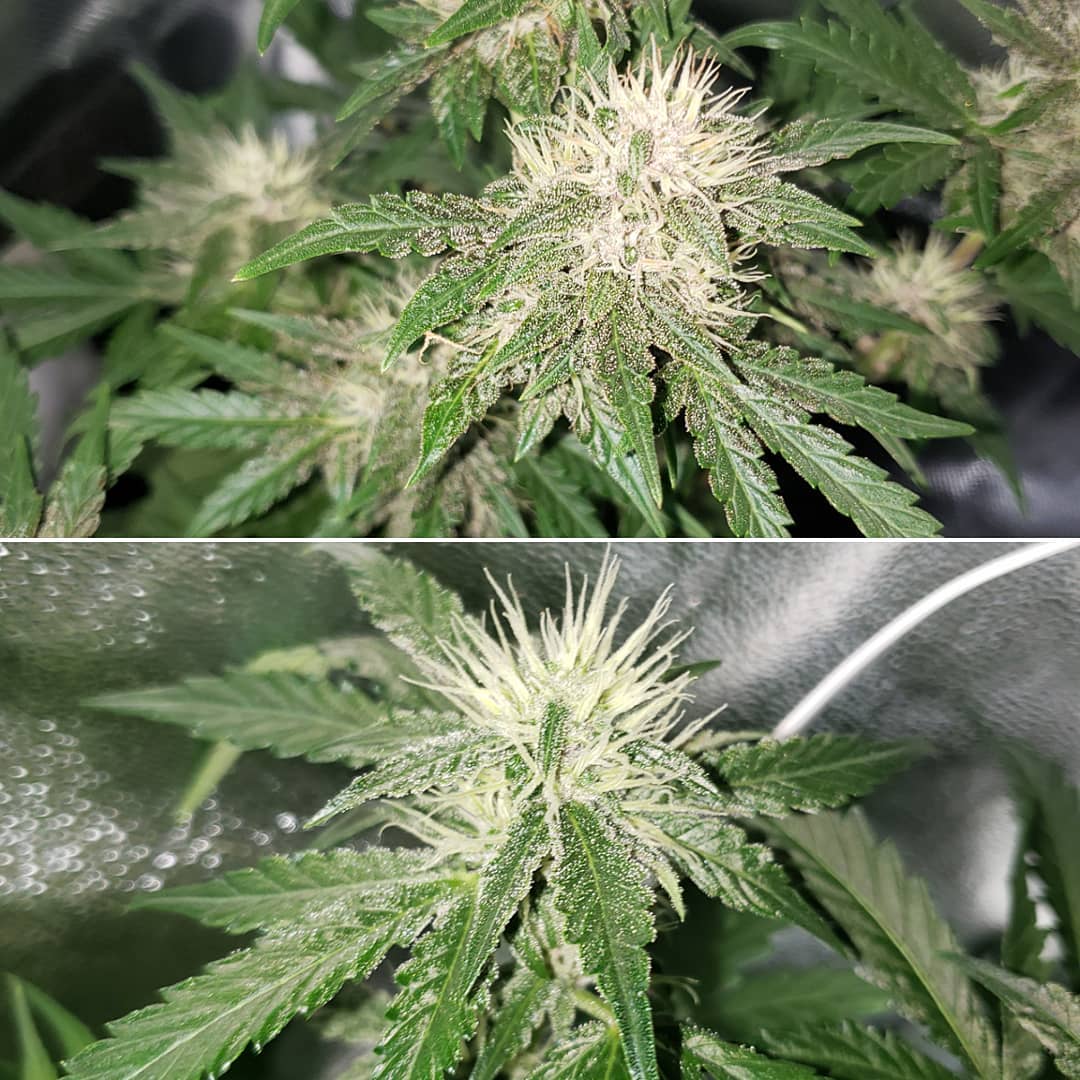
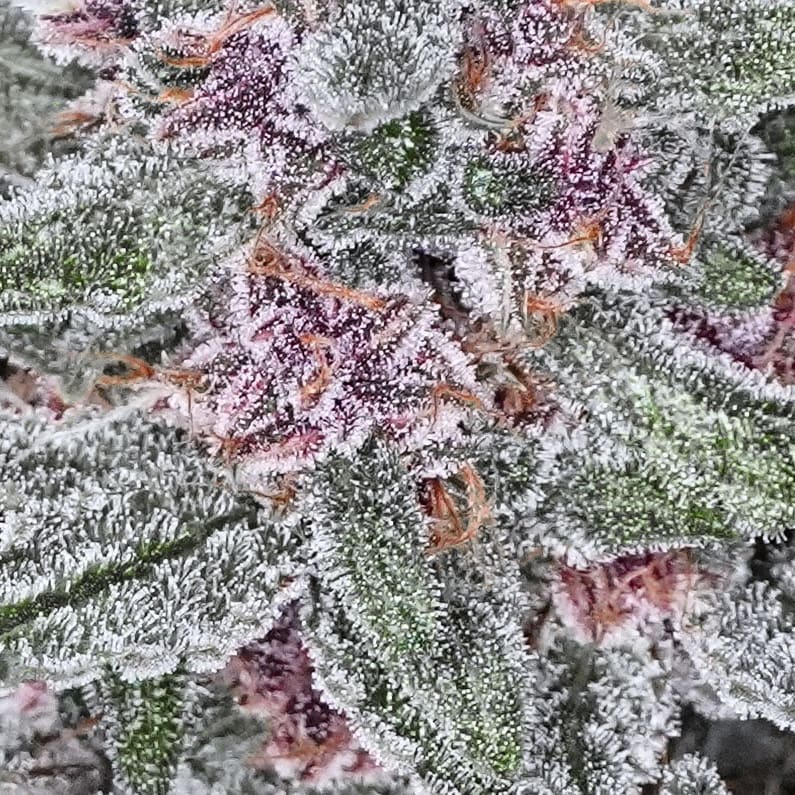
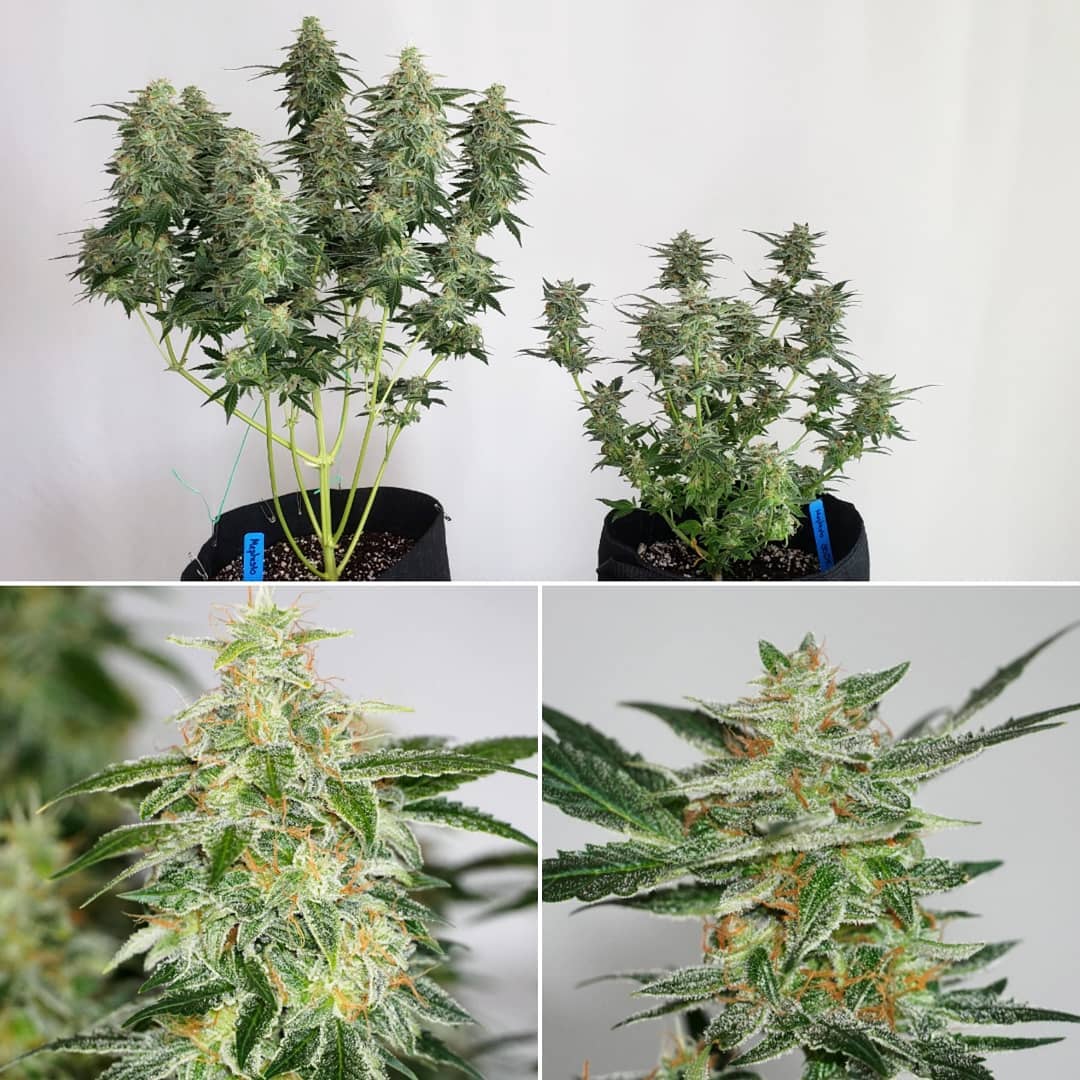
The buds are starting to look very close to harvest. The HPS really seems to be bringing out the colors of buds, while the LED buds are more muted in color. Here are some of the most colorful ones from the HPS tent. Clockwise starting from top left: Purple Roc Berry, THC Bomb Auto, Cookies n Chem, OG Kush Auto.

Purple Roc Berry trichome closeup
THC Bomb Auto trichome cloesup
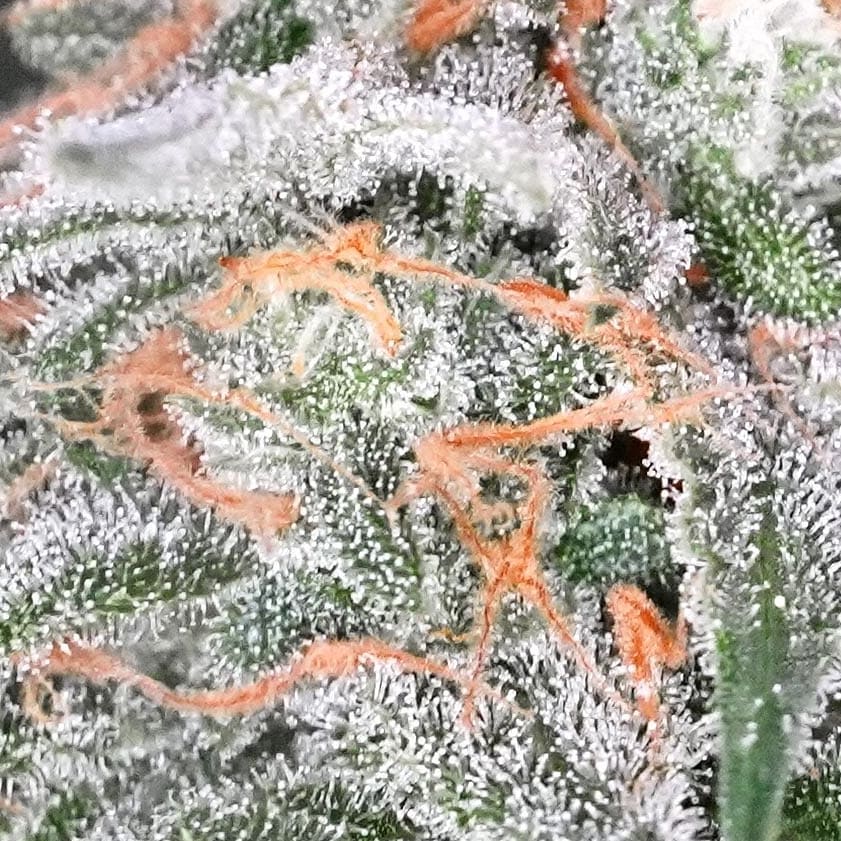
Cookies n Chem trichome closeup
OG Kush Auto trichome closeup
Since I plan on harvesting them soon, I’ve stopped giving them nutrients and will only be giving them plain pH’ed water until they get cut down (why stop giving nutrients before harvest?)
Week 12
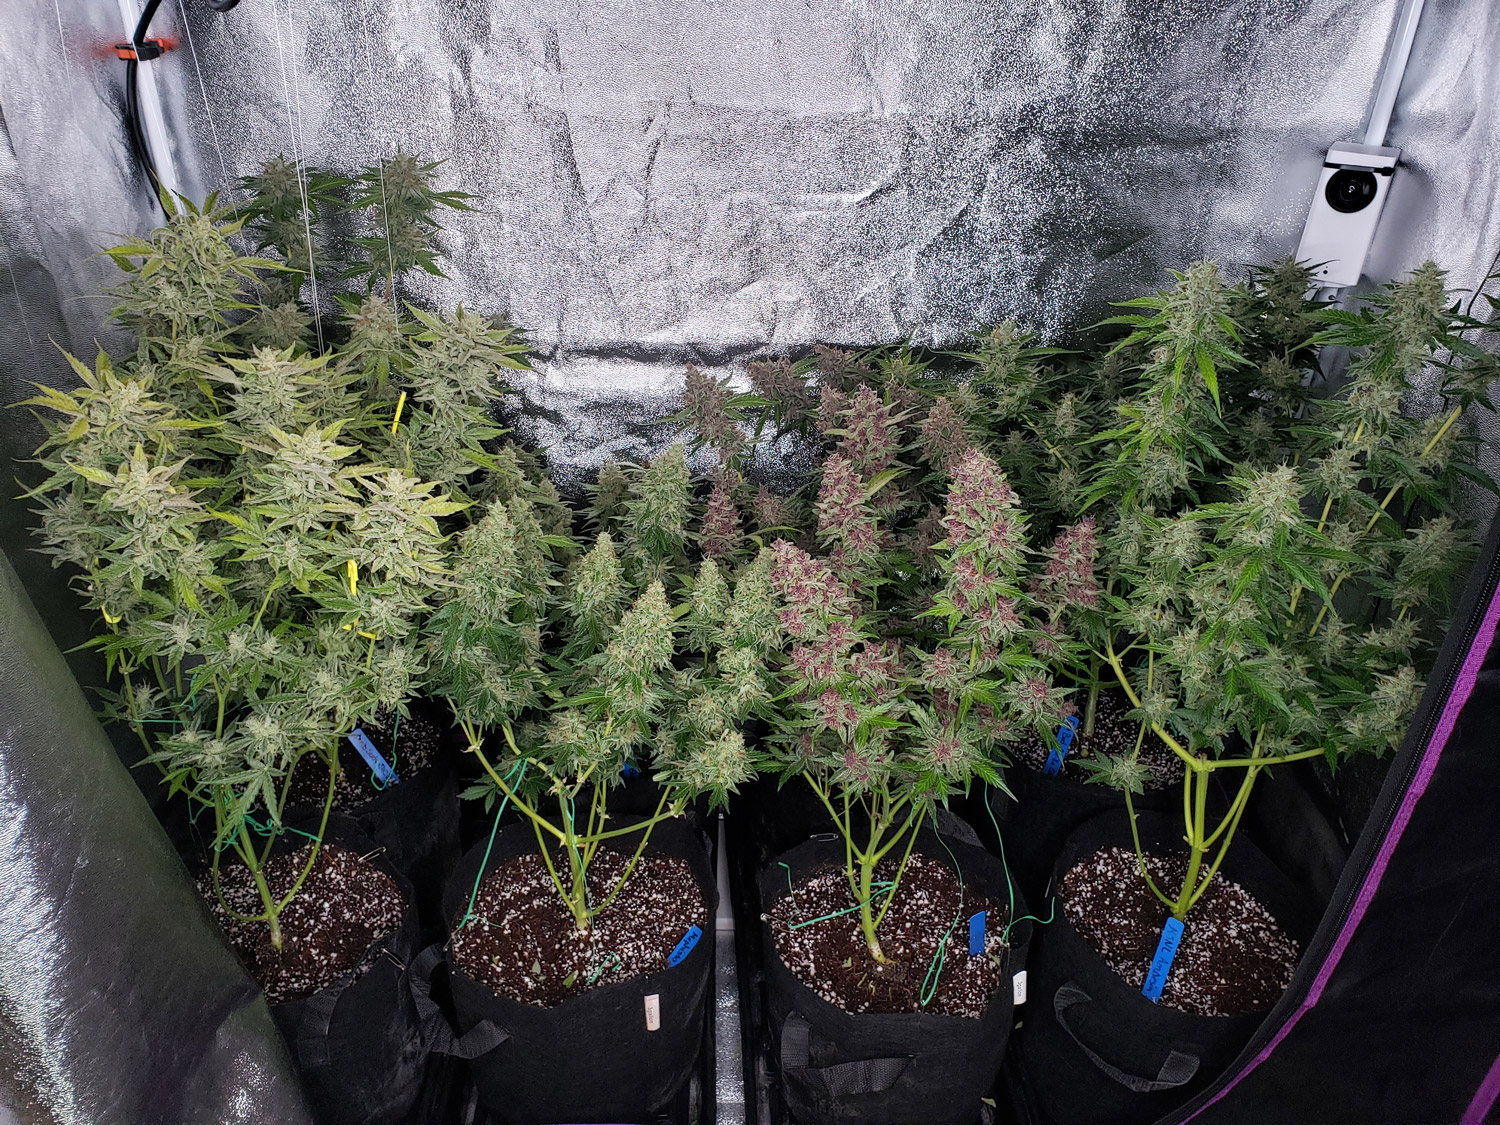
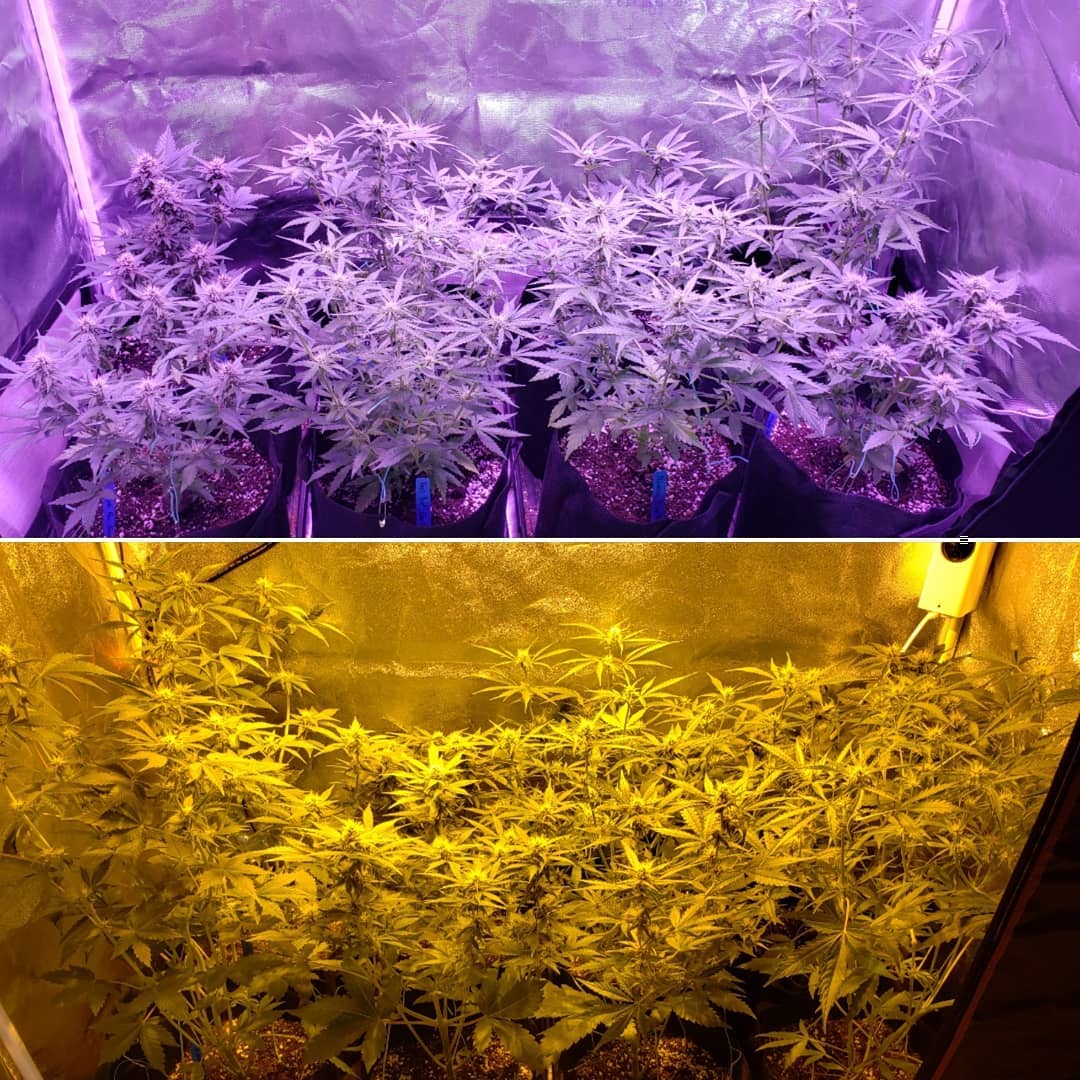
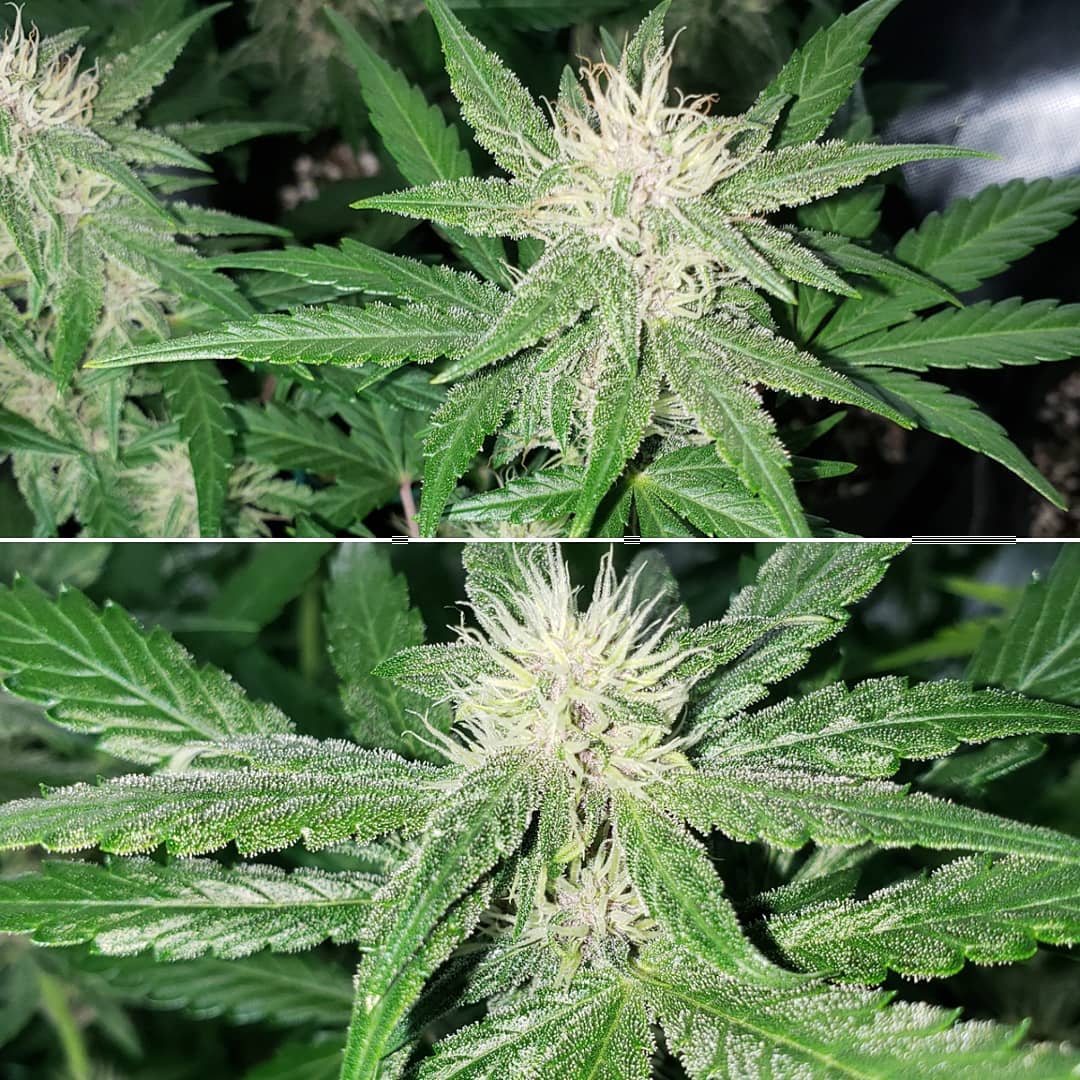
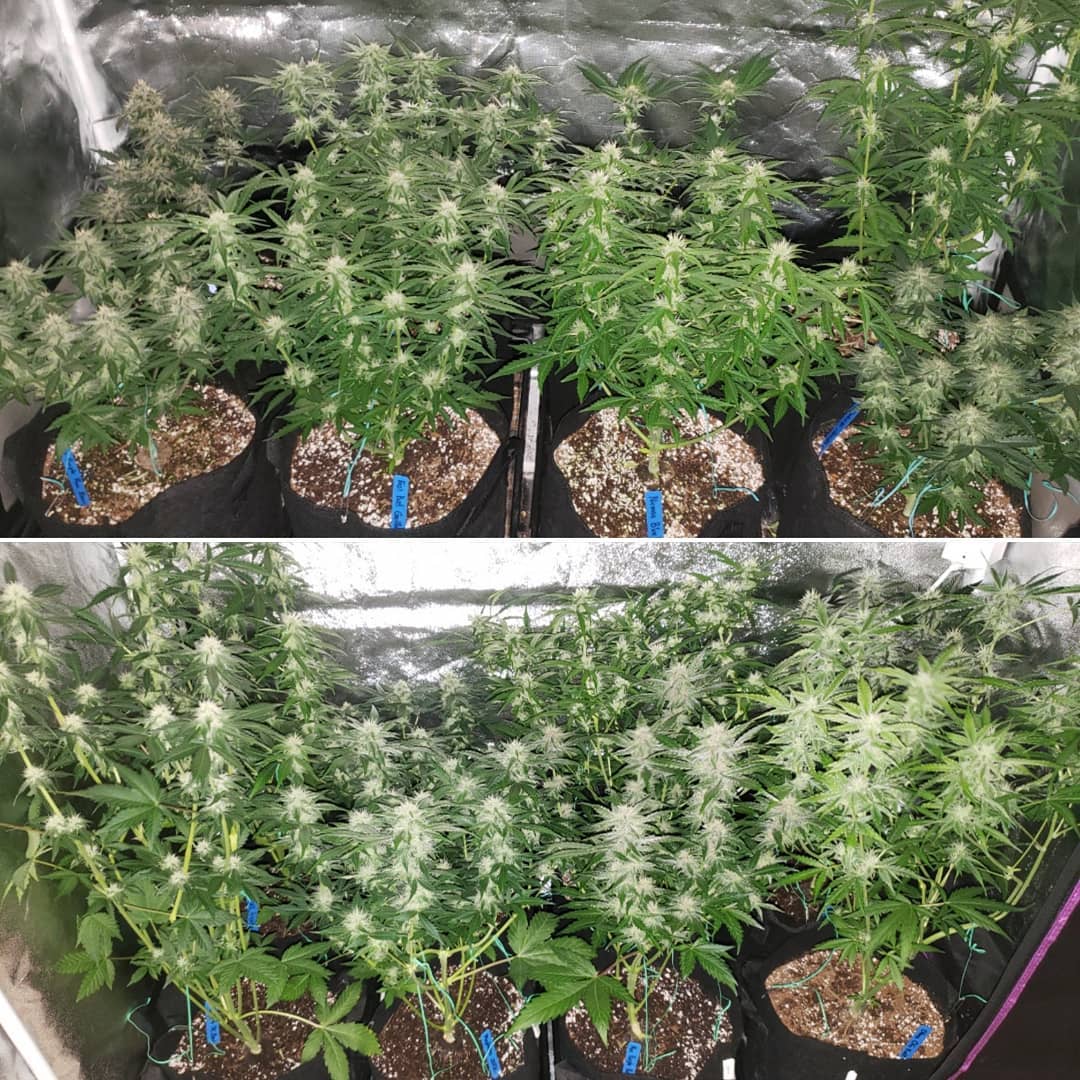
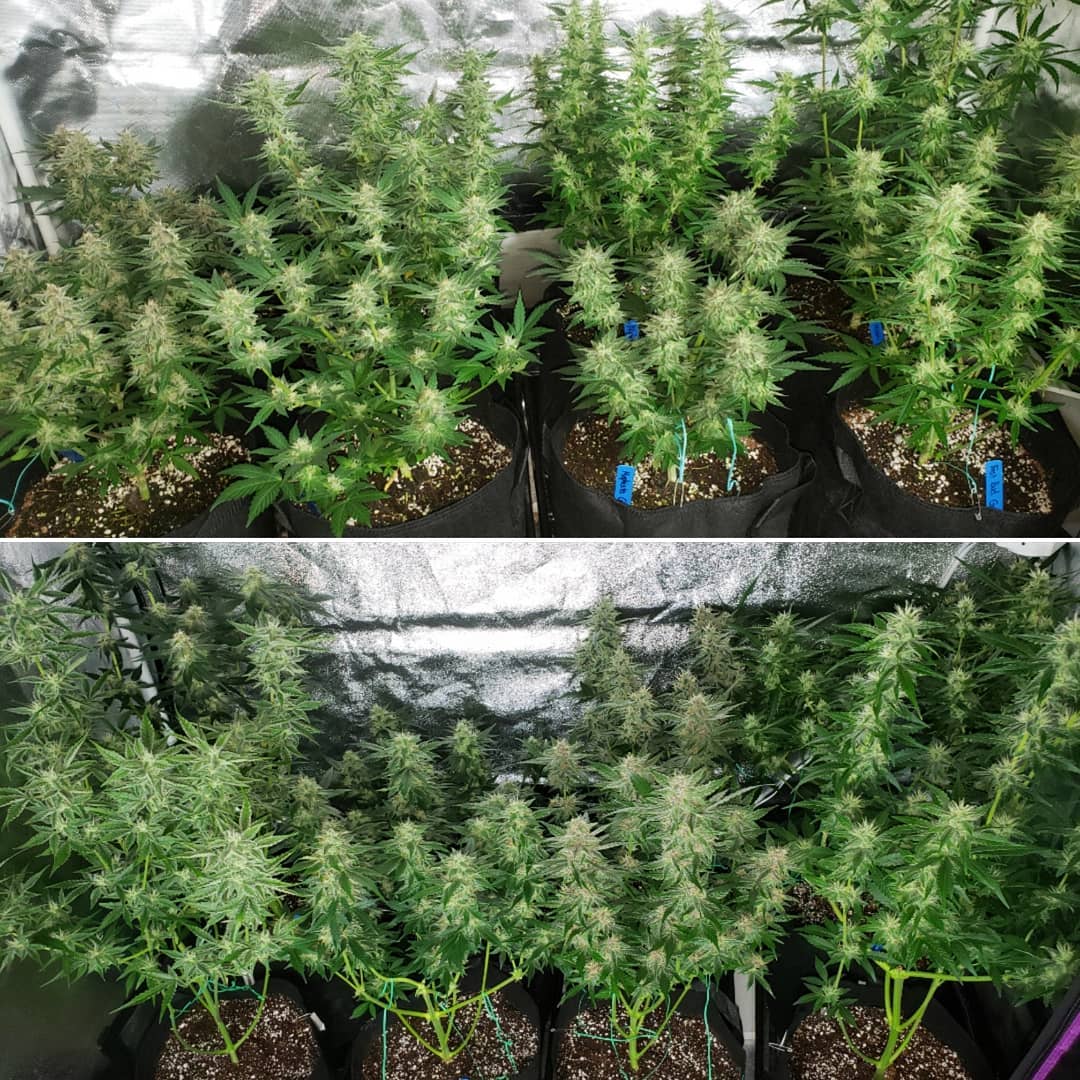
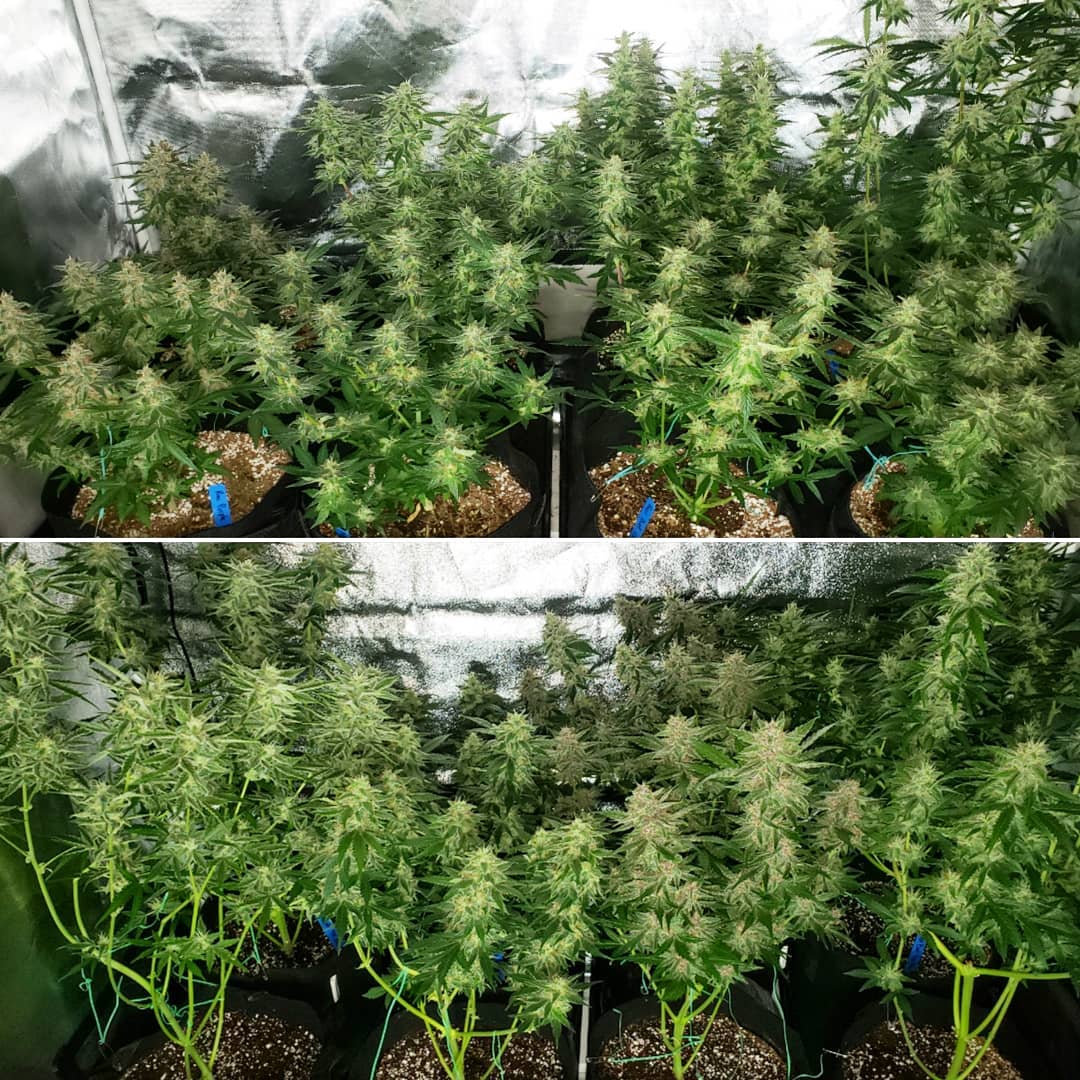
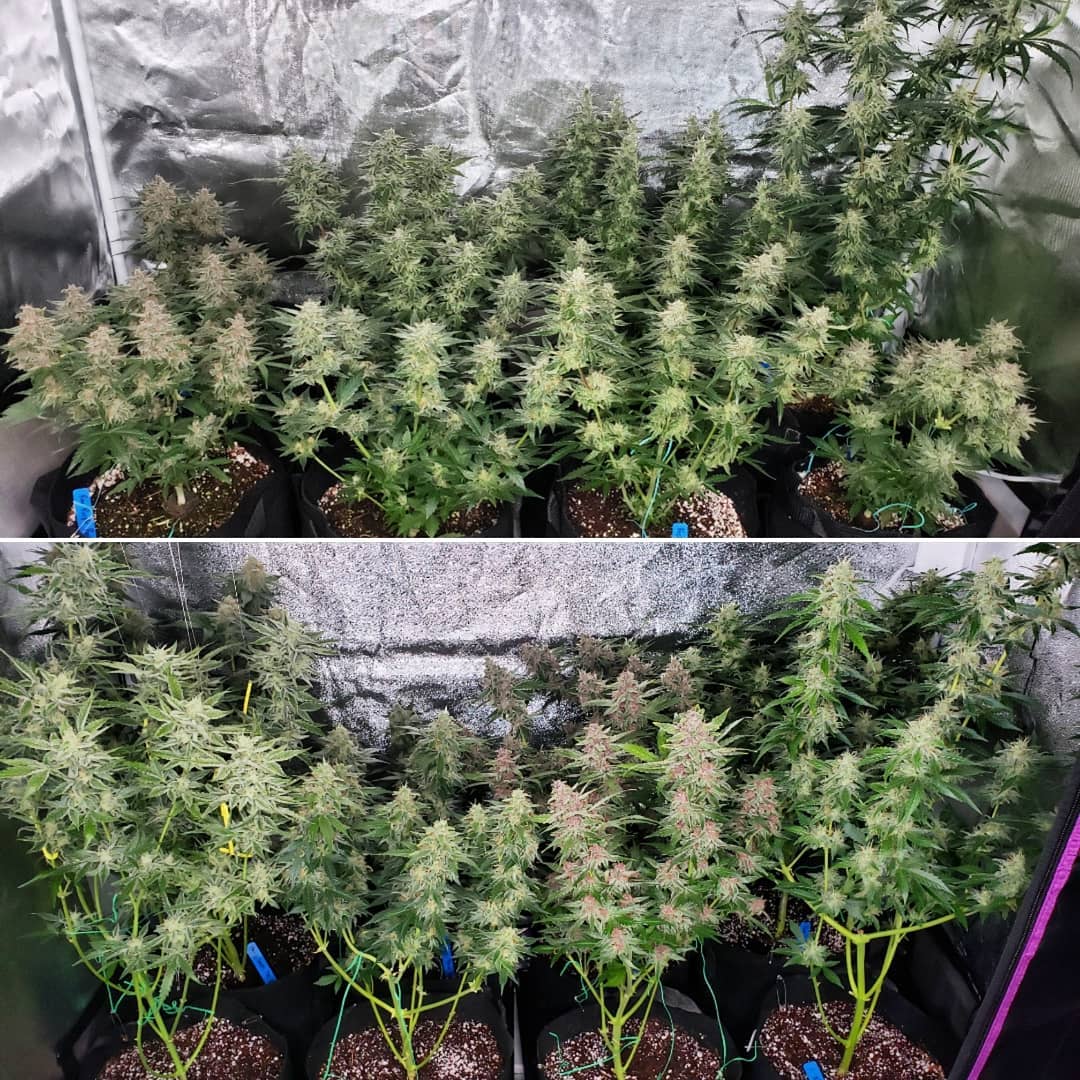
September 18 – Here’s a tour/comparison of all the plants so you can clearly see how they all looked before harvest.
Left plant is from the HPS tent, Right is from the ViparSpectra LED tent
Purple Roc Berry plants by RocBudInc. The HPS buds have a generic “weed” smell, while the LED version of buds has a sharper smell.
SODK by Mephisto Genetics. They both have a similar smell that’s kind of like citrus. HPS buds are more earthy and LED buds are more sour. This particular strain really struggled under the LEDs.
Cookies n Chem by RocBudInc. They smell similar: slightly sweet, slightly sour, and energizing. I’m not great at describing smells. The LED buds definitely smell stronger with this strain, and have a touch of pine.
Blue Mystic Auto by Nirvana. The HPS plant has a dense Indica structure with a strong classic clean kush smell. The LED plant has more airy sativa structure. I’m not sure whether that’s from natural variation or the grow light. The LED plant has a lower overall smell with a earthy hazey scent.
OG Kush Auto by Ethos Genetics. These ones are both in the tent for the picture because one is tied to the top of the tent so I couldn’t take it out. Similar bud structure and a classic Kush smell that clears your nose. Although they smell very similar, the LED buds smell more to me.
Gorilla Glue Auto by Fast Buds Genetics. Both smell herbal and fresh, like minty wood mixed with kush. These plants smell very similar to each other but in this case, I think the LED buds have a stronger smell so far.
The two MSNL Auto Amnesia plants look and smell remarkably similar to each other despite being grown under different grow lights. Both have a strong complex smell that’s kind of a spicy sativa scent with a slightly citrus undertone.
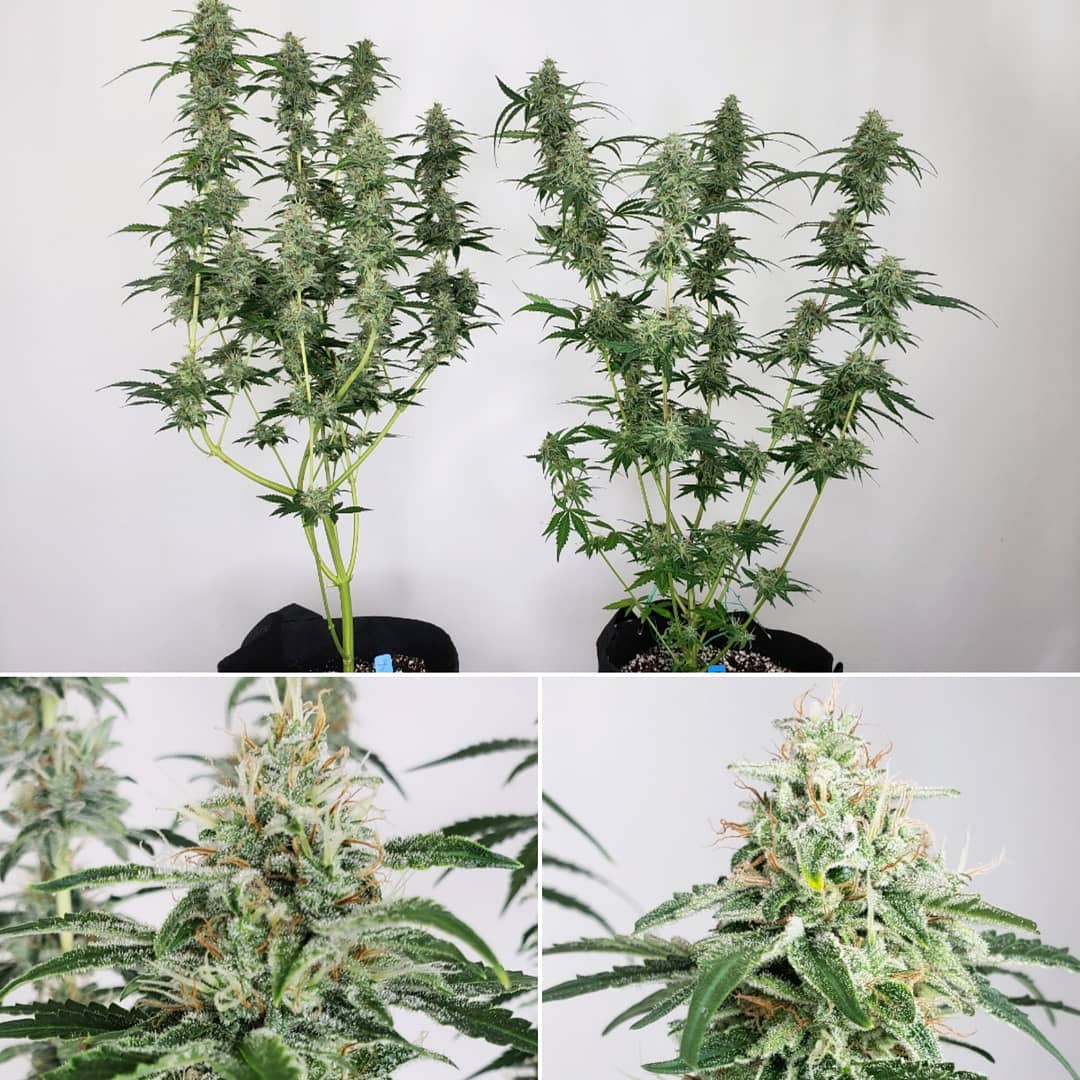
These autoflowering plants were grown from seed so there is genetic variation, but isn’t it interesting to see how differently they turned out? HPS seems to be winning overall for yields, ViparSpectra seems to be winning for smell. We won’t know about potency until after harvest!
September 24 – One more update before harvest.
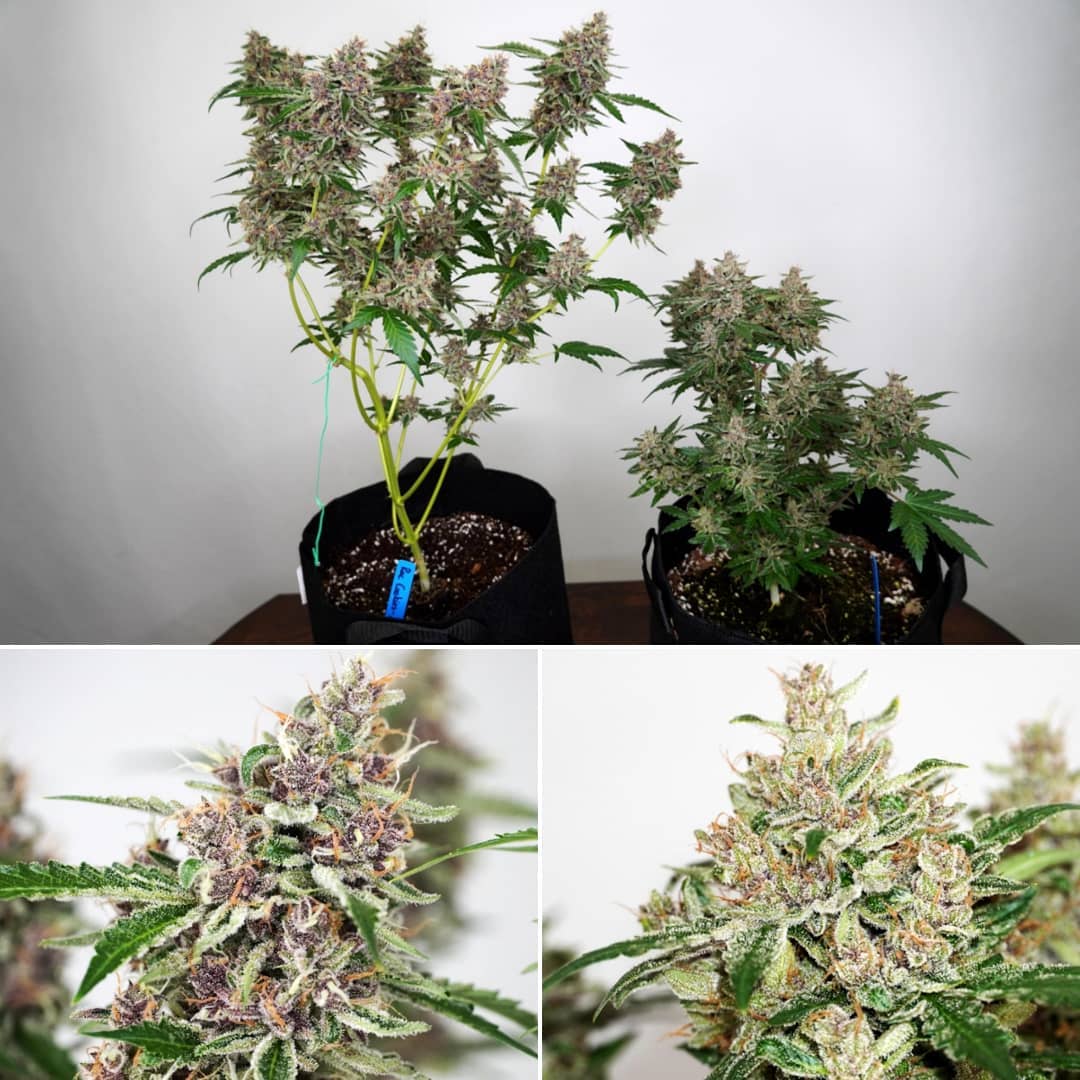
End of week 12
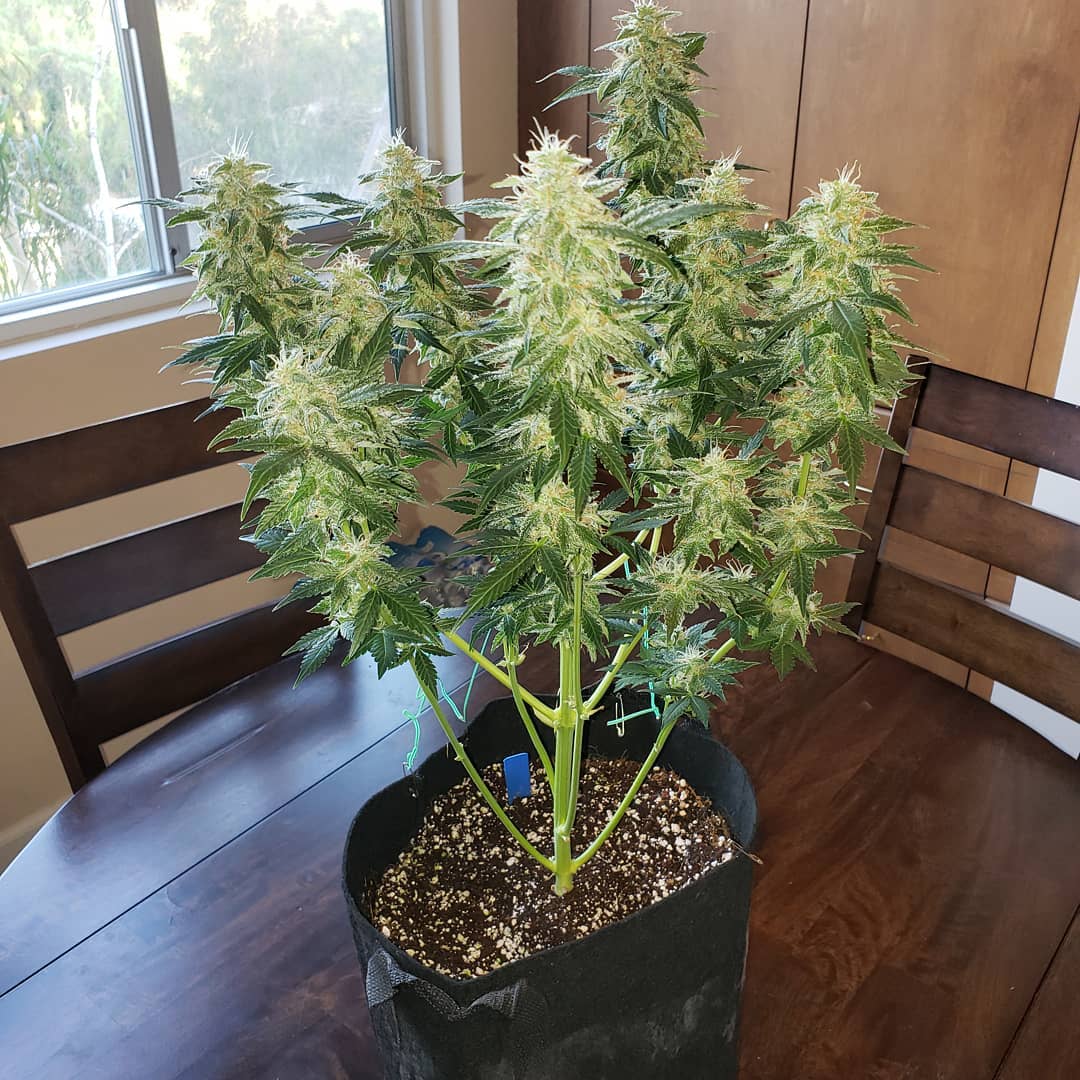
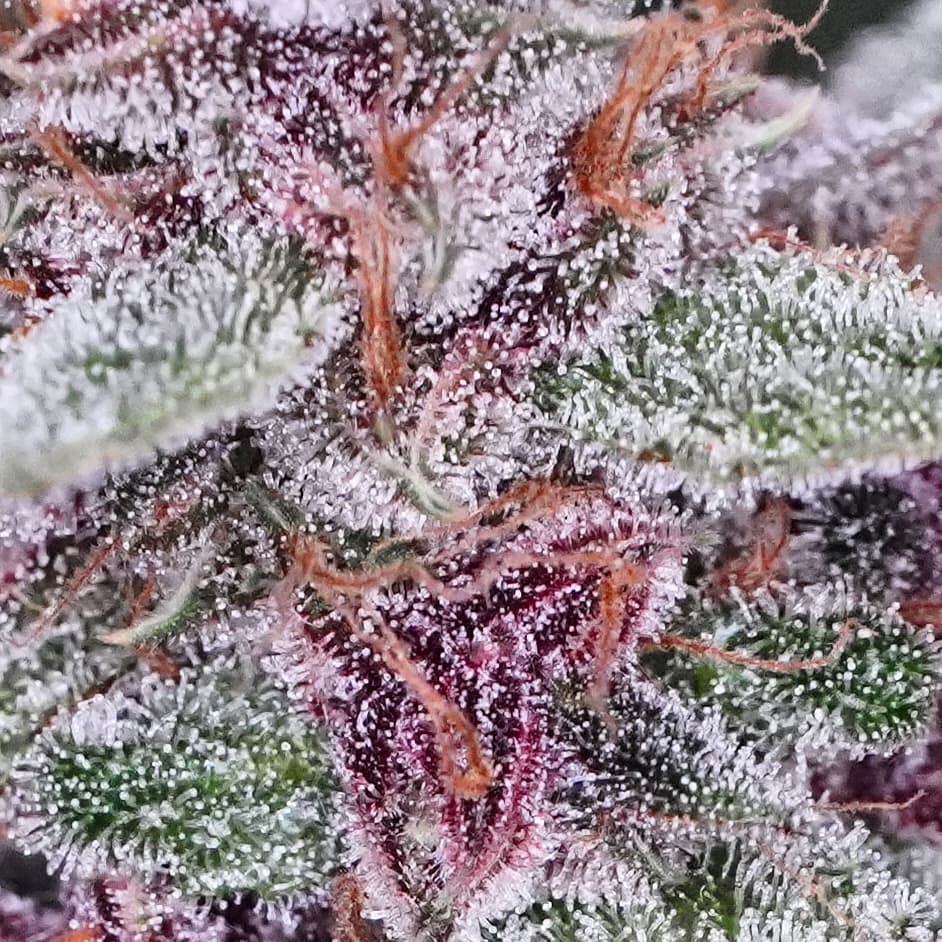
Color doesn’t have any effect on potency or bud effects, but I have to admit I’m smitten by the colorful pink-purple buds on this Purple Roc Berry plant
The top leaves are starting to get lighter since the plants have stopped getting nutrients. These plants are in coco, which is inert and doesn’t naturally have any nutrients. That means once the plants stop getting nutrients they start losing green within a week.
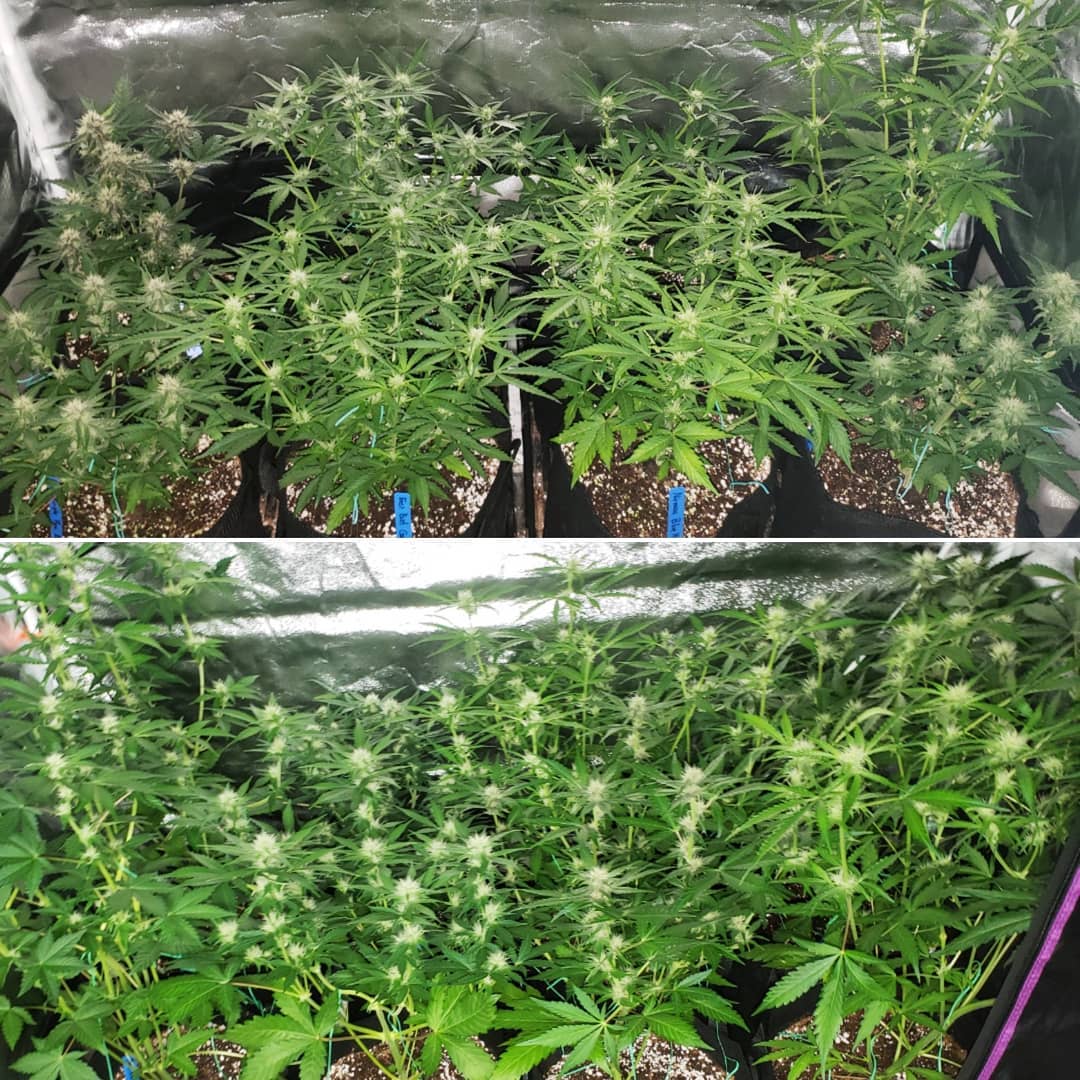
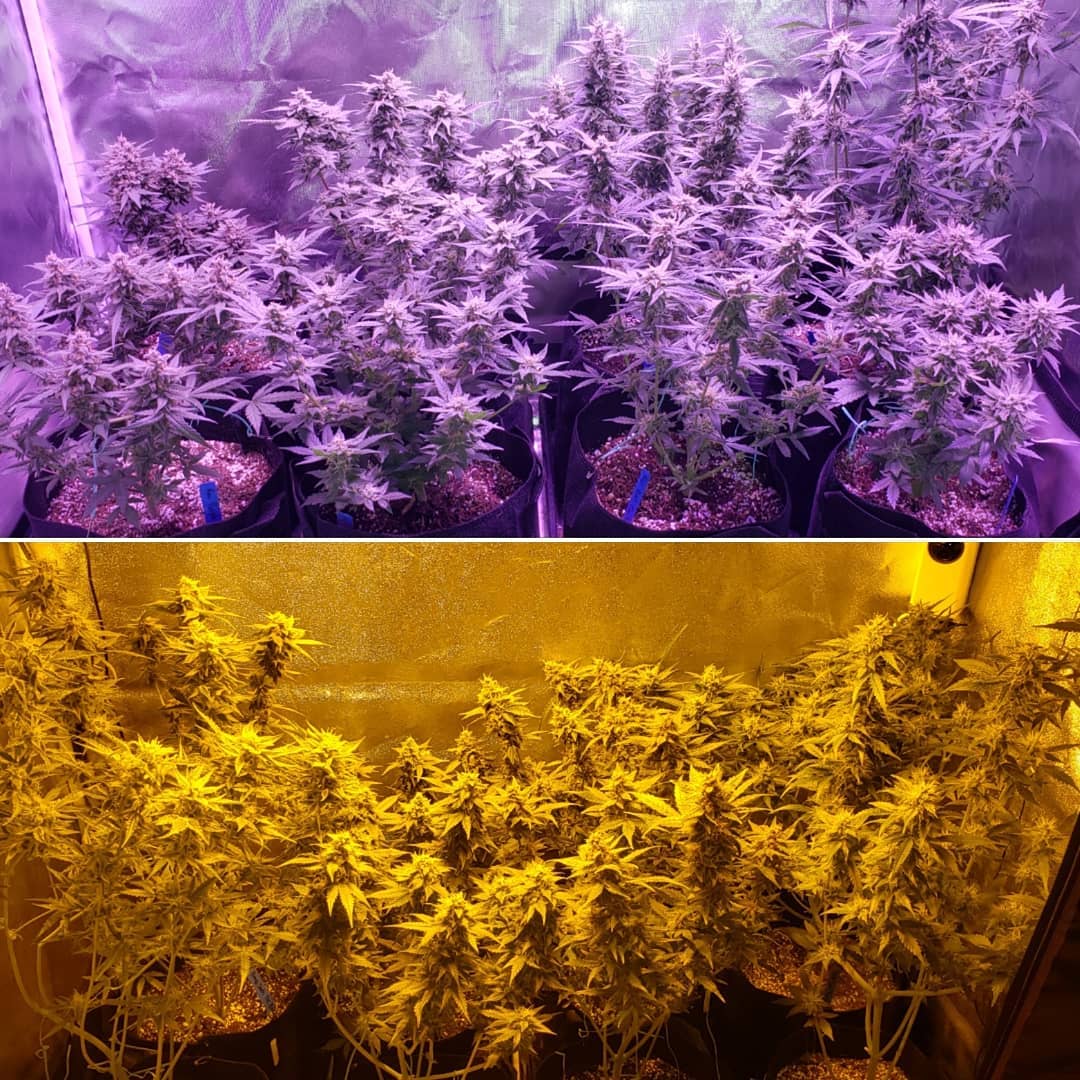
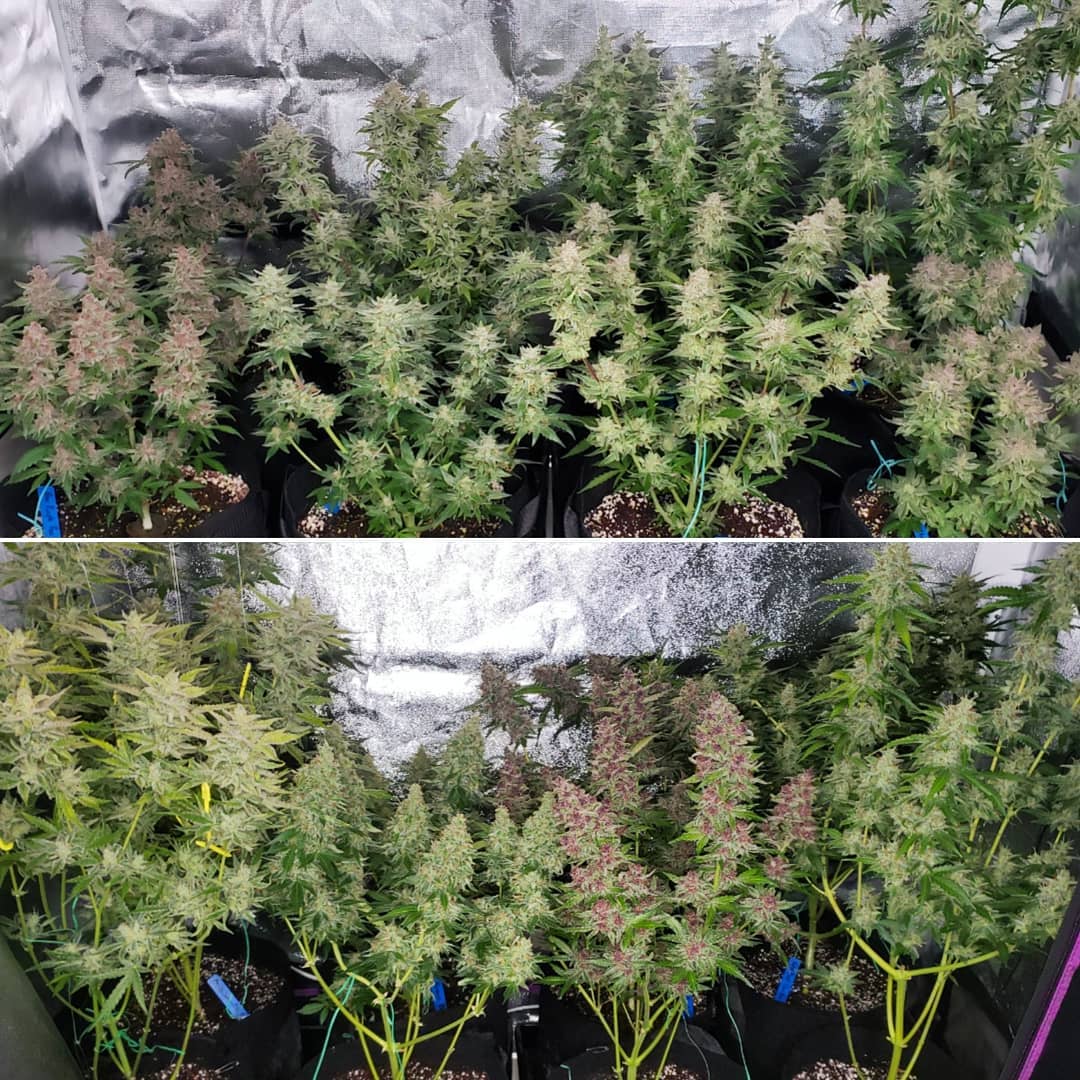
A closer look at the HPS tent
A closer look at the ViparSpectra LED tent
As harvest approaches, I’m trying to keep the humidity under 55% and the temperature between 70-79F.
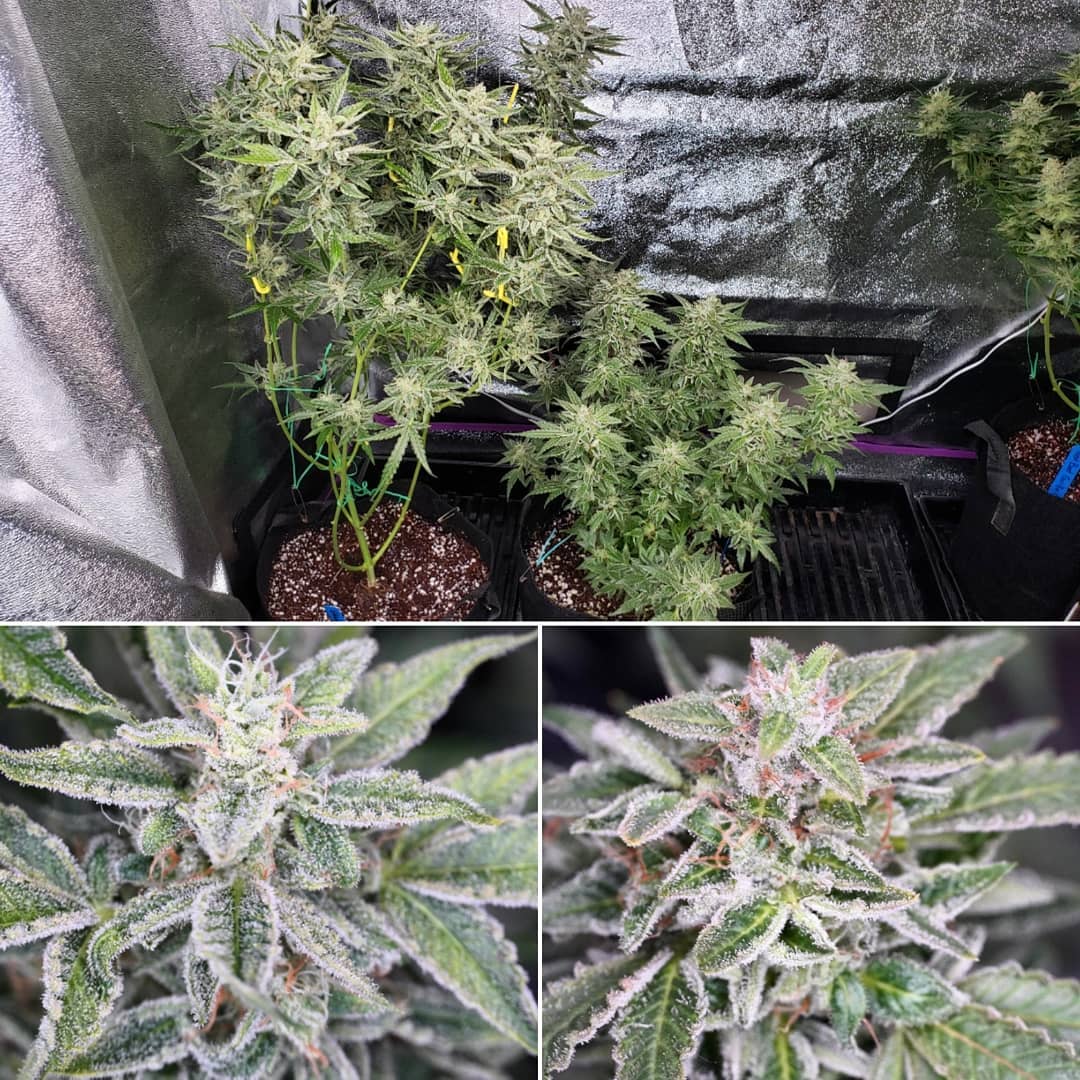
September 29 – As I mentioned before, cannabis plants often show their “autumn colors” on their top leaves when they stop getting nutrients in the water. The leaves can turn yellow, but also other fun colors like pink, red, or purple.
This little ball of buds in the LED tent “went purple” after it stopped getting nutrients before harvest

The entire garden has been getting plain water for about a week at this point. This particular plant was totally green two weeks ago, and look at it now! It’s as colorful as some of the actual “purple” strains I’m growing.
This picture shows the LED plants 5 days ago vs today. You can see how the colors have changed over just a few days. The ball of buds is the front right plant.
If you’ve been giving nutrients in the water, it’s often recommended to give just plain water for a while leading up to harvest. Some people call this “flushing” before harvest. This helps the plants use up any remaining nutrients in the plant, and the crazy colors are a side effect. If you haven’t been giving extra nutrients in the water (for example in super soil), there’s no need to “flush”. These plants are being grown in coco, which means that they start losing color quickly without nutrients in the water. You only need to flush for about a week in coco.
Do you flush your plants before harvest?
I’ve tried it both ways (flushing and not flushing), and honestly, I didn’t notice a huge difference. It may because I start reducing nutrient levels several weeks before harvest, which means there’s minimal buildup in the plant. That being said, it’s considered good practice to withhold nutrients for at least a little while before harvest, so I always do it anyway. It helps ensure buds are as smooth as possible without harshness or weird flavors.
Harvest!!!
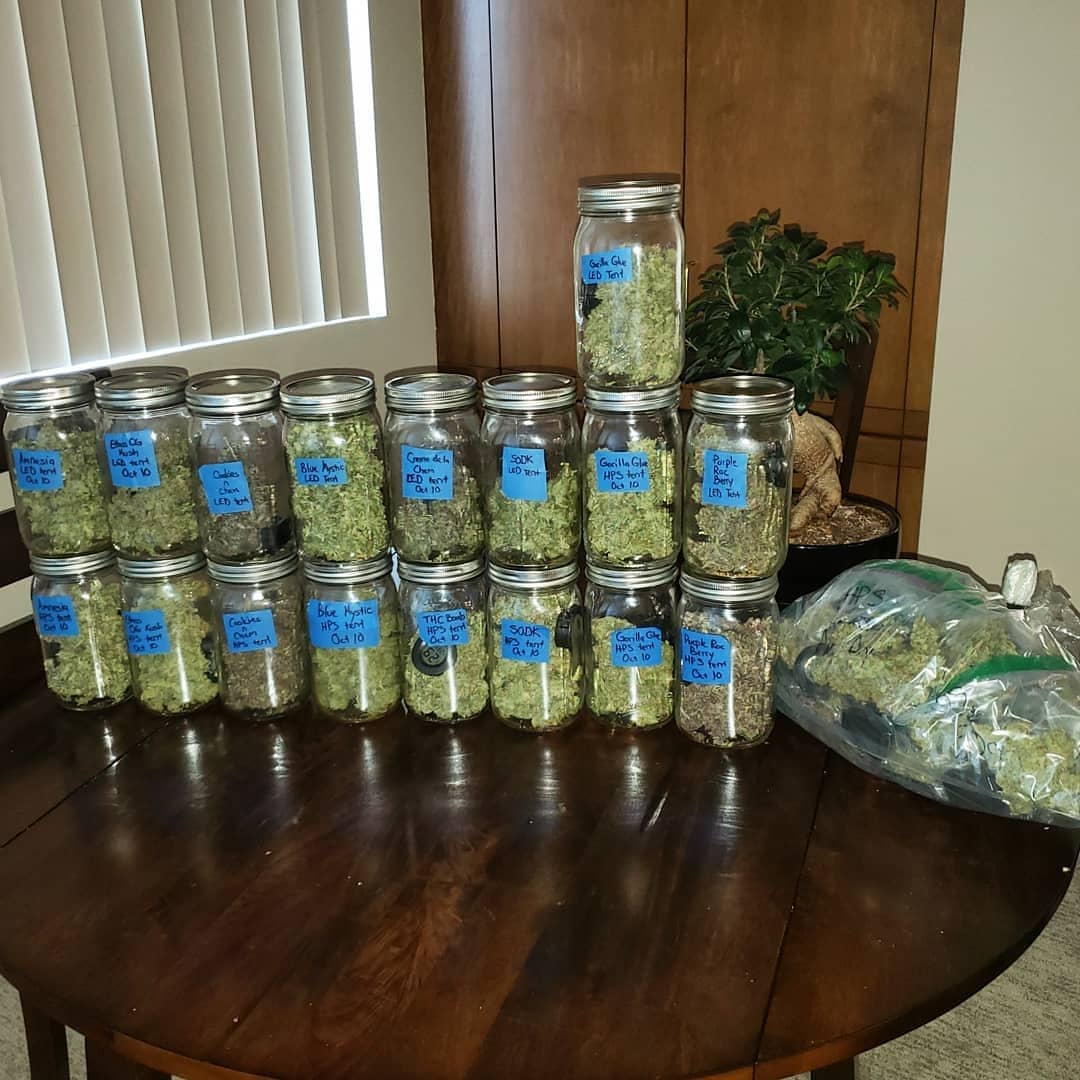
October 2, 2019 – Harvest day! These plants were harvested at 91 days from seed (or 2 months, 29 days). I’m so excited for this harvest! I can’t wait to weigh the buds, smoke them, and get the lab results.
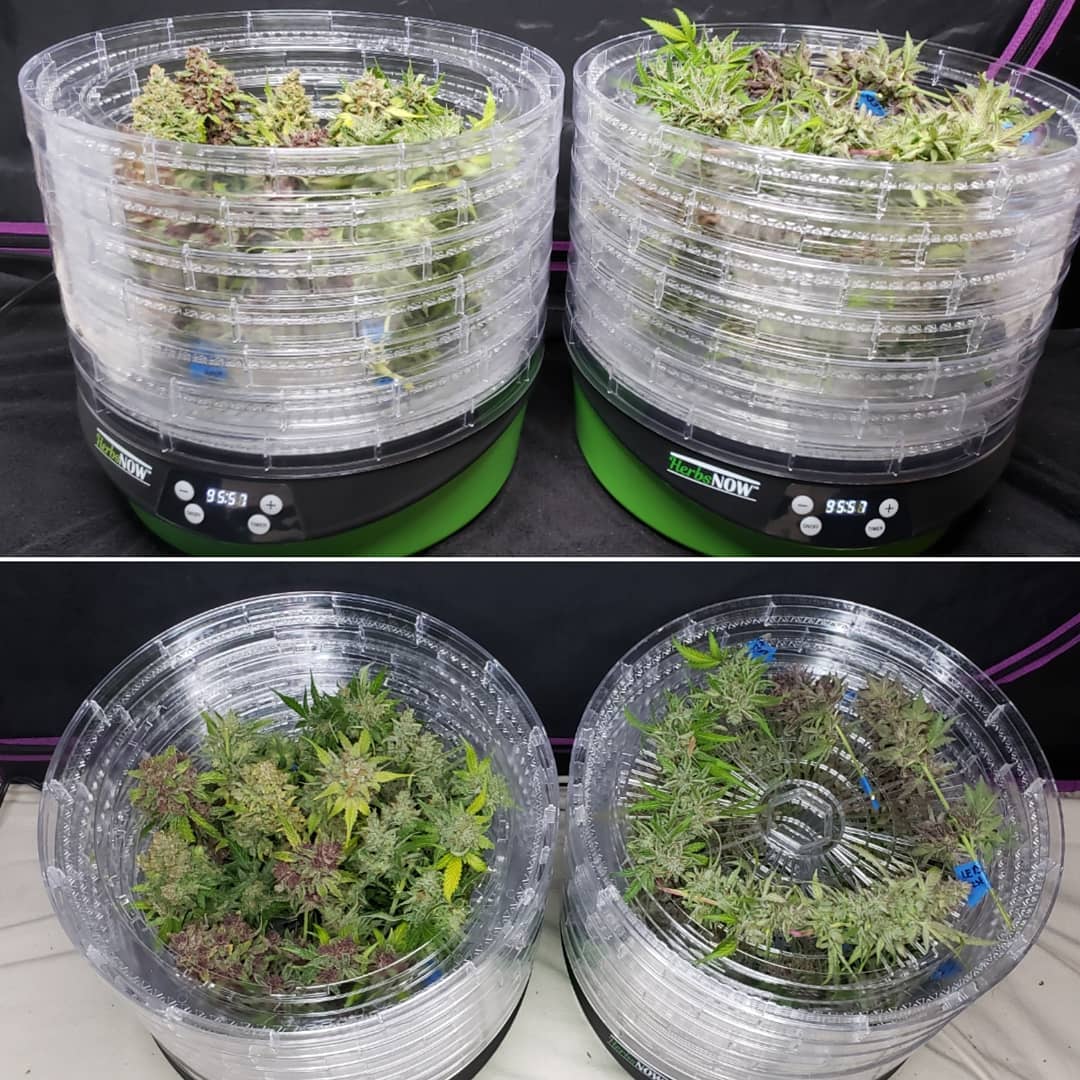
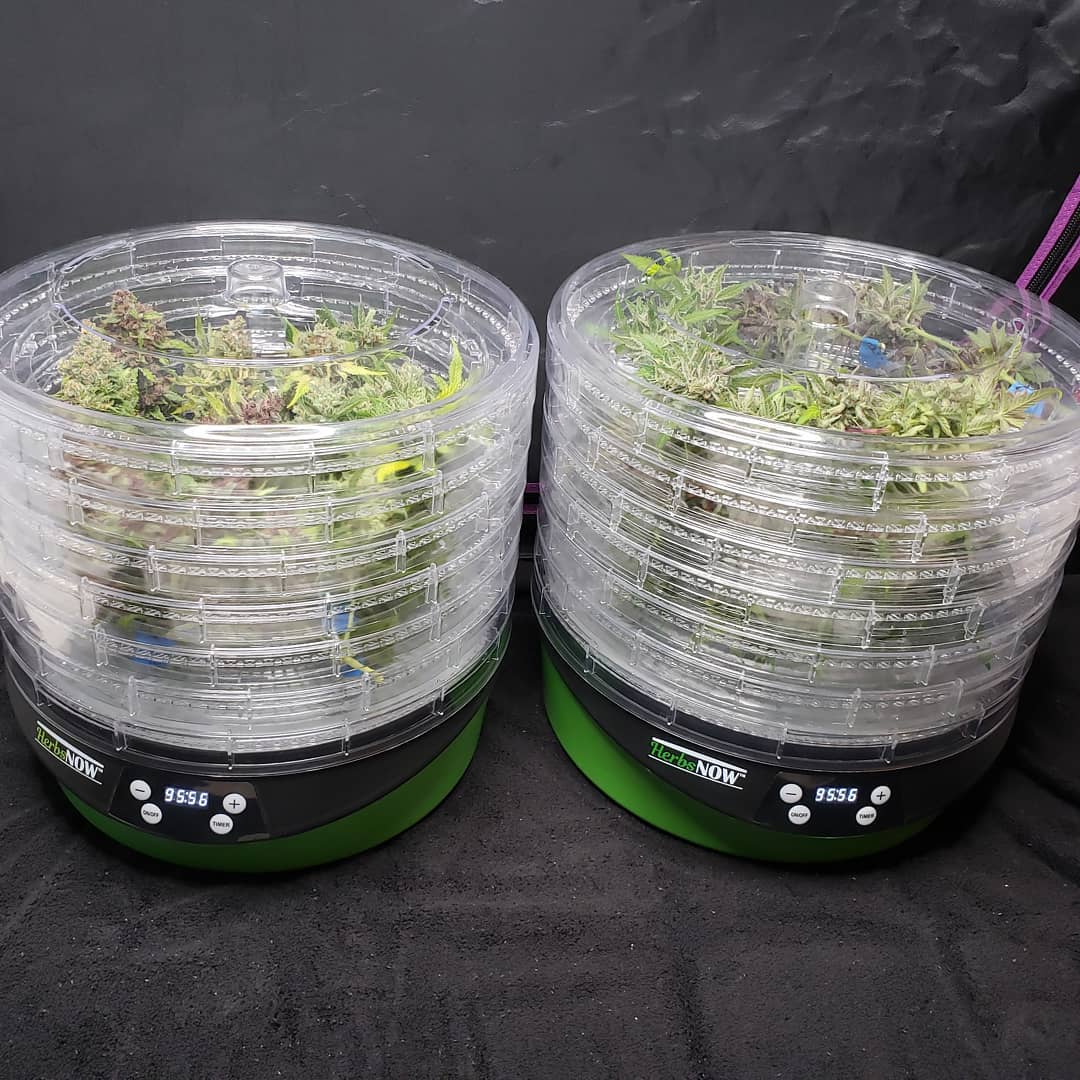
Both grow tents are full of beautiful sticky and stinky buds. It’s going to be a busy weekend. I’ll be testing out the Herbsnow dryer as well to compare how well it performs compared to air-drying. Can’t wait!
After cutting off all the branches, I hung the plants back in their respective tents.
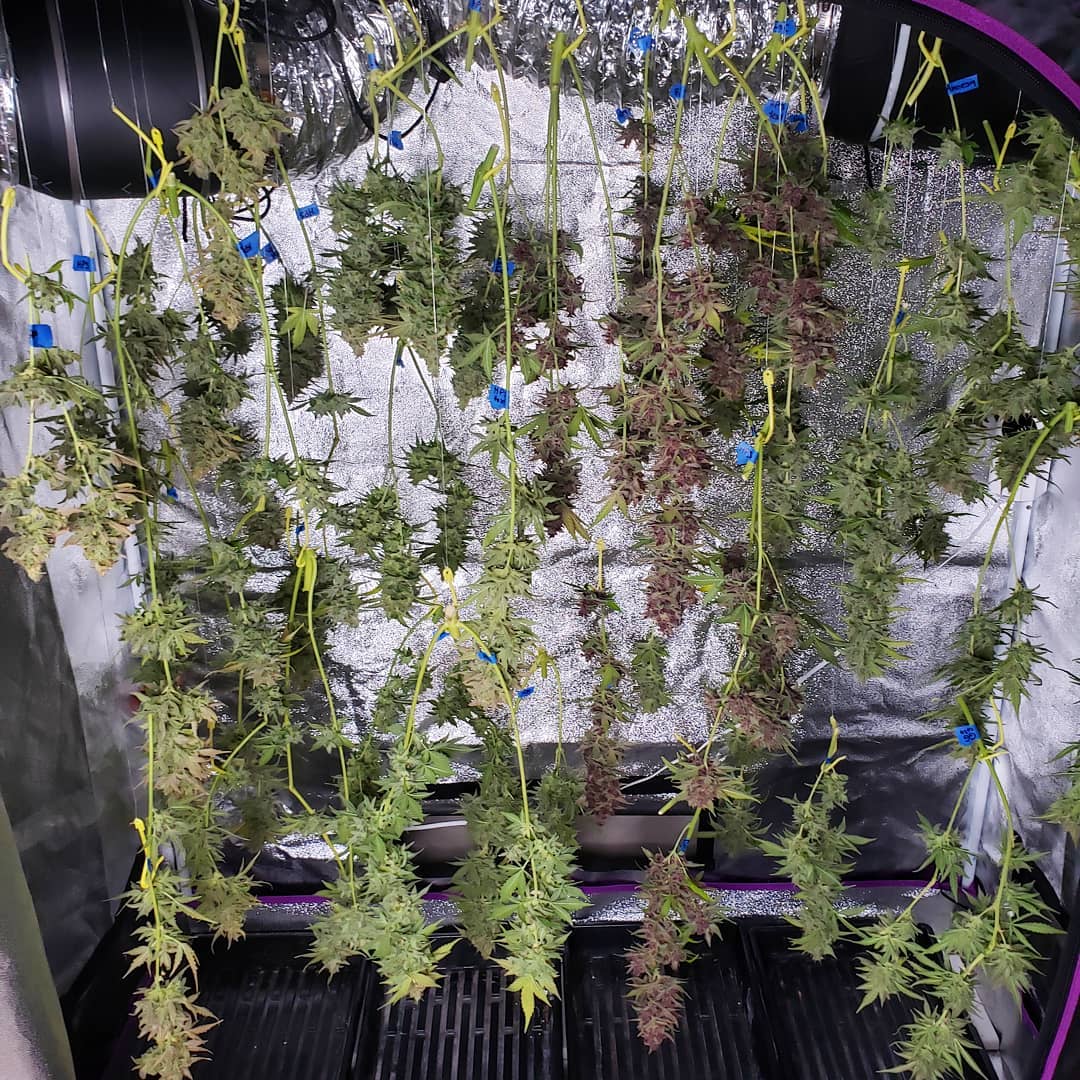
Drying in a grow tent is awesome because it gives you the ability to control the airflow and filter smells in a controlled environment.
How did I hang the plants? I strung nylon rope across the top of the tent and used plant yo-yos. I like the yo-yos for drying because they are designed to hold cannabis branches without disturbing the buds. They’re totally adjustable so you can easily make sure the buds are positioned perfectly and move them up and down as needed.
I hung the plant yo-yos from thin nylon rope that I strung across the top of the tent.
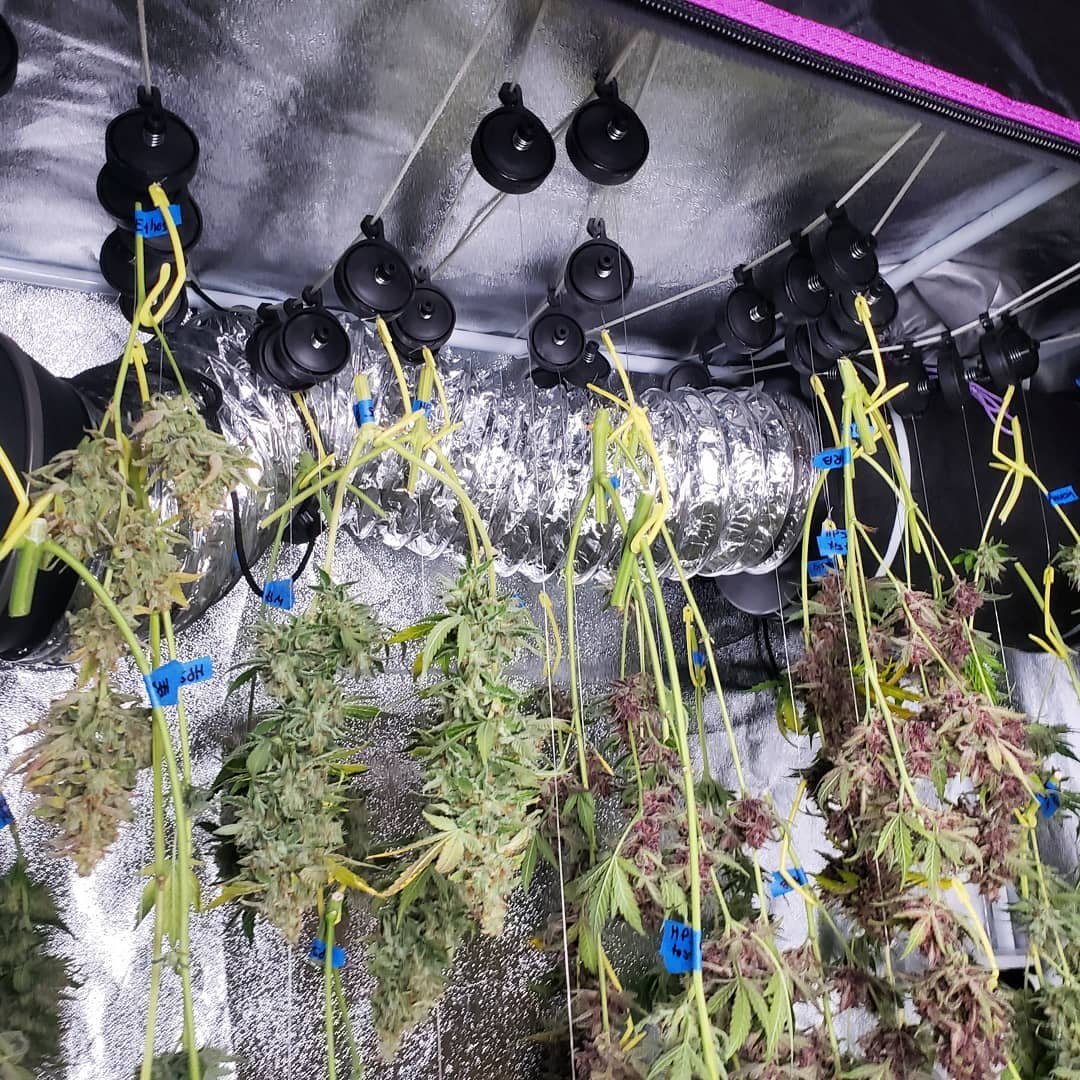
Why don’t I hang the whole plant? I cut off the branches and hang them individually to help buds dry more uniformly. Since all my plants have about 8 main bud sites, if I hang the whole plant upside down they’ll mush together and form wet spots in the middle. I want each bud to have at least a few inches of air between them so they all dry evenly and consistently.
Did I trim the buds before or after drying?
I always remove all the big fan leaves before drying. As far as further trimming the sugar leaves (small leaves on buds), it depends on the environment and the plant. Some plants can be kind of leafy around the buds. I’ll trim those ones down so the buds aren’t totally enveloped in leaves. When buds are really fat (for example when I used to manifold it created buds that were multiple inches thick), I trim those ones too to help prevent mold during drying. These days I try to grow buds that are 1-2 inches thick. It may not be quite as impressive but the bud quality is better with chunky nuggets as opposed to a giant salami, and they dry better.
If it’s humid, or if I’m stuffing a lot of buds into a small place, that’s another reason to trim the buds thoroughly before drying, because it will help prevent mold.
In optimal drying conditions, I trim after drying. The extra leaves help prevent the outsides of the buds from drying as fast and buds often seem a bit tighter/denser when they’re dried with leaves on. I also press down on buds a bit a few times after they’re jarred, and that helps tighten up any buds.
Check out our complete cannabis trimming tutorial.
I will trim these buds after they’re already dry since my drying environment is going to be totally controlled for this harvest. I have an AC and dehumidifier running in the drying room 24/7 so it’s 62-65F and about 60% humidity in the tents (optimal drying conditions are considered 60F/60% RH, but my AC only goes down to 62F). The tents have the exhaust fan on low so buds are getting gentle air circulation and all smells are being filtered.
What is the HerbsNow Dryer and how is it used?
The HerbsNow dryer is a device that is meant to dry cannabis buds evenly and well. It is basically an altered food dehydrator that runs at a very low temperature (typical dehydrators only go down to about 100F/38C while this one runs at around 80F). It is also on a 96-hour timer and buds are dried and ready to start curing in 4 days for most people.
Note: The HerbsNow only dries buds. They still need to be cured as normal.
I first heard about this dryer as a way to help growers prevent mold and hay smell while drying. That intrigued me because a LOT of growers struggle to get their buds dried exactly right, and it sucks for buds to come out poorly because of something that happened right at the end. That’s heartbreaking, yet it’s unfortunately common for growers who don’t have an optimal drying environment and can’t change it.
Yet the dryer seemed too good to be true since my experience has found high temperatures and quick-drying are some of the main causes of hay smell. How could something that uses heat and dries in 3-4 days actually prevent hay smell? It just didn’t make sense.
I bought one of the dryers last Spring just to prove that it wouldn’t work. I was willing to sacrifice my buds in the name of science. After harvest, I took two plants and dried half of each plant in the dryer and half in my grow tent. The dryer-buds were done in 3-4 days, while the air-dried ones took 9 days. I was shocked that the buds from the dryer seemed exactly the same as the buds dried in air. I couldn’t believe it. I decided to get the buds lab tested.
When I got the samples lab-tested last spring, I found the buds dried in the dryer vs the ones that were air-dried had comparable lab results. In fact, the dryer performed better in some measures!
The HerbsNow dryer dries buds in 3-4 days, but do buds come out better or worse? Last spring I tested the HerbsNow dryer on two different plants and was pleasantly surprised by the results.

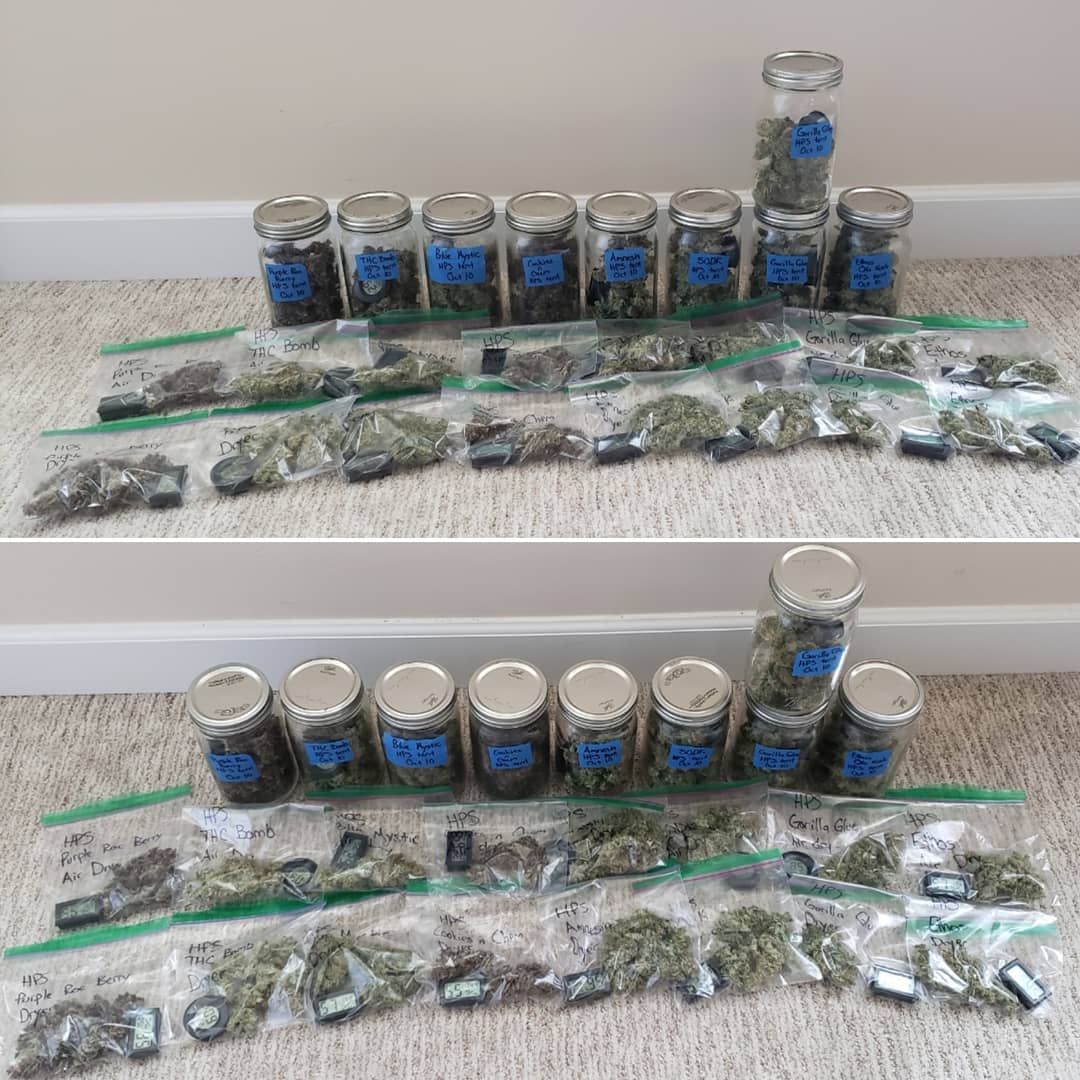
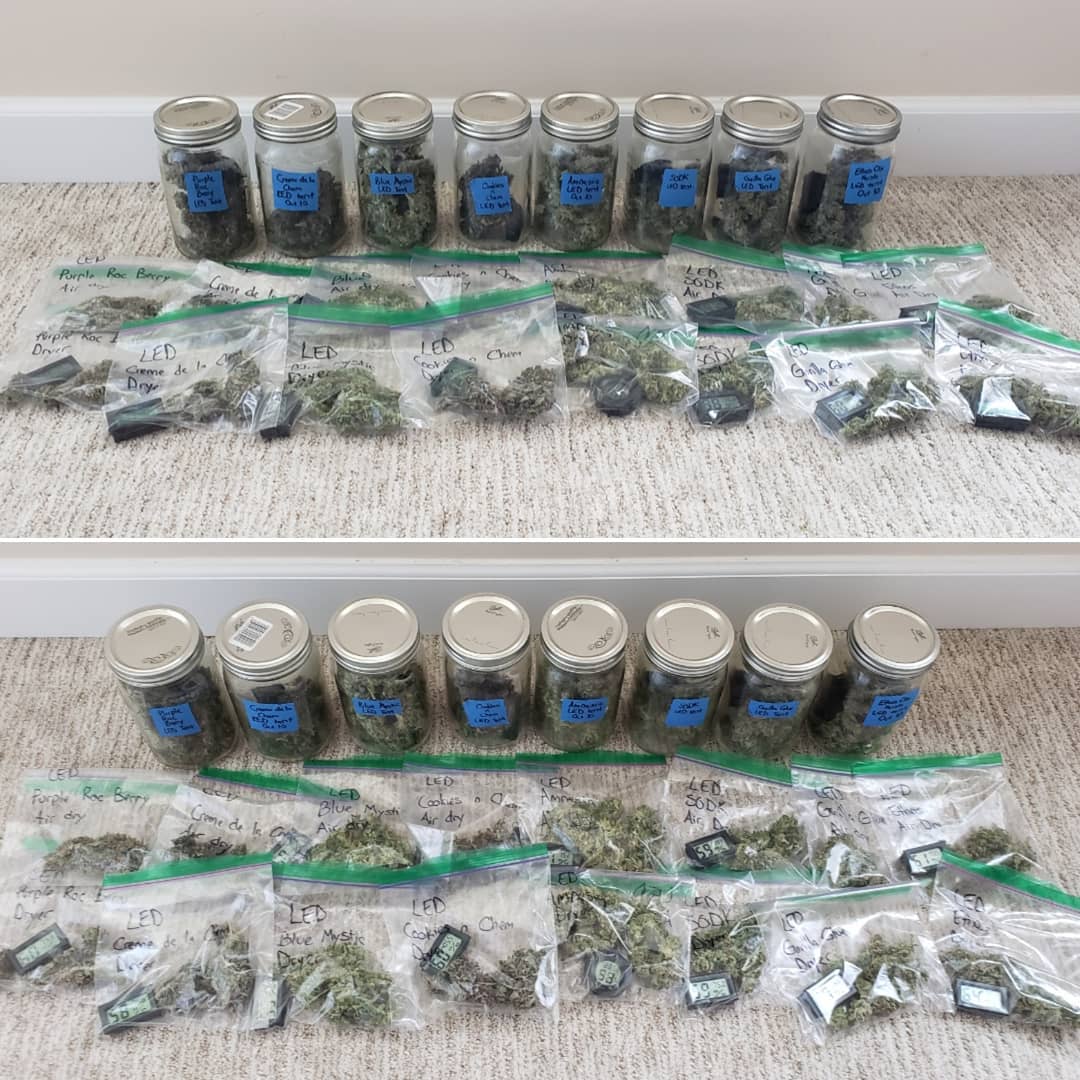
When I started this grow journal, I decided I was going to run that experiment again. Yet this time I am going to get all the buds tested for cannabinoid and terpene percentages for a much bigger sample size. For each plant, I found two matching branches that originated from the same place on the stem, with buds of similar size and appearance. I marked the “test colas” so when I get the lab tests I can make sure the samples are from the same part of each plant.
I also will do the air-drying “by the book” and completely control the environment with an AC and humidifier/dehumidifier to ensure that I’m creating a fair comparison.
The left dryer shows the buds stacked upright via the “Christmas tree method” to prevent the buds from getting flat spots. This also lets you fit more buds in the dryer. It was suggested by a reader and when I contacted the HerbsNow owner he said it works well that way. Sneak peak: After doing it both ways, I recommend the “Christmas tree method”. There’s really no downside.
I took a branch from all 16 plants and dried them in the dryer, while the rest of the plants were air-dried in an environment controlled to 62-65F and 60% RH.
Pros: the dryer works great in high humidity, prevents mold and hay smell for most people, and dries buds quicker than any other method I know of. Most growers I’ve talked to report they get comparable results to air-drying. For those who struggle with air-drying it can be a lifesaver.
Cons: Dries buds way too fast in low humidity, some growers report still getting hay smell, can over-dry buds (so you should start checking buds on day 3)
Then the dryer is turned on, it automatically sets a 96-hour timer. However, it’s a good idea to start checking on buds around day 3 to prevent overdrying.
Lab Results
There are lots of lab results to share from this grow. I’ll give you the certified analyses, an excel spreadsheet with all the data, and pictures to help you visualize the information.
- Certificate of Analysis for each sample [PDF]
- Spreadsheet of all the data so you can look through it yourself [CSV]
HPS vs LED grow tent lab results. Total harvest was about 1 pound!
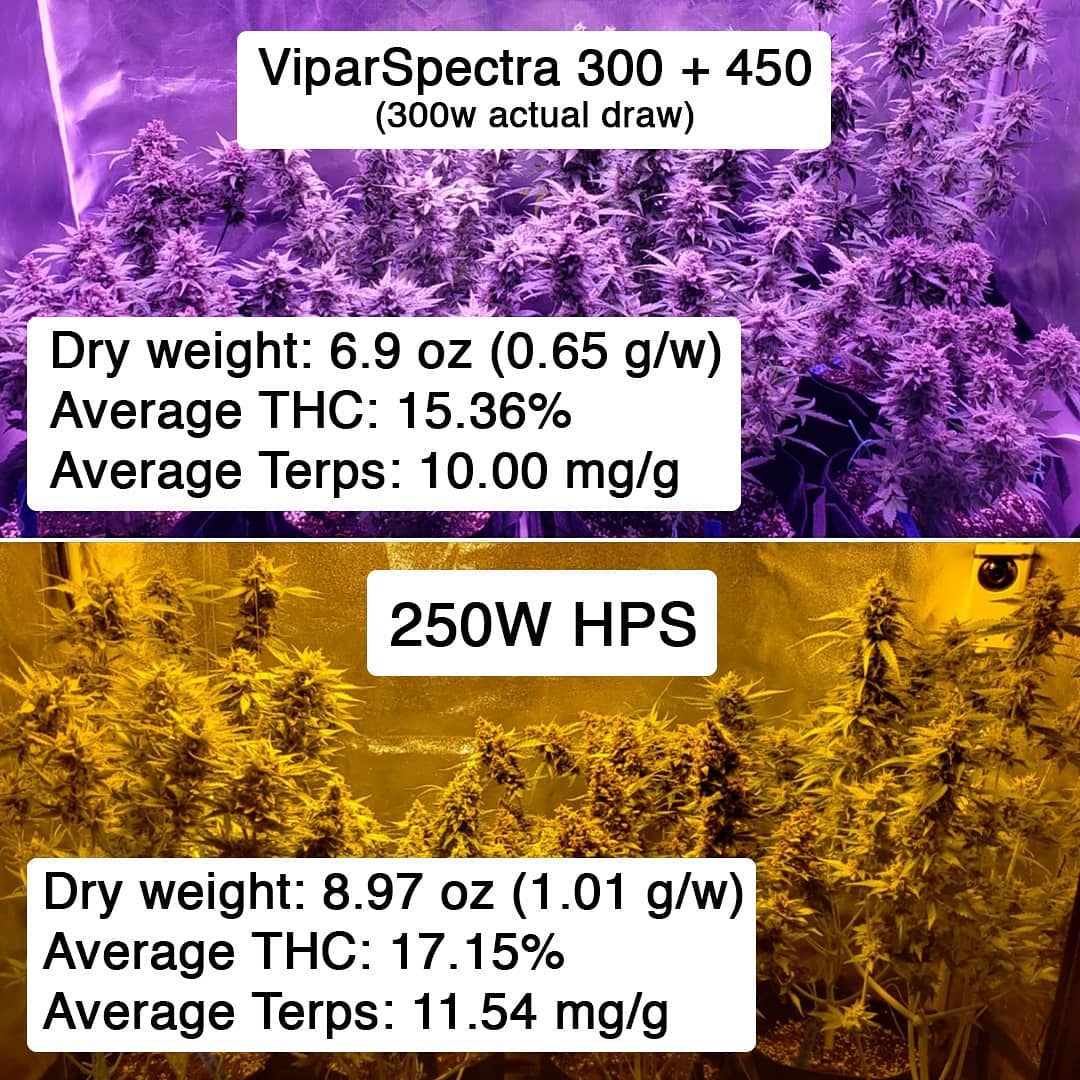 Based purely on the numbers, it really looks like the HPS won in all measures. However, not all plants followed the trends. Some of the LED plants had more weight, stronger smells or higher THC percentages. These numbers represent the average. I encourage you to download the full data above so you can see for yourself. I’ve now been smoking all the buds for several weeks. I’ll share all my thoughts on the HPS vs the ViparSpecta LEDs in the Summary below.
HerbsNow Dryer results
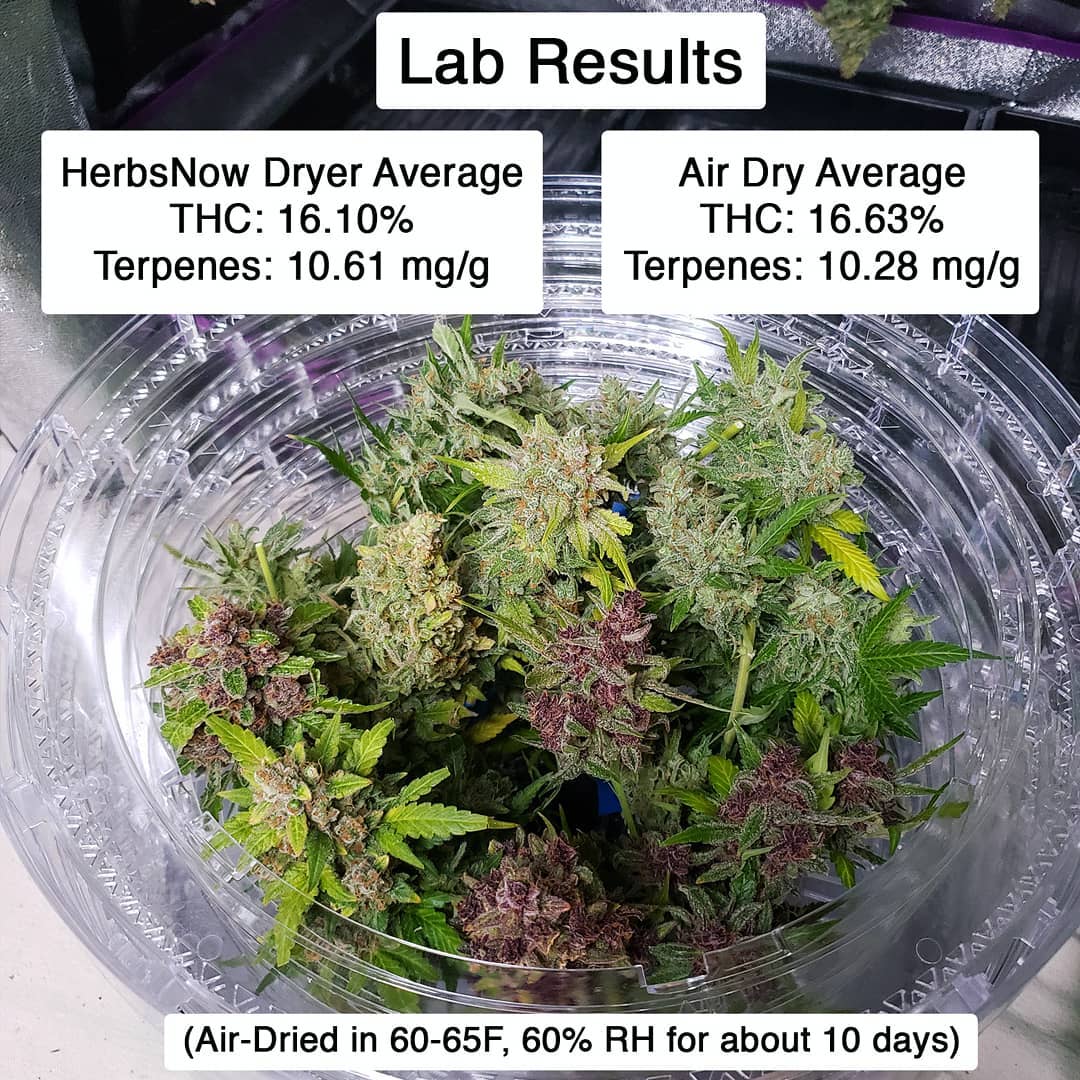
I was surprised at how similar the numbers are. Since I put so much effort into controlling the environment of the air-drying room, I felt pretty certain the air-dried buds would crush the dryer in the results this time. Yet even when I smell and smoke the buds, I can’t tell the difference.
The AC and dehumidifier used more electricity than my grow lights for over a week as buds dried, and my electricity bill is enormous just from drying. It makes me appreciate how easy and cheap the dryer is to run compared to a drying room. Some plants did better with one method, some did better with the other, but overall it averaged out to be about the same. I also like how that the dryer gives you the ability to harvest in stages, while you kind of have to harvest all the plants at once when you’re going to be controlling the environment of an entire room. Since I like to grow many different strains at a time, the flexibility to harvest just a few plants at a time would actually be really helpful.
Overall thoughts on the Herbsnow dryer from my experience and talking to other growers who’ve used it:
Positive
- Although the dryer doesn’t seem better than air-drying, it does seem to get comparable results when used as directed. At least, the differences are difficult to measure or notice.
- For growers who’ve been struggling with drying buds due to getting hay smell or mold, this may be a simple but effective solution
Negative
- Avoid the HerbsNow if your air is dry. My humidity was around 50%, which worked well, but some growers have said they get poor results using the dryer in low humidity. You can put a shot glass of water in the bottom of the dryer to add more humidity, but for growers with low humidity, consider drying buds in a cardboard box or paper bag. That will keep a humid pocket around your buds.
- The price! This machine costs $150 for just one unit that can only hold a limited amount of buds. Considering it’s basically just a food dehydrator with reduced heat, that seems like a steep markup. That being said, I’ve ordered a few cheap food dehydrators with the goal of disconnecting the heating element to see if a DIY dryer would work just as well (or better) with no heat at a reduced cost. However, I can’t seem to find a dehydrator that costs under $150 with trays that can be removed from the middle, which is a key feature of this dryer. Contact us if you have been able to DIY a dryer, or if you know of any competitors. As far as I know, the HerbsNow dryer currently doesn’t have any competition so they have a total monopoly. As a result, they can charge whatever they want. I imagine once there are more options the price will start to come down. But for now, this dryer is definitely an investment!
Tips
- Make sure to check buds around day 3 as the full 4 days can be too long and over-dry buds, especially for smaller loads. If you have a lot of buds stuffed in the machine, you may need an extra day.
- Buds are done drying when small stems snap instead of bend. At that point take the buds out and jar/cure them as usual.
- A dryer can only hold up to about 6 ounces of buds at a time (6 ounces after buds are dried, or about 24 ounces when buds are still wet). You can fit the most amount of bud by using the “Christmas tree” method of stacking buds upright instead of on their sides.
- If you’re already happy with your drying results, you probably won’t notice any positive difference with the dryer. It’s more suitable for people who are struggling with drying.
Summary of 250W HPS vs ViparSpectra LEDs
I realize I’ve included a lot of information so I want to summarize the results and my thoughts on these two lights. They’re both good grow lights that produce great bud. The HPS light was more simple to use, but the ViparSpectra lights performed really well once I figured out how to use them better!
- ViparSpectra 300 & 450 – (300W power draw) – 6.9 oz
- 250W HPS (250W power draw) – 8.97 oz
Here is the entire harvest. The bag has the 32 samples (two from each plant) that are going to the lab for testing.
250W HPS Grow Light – 8.97 oz Harvest
Positive
- This light was cheaper to buy than the ViparSpectra LEDs and yielded more grams/watt
- Plants grew green and healthy under this lamp. It seemed like nothing could stress them out
- A 250W HPS can be kept as close as 12″ away which makes it suitable for shorter spaces
- Buds were more colorful and had higher potency (at least according to the lab; they seem about the same when smoking)
Negative
- HPS caused long, lanky, stretchy growth in the vegetative stage. I recommend using an MH bulb for the vegetative stage and switching to the HPS bulb only after plants start flowering (most lamps that can do one can do both). An MH bulb in the vegetative stage will cause plants to stay shorter and bushier.
- Since the HPS is kept so close to the plants, it’s easy for a hood/reflector to cut off the light from the sides. That’s why I tried a few different reflectors over the course of this grow. In the end, I found a cheap wing reflector actually got the most light to the most parts of the tent, because it allows every plant to have a direct line of sight to the bulb
- Although this small-sized HPS doesn’t put off a lot of heat overall (it stayed around 76F in the HPS tent during the day), the bulbs get extremely hot. You will definitely need to be careful not to touch the bulb or it will burn you.
250W HPS harvest with all the samples
ViparSpectra LEDs – 6.9 oz Harvest
Positive
- I have never used ViparSpectra LEDs before and I learned a lot during this grow. I think I would get better yields if I grew with the ViparSpectras again. I included the tips below that I wish I’d know when I started!
- They spread out heat evenly through the tent. Unlike the HPS, the lamps have built-in heat sinks and fans, which means the fixtures run cool enough to touch.
- Produces high-quality nugs that are smooth and smell amazing
Negative
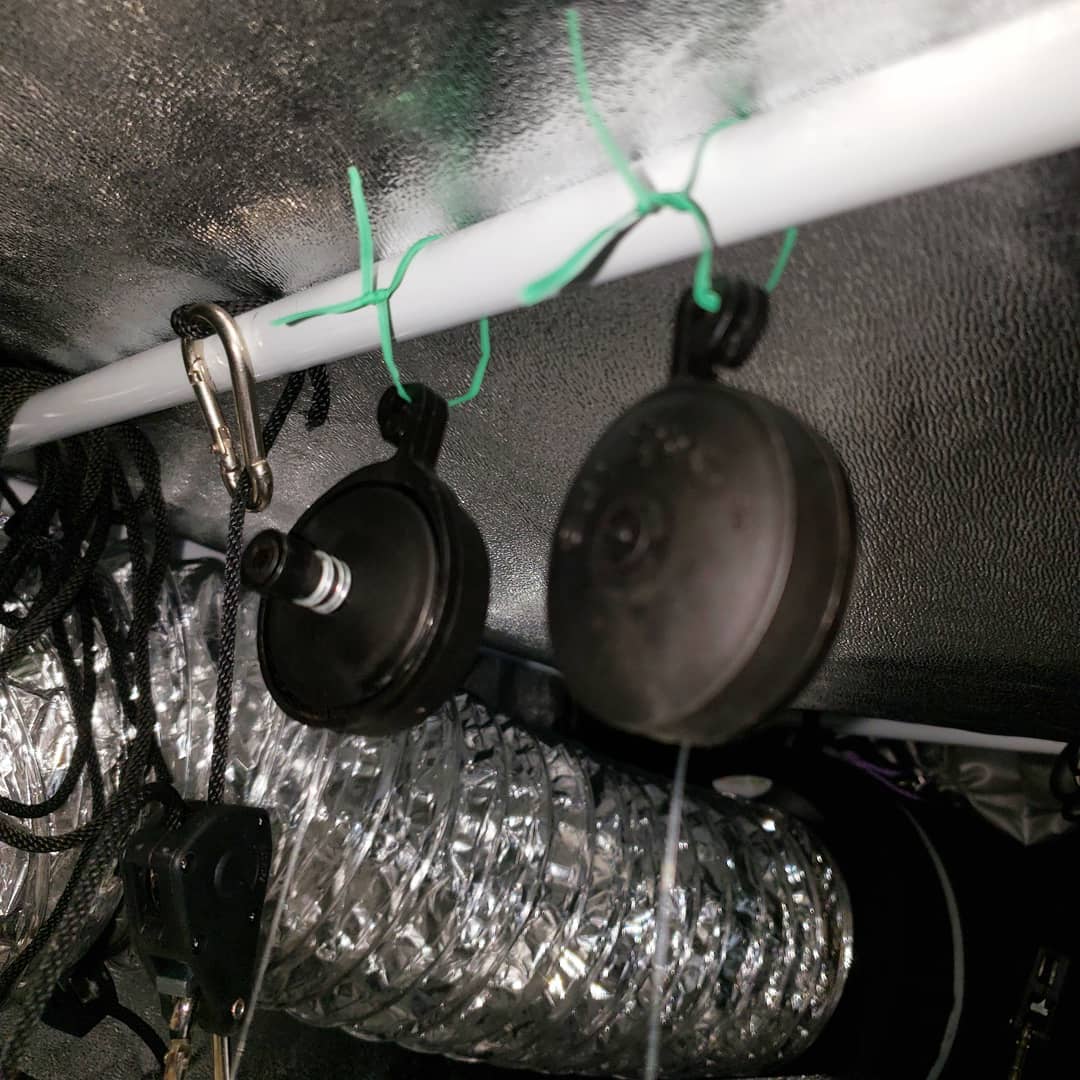
- The hangers that come with the ViparSpectra LEDs are barely usable. I don’t know how they think they’re acceptable lol. I highly recommend making your own hanging apparatus
- It can be difficult to determine the best distance to keep grow lights from plants, as each plant seems to react to the lights a little differently. I included some hints below.
Tips I’ve learned about the ViparSpectra LEDs
- try to keep lights as close as you can, but move them further if you see signs of stress (yellowing, brown spots, leaf edges tipping up) near the LEDs
- start at 18″ away
- move lamp to 24-30″ away from plants if you’re seeing signs of stress close to the lights
- then slowly lower the lamp back down to 18-24″ over several days and watch how plants react
- rotate the plants regularly if possible
- angle the lamps so the light comes a little from the side as opposed to directly from above
- use one bigger lamp instead of two smaller lamps to reduce interaction between the lights
ViparSpectra LED harvest with samples
Which grow light is best?
It’s impossible to say which one is best since that is a subjective opinion. These lights are very different from each other and are used differently. However, given these results, I think most first-time growers would be happier with the 250W HPS. Especially since the 250W HPS is easier to use, you can spend more time paying attention to your plants and less time worrying about the grow light.
That being said, I think most growers on a small budget would be happy with either light!
What’s your favorite cheap grow light? Contact us and let us know!
Jump to…
- How to Start Growing Weed
- 10-Step Beginner Grow Guide
- Examples of full setups with different types of grow light
- How to grow up to 1 pound with a 315W LEC grow light <– My favorite type of grow light!