by Nebula Haze
Table of Contents
Intro: When to Harvest Cannabis Buds
- Time your cannabis harvest so buds have high THC and the best smell.
- Quick overview and get your optional supplies.
1st Harvest Method: “Pistil Method”
- Compare your buds to pictures.
- Look at the hairs (“pistils”) on buds.
- Harvest when most hairs curl in.
2nd Harvest Method: “Trichome Method”
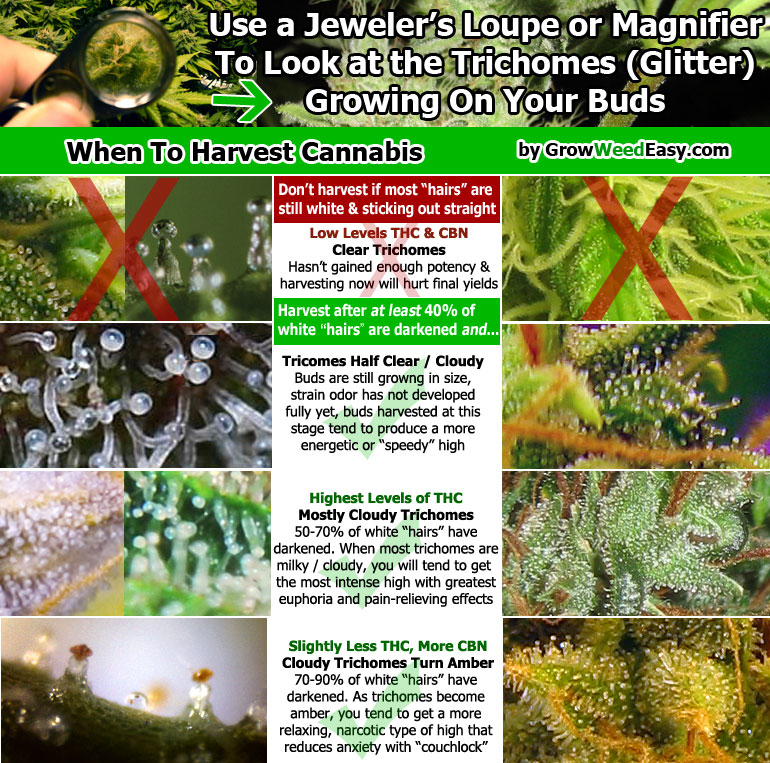
Look at the color of trichome heads on buds…
- Clear – Clear trichome heads are not potent yet.
- White – White trichome heads are at max potency.
- Amber – Yellow/gold trichome heads are losing potency.
- Purple – Purple trichome heads don’t say much about potency.
7-Point Cheat Sheet: Cannabis Harvest Timing Tips & Hints
- Follow our cannabis harvest cheat sheet to ensure your best harvest.
Note: Looking for other growing weed harvest content? Contact GrowWeedEasy.com and tell us what cannabis harvest tutorials or harvest questions you want us to cover.
Get our complete harvest system.
This harvest tutorial is part of our “how to harvest cannabis” series:
Flushing > Harvest > Trimming > Drying & Curing
Intro: When to Harvest Cannabis (for highest potency and best smell)
When should we harvest the buds from a cannabis plant? That is the eternal question… I’m sure the answer we’re all thinking is “Not soon enough!”
(How far are your plants in the flowering stage? Check out the flowering stage timeline!)
Unfortunately for us impatient marijuana growers, harvesting at the right time is just as important as how you grow the plant. Harvest too soon and you lose potency, smell, density, and cannabis yields; too late and you can end up making a batch of sleep medicine.
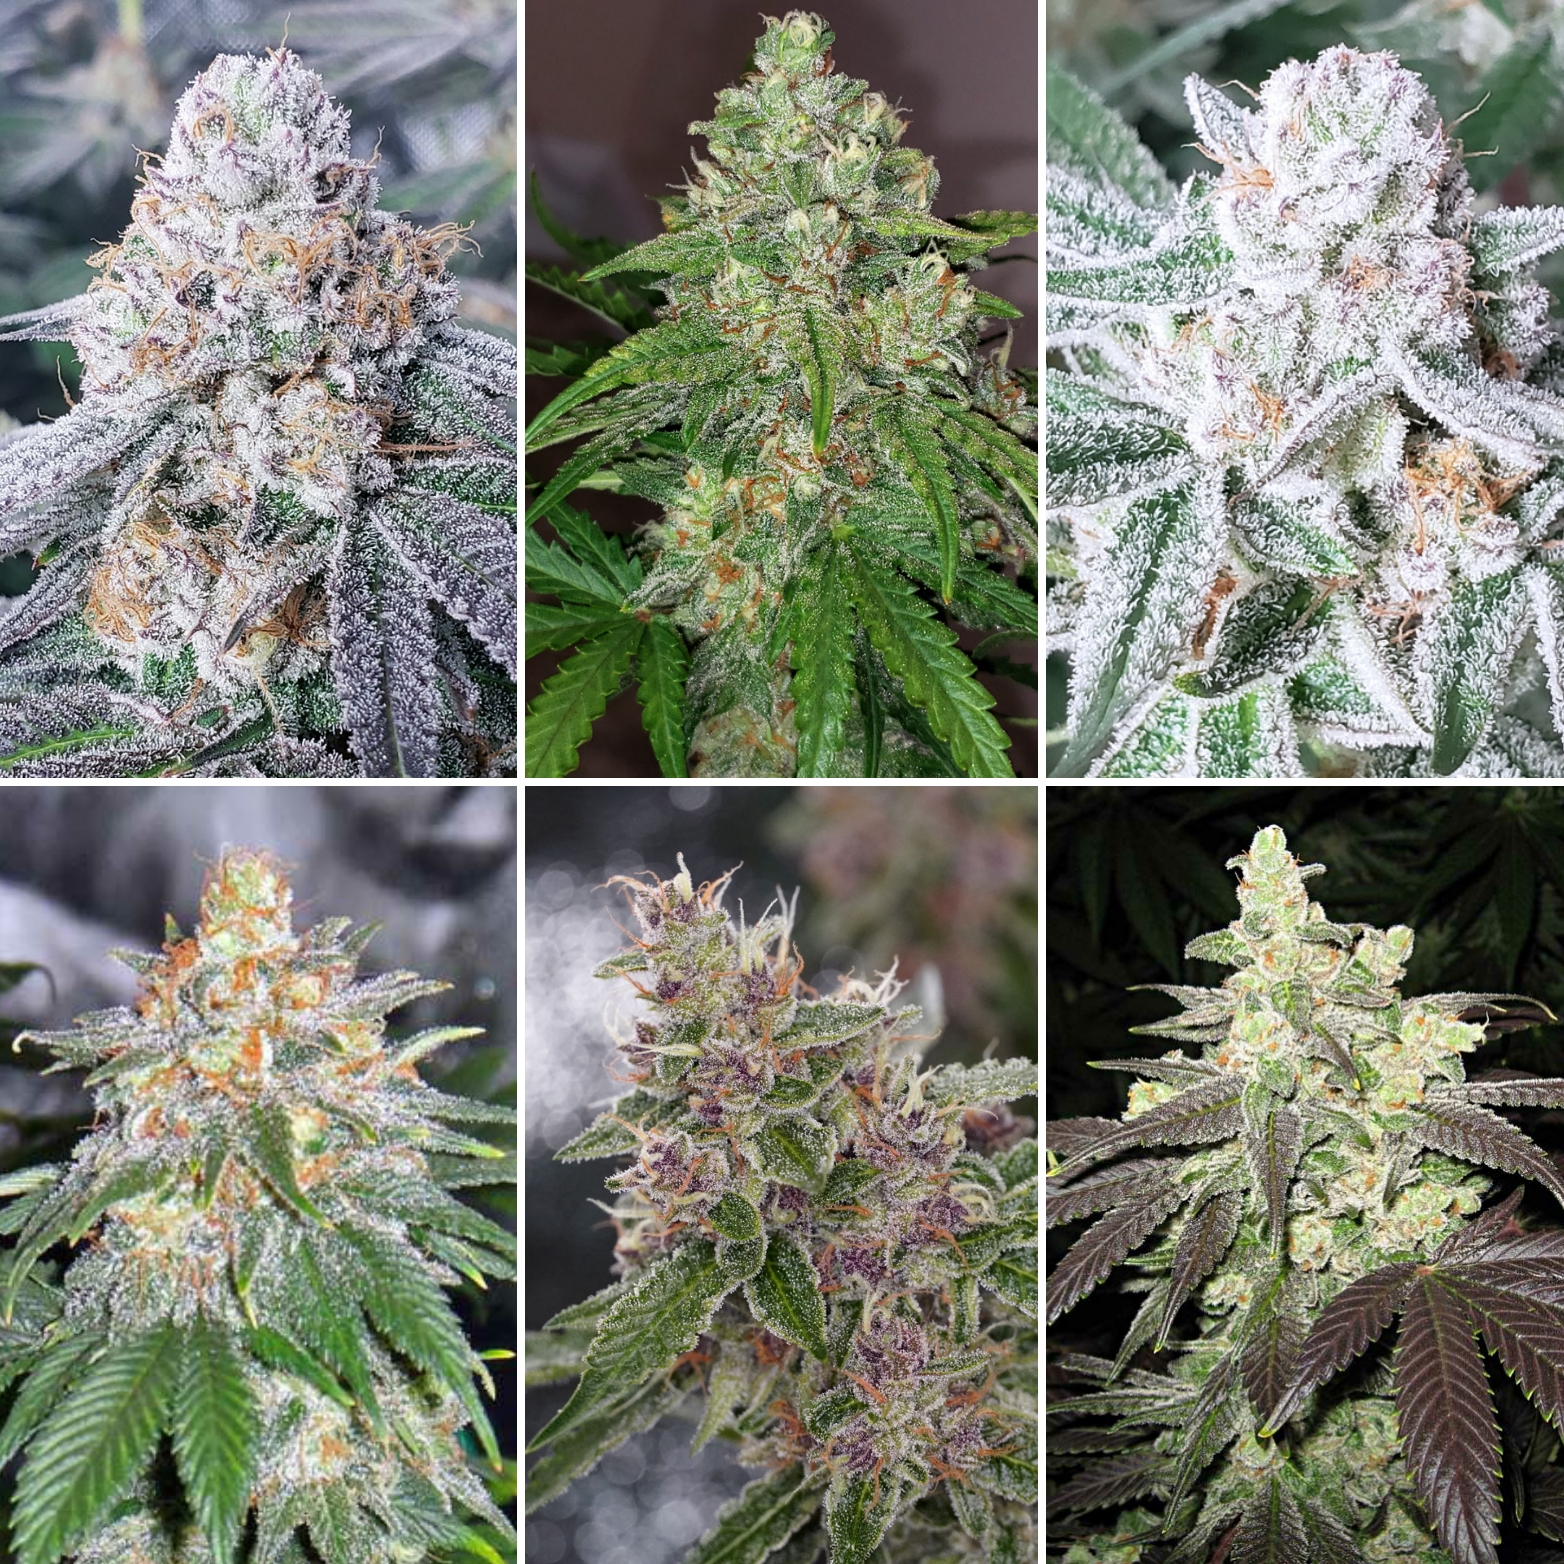
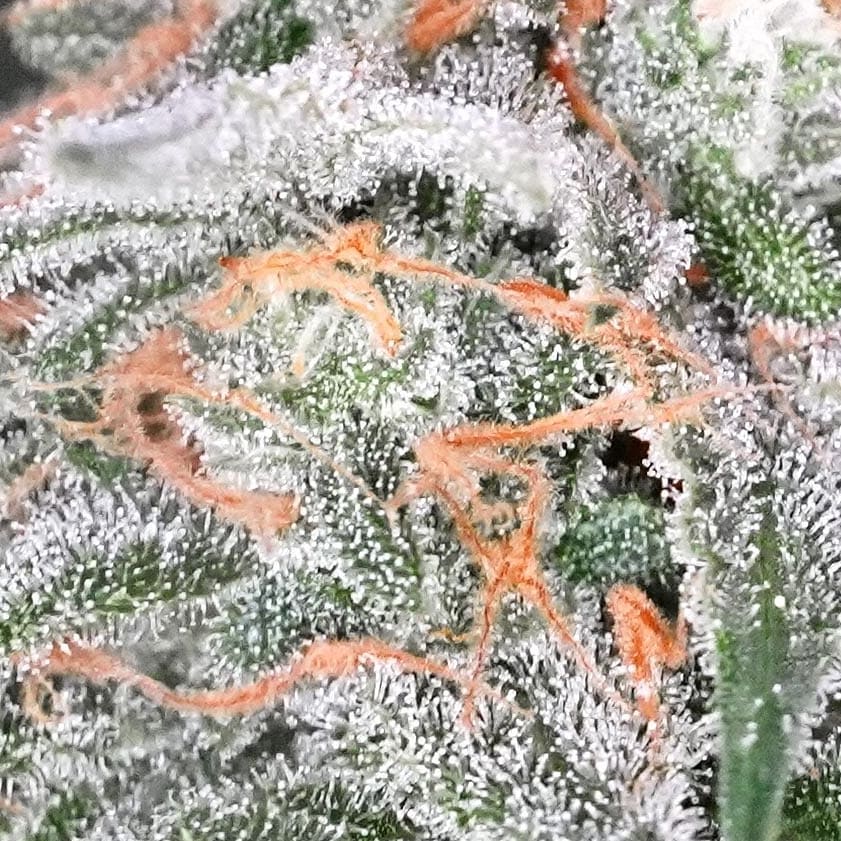
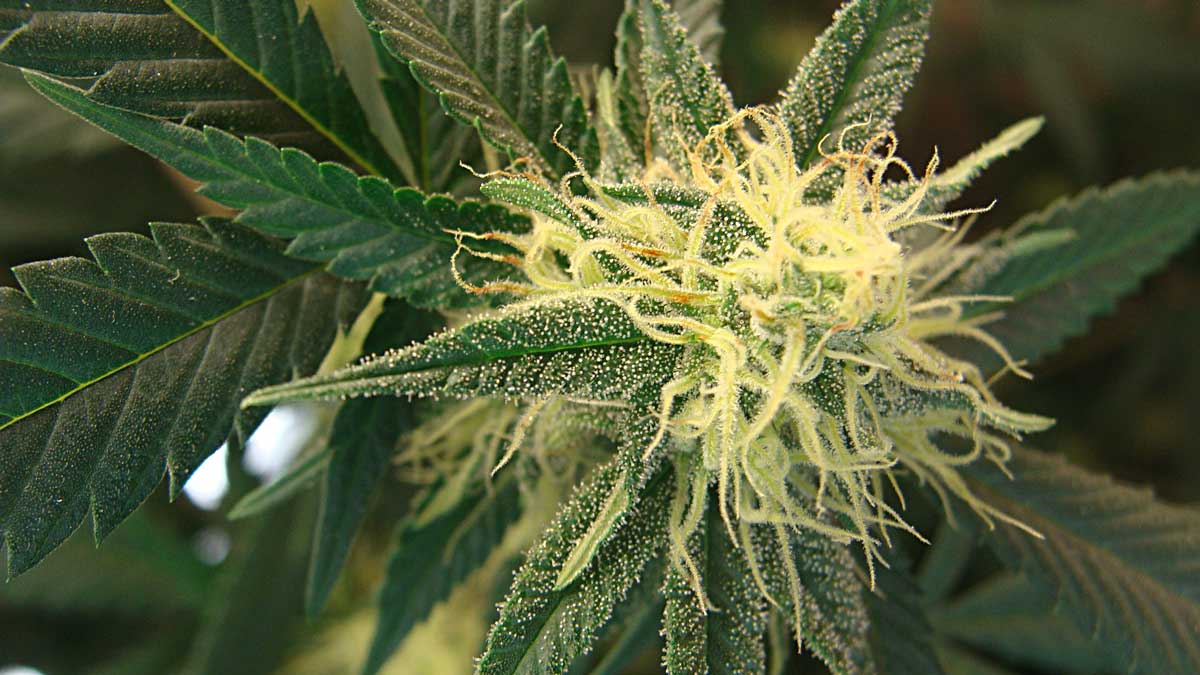
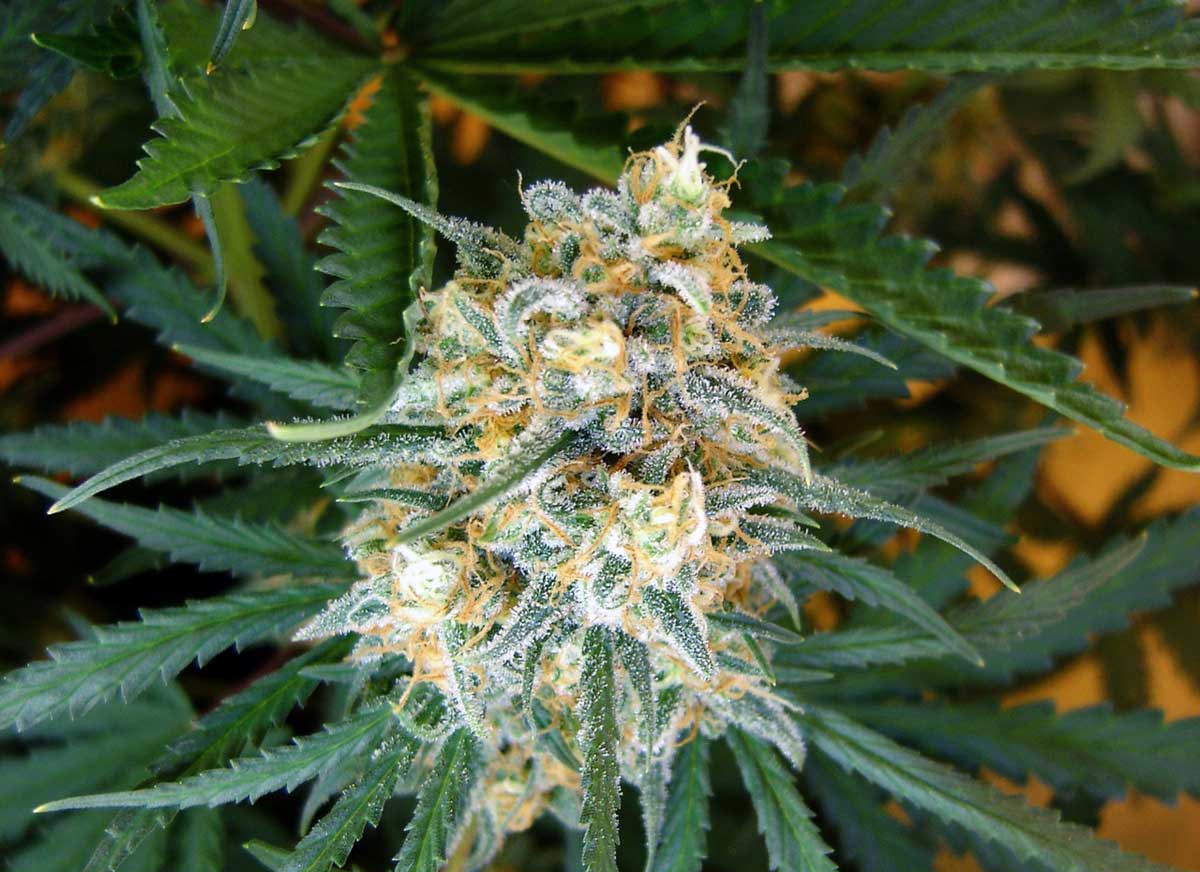
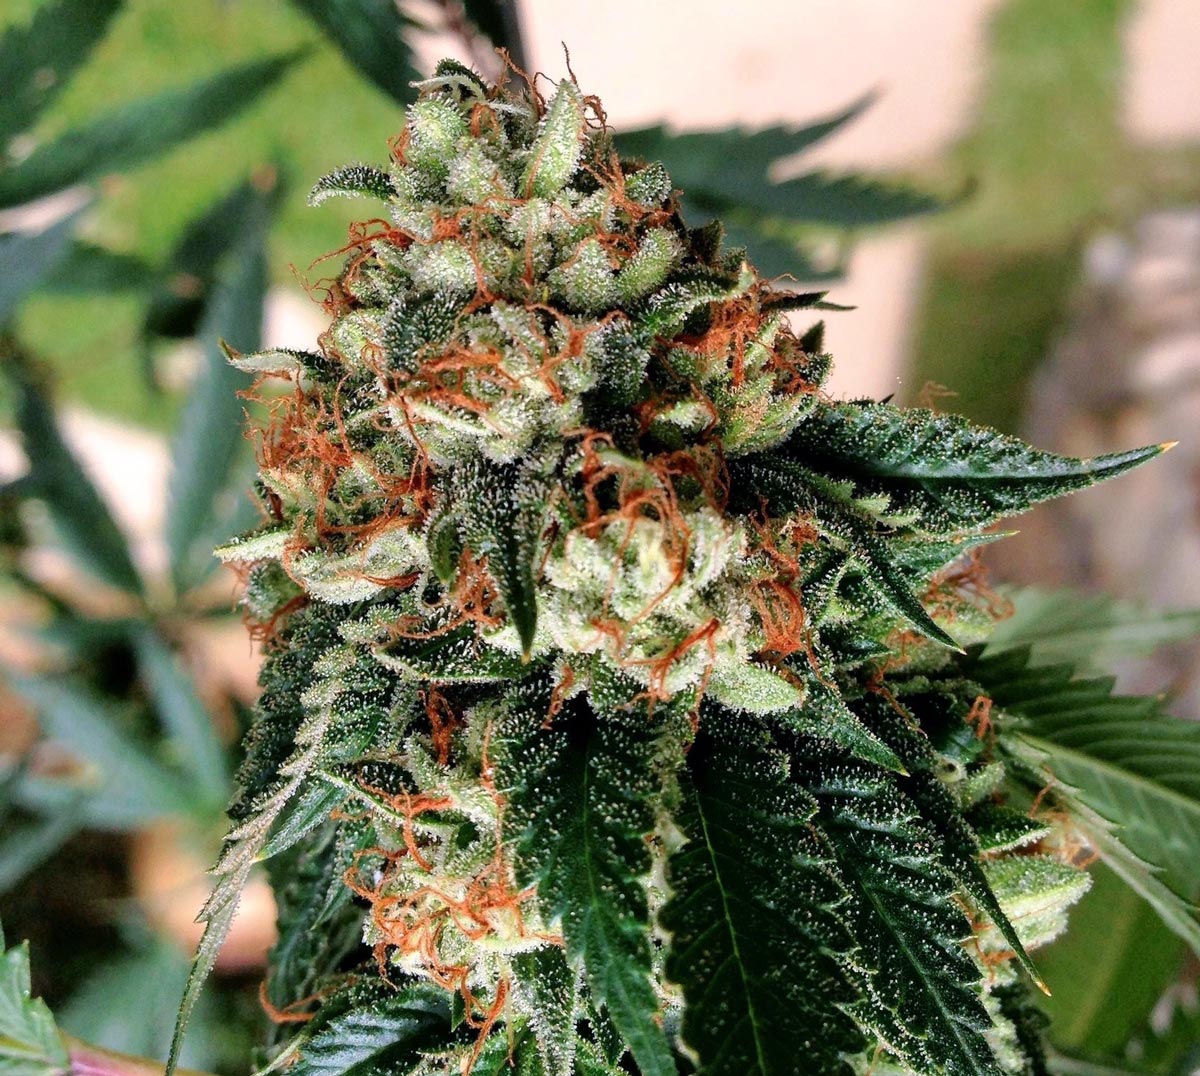
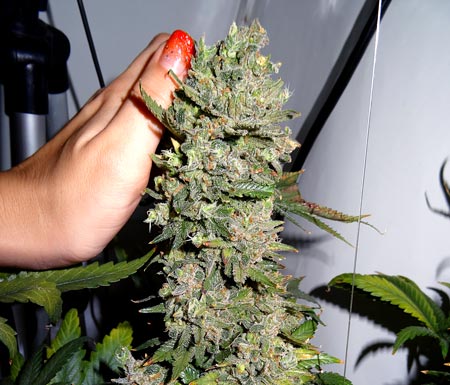
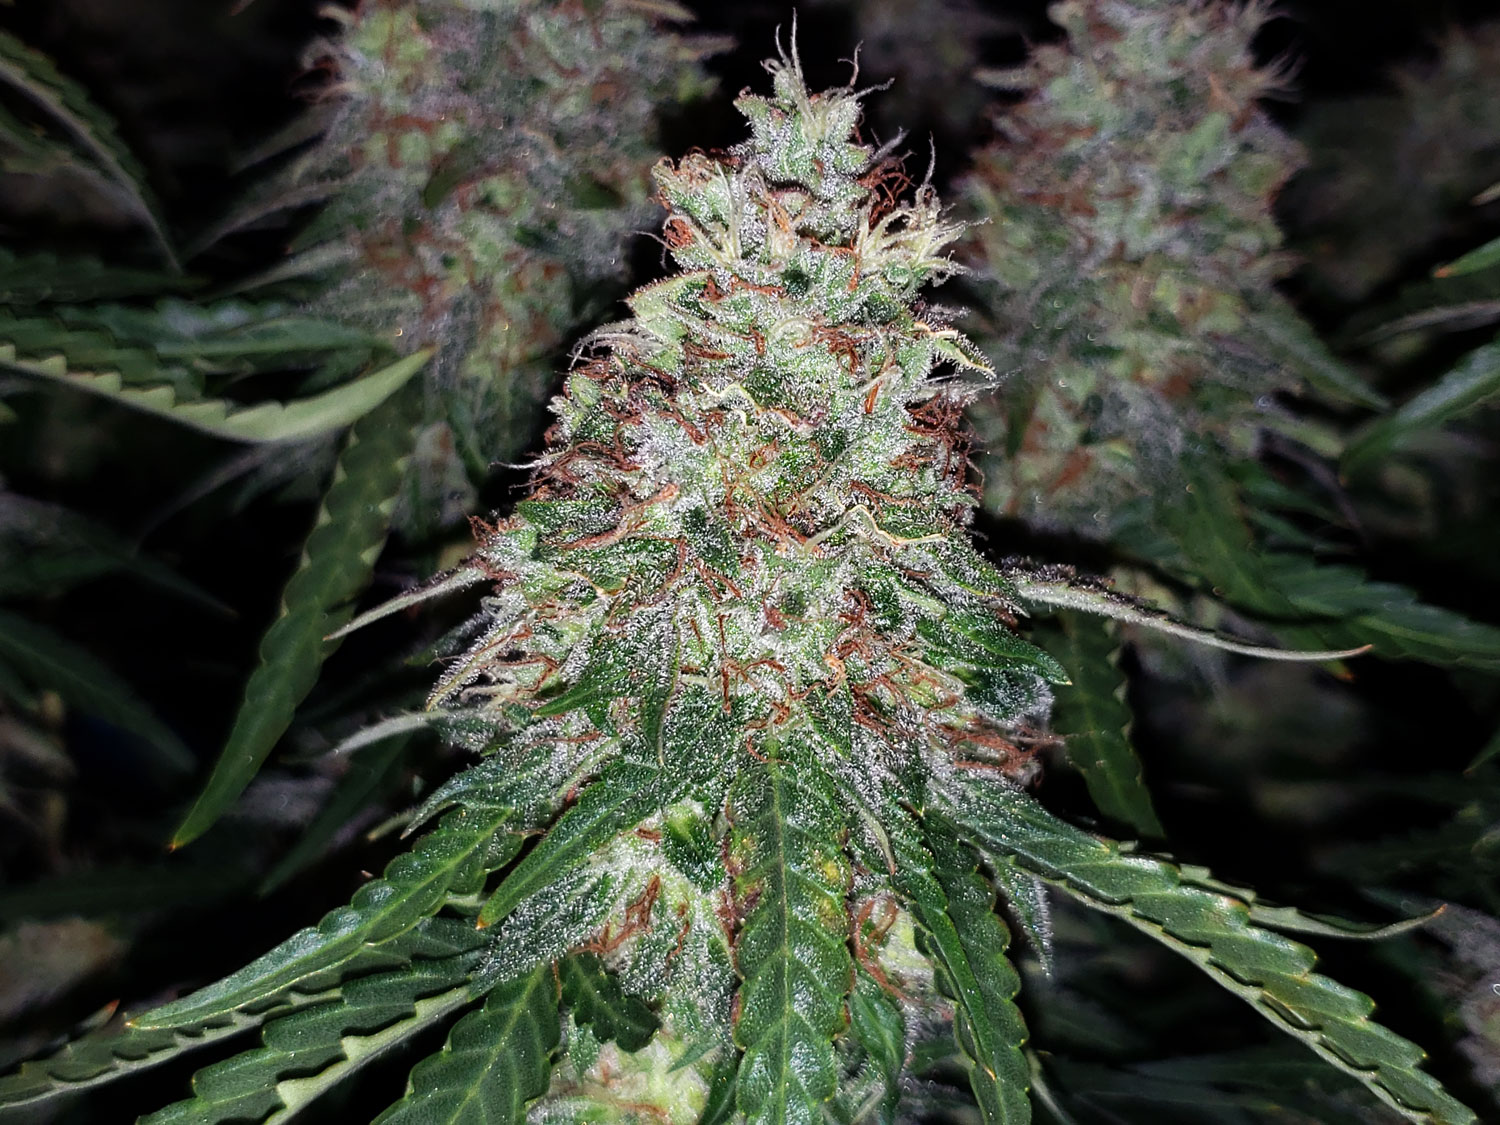
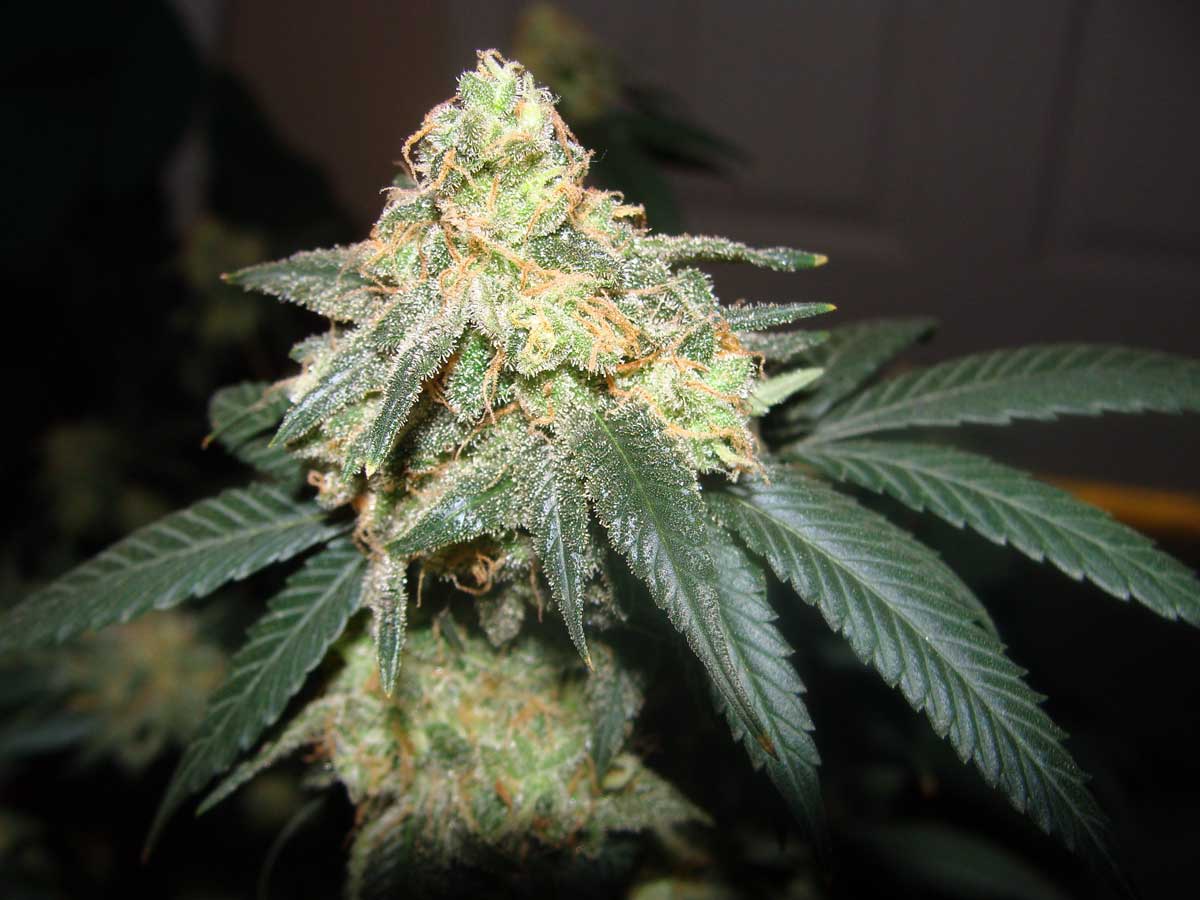
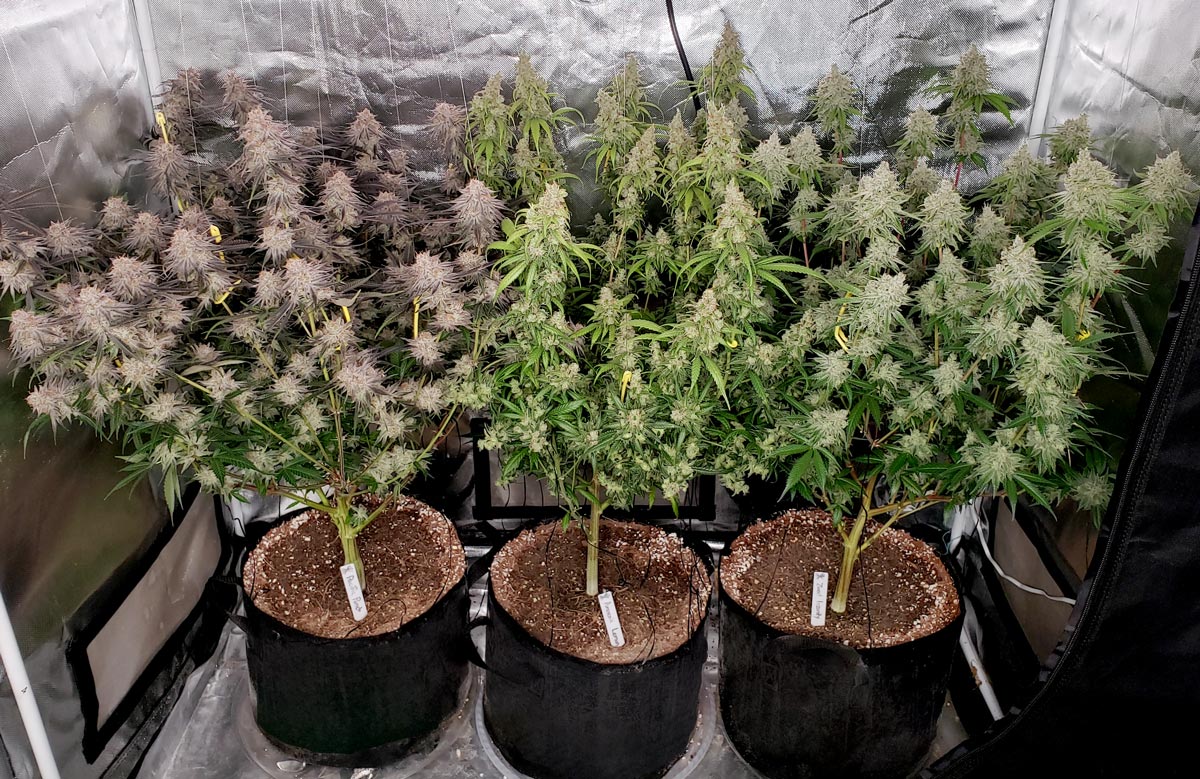
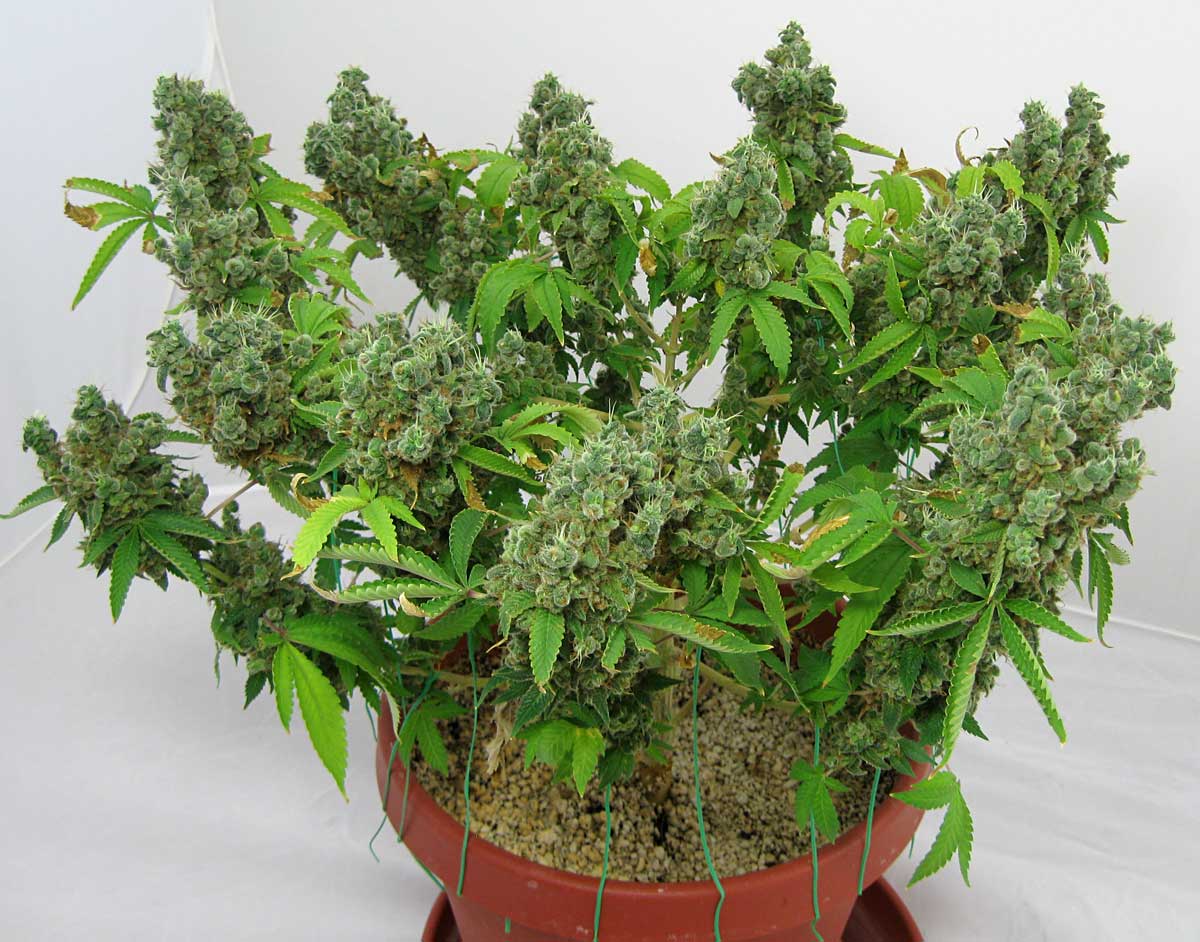
Ready-to-Harvest Bud Examples: The following six marijuana buds are in the harvest window. Buds are ready to harvest when most of the “hairs” have darkened and curled in and you can see the solid bud underneath.
Ready to Harvest Cannabis Buds – Hairs are mostly curled in.
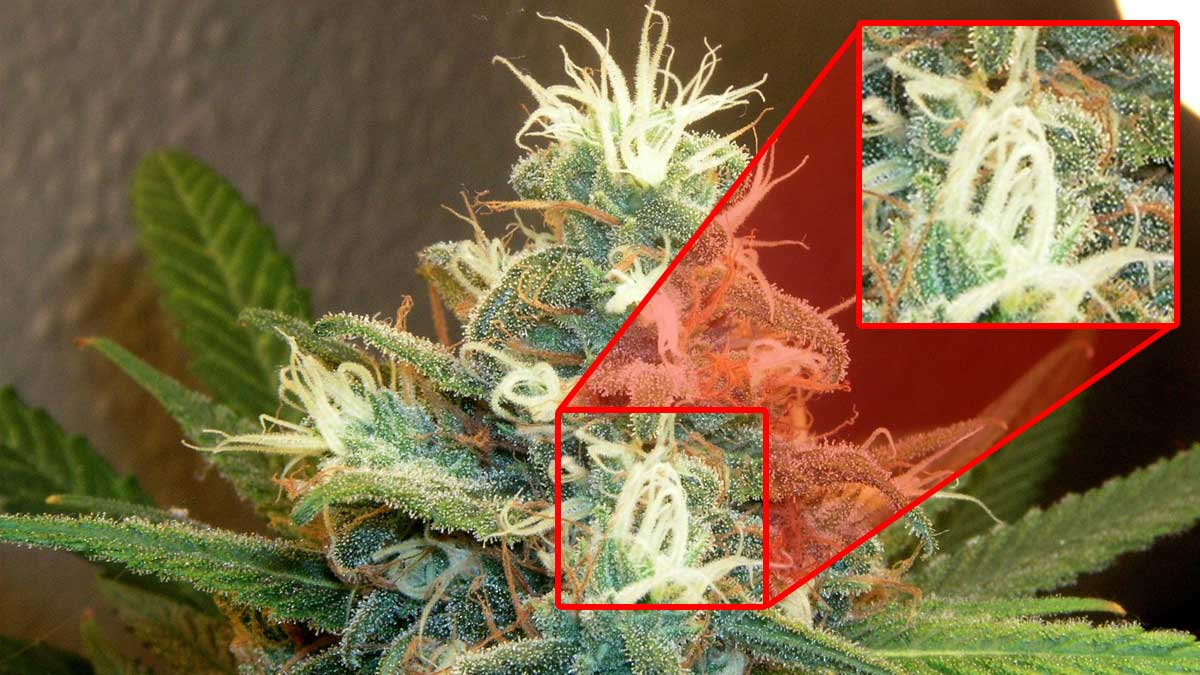
Looking at the buds is a great estimate, but you can look at the glittery trichomes under a magnifier for the most precise harvest time. Trichome heads on buds start out clear and glassy. At this point, buds are not very potent.
Look at trichomes with a magnifier (like this jeweler’s loupe) for more precise harvest time.
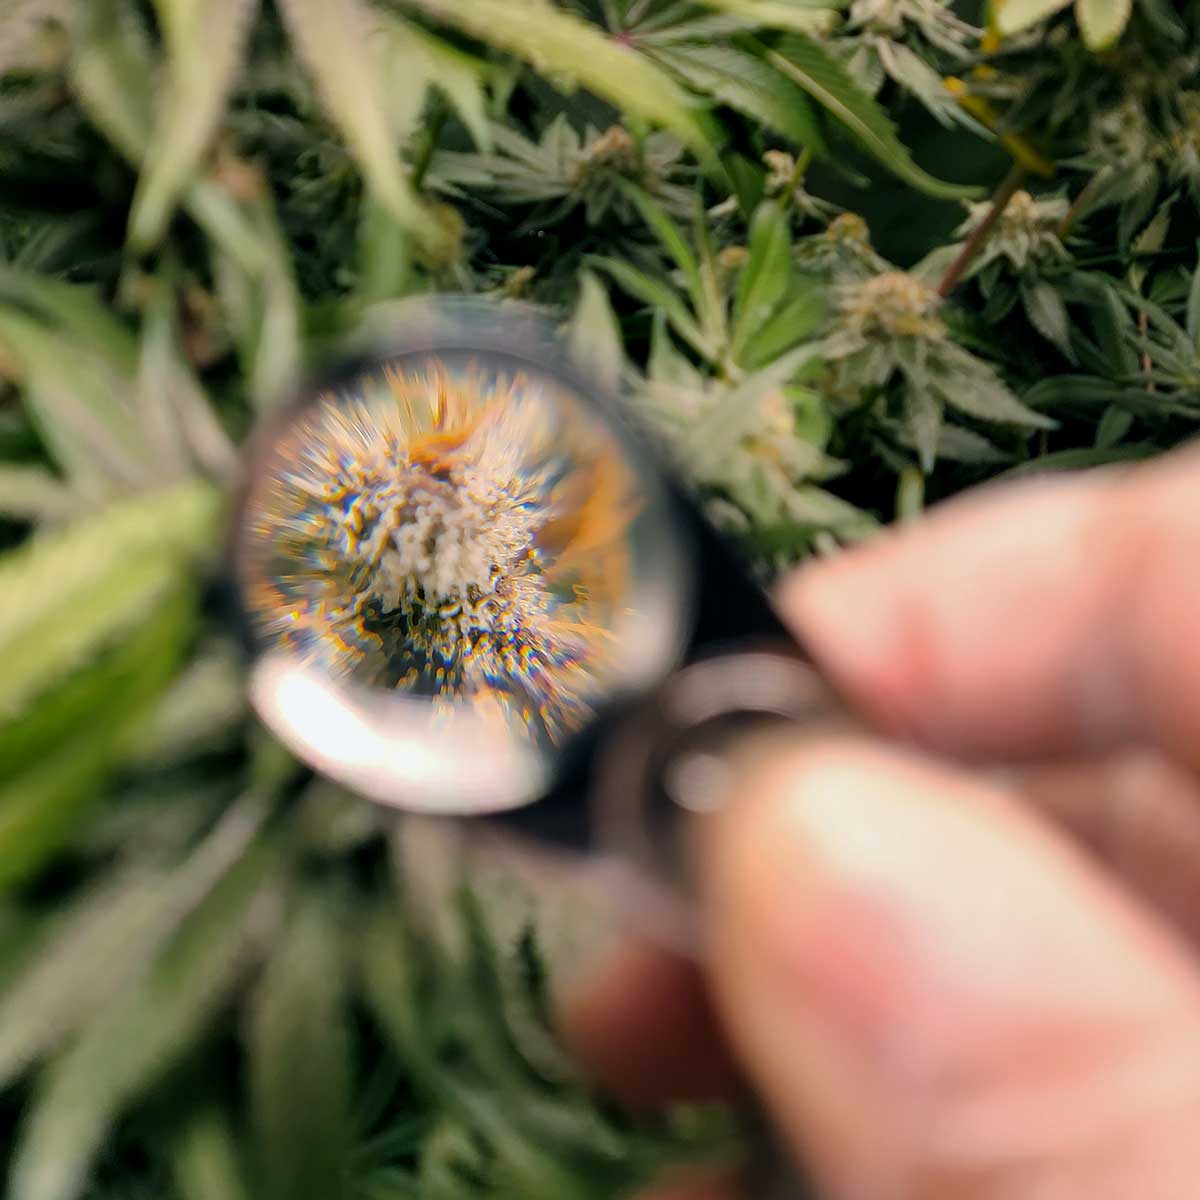
If you only see clear glassy trichomes, the buds are not potent yet.
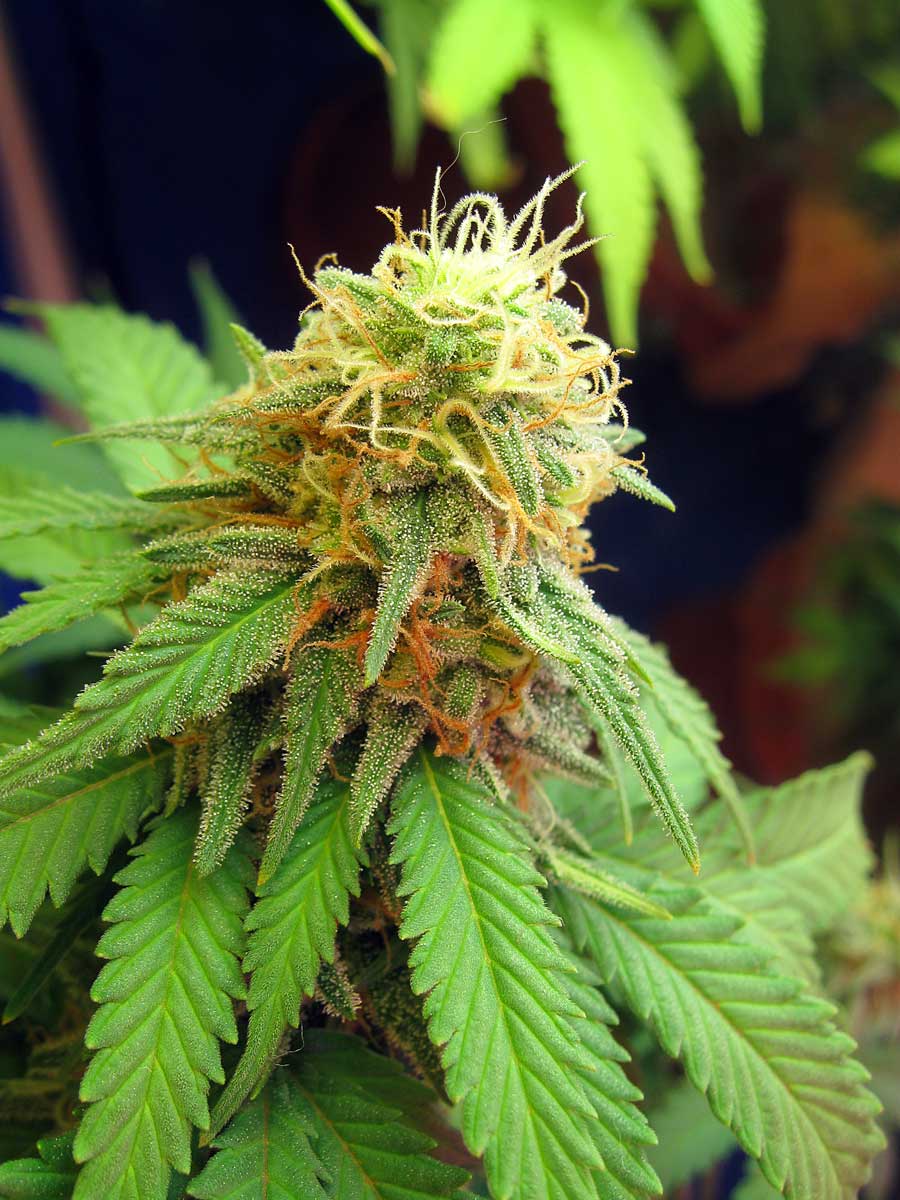
As cannabis buds mature, trichome heads turn milky white. They kind of look like white plastic under magnification. These white trichome heads are associated with the highest level of THC, CBD, and terpene content (smell) in buds.
The highest THC, CBD, and smell tends to be when trichomes look white.
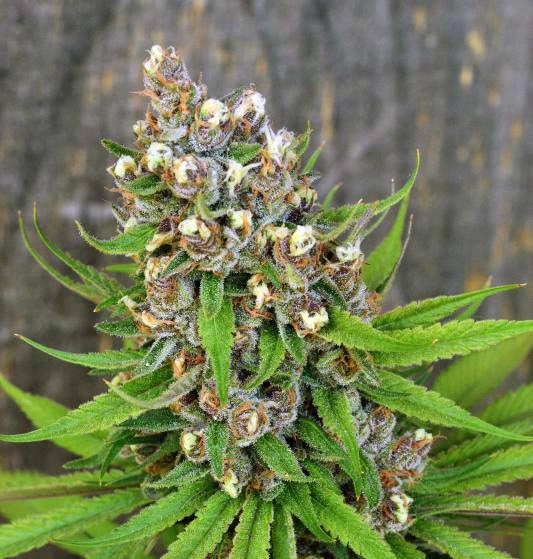
If given more time, white trichome heads turn amber/golden (for most strains). Amber trichomes have less THC but produce more of a relaxing/body/anti-anxiety effect.
Yellow (“amber”) trichomes signal a late harvest, and may make you sleepy, or at least extra relaxed.
Quick Recap: When to Harvest Cannabis Summary
Method 1: Look at Buds and Compare to Pictures
- Buds are solid, hairs have curled In – Buds are ready to harvest when hairs have darkened and curled in, revealing the solid bud underneath.
Method 2: Look at Trichome Color with Magnifier (more precise)
- Clear Trichomes – Not ready to harvest. Buds have low potency and reduced smell.
- 1/2 Clear, 1/2 White Trichomes – This is on the early side to harvest cannabis. THC is not at max potency yet. May cause more of an “up” or psychoactive mental effect, with less of a “down” or body effect. Buds won’t feel as “strong” or get you as “high” as if you harvest a little later. Yields also typically haven’t maxed out yet.
- Mostly White Trichomes – Typically highest levels of THC, CBD, and terpenes (smell). Strongest overall effects of buds. Also, buds tend to have achieved max density and size.
- Amber (Yellow) Trichomes – As buds continue to mature past their “prime”, the trichomes start turning amber/golden. The greater the number of amber trichomes, the more buds produce a “down” body/couchlock effect. THC levels start to go down as THC is converted to less psychoactive CBN.
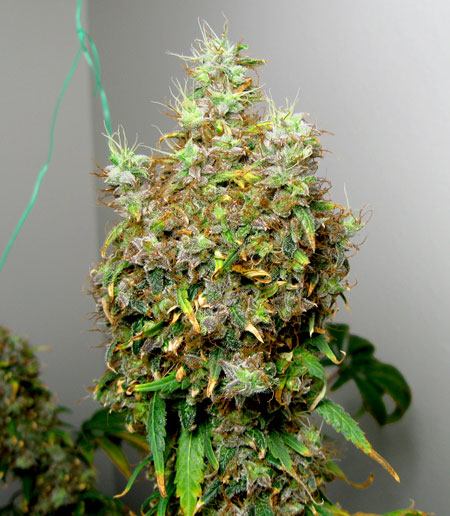
This bud with all-white trichomes has reached the highest level of THC/CBD. Wait another week or two for trichome heads to turn amber/golden for more of a relaxing effect.
You only need 3 things to determine the best marijuana harvest time:
- The knowledge of when to harvest – You get that today!
- Eyes for visual inspection – You’ve hopefully had these for a while.
- A magnifying tool (optional but recommended) – Makes the glittery, resin-filled trichomes on your buds easier to see. Although not 100% necessary, a magnifier lets you time your harvest perfectly to get the exact effects you’re looking for. See reviews of different magnifiers.
When it comes to magnifying tools for growing, the 3 most popular options are…
- Jeweler’s Loupe – This is the cheapest and most low tech way to get the job done. Unfortunately, it is still difficult to get the best insight into how your buds are doing unless you have really great eyes, though the one I linked to is the best that I’ve tried. Will definitely get the job done in a pinch!
- Your Camera Phone – Many modern smartphones have excellent cameras that can take clear pictures of trichomes. Try to use lots of natural light, hold the phone very still (set it on something stable if possible so you’re not holding it with your hands), and zoom in for the best images.
- Digital USB Microscope – A digital USB microscope is one of the best tools to determine the right harvest time. A digital microscope costs a bit more than a loupe and most models need to be connected to a smart phone or laptop, but they will get you face-to-face with your trichomes and allow you to take video to re-examine afterward or get a second opinion. You’ll be almost uncomfortably close to your trichomes.
Learn about the best magnifiers to clearly see cannabis trichomes.
Use a USB microscope to take clear pictures of trichomes.
This harvest tutorial will fully cover the two main techniques cannabis growers use to identify the right time to harvest marijuana plants.
Note: You may want to flush your cannabis plants in the last week or so leading up to harvest time if growing in soil or coco, and for at least a few days in hydro. This is most important if you’ve been using high levels of added nutrients while buds are forming. Click the following link to get more info on flushing before harvest: https://www.growweedeasy.com/flushing
First, we’ll show you how to identify harvest time by checking the pistils (the ‘hairs’ on your buds). The pistil method isn’t nearly as accurate as checking the trichomes (the ‘glitter’ on your buds), but it’s definitely a good place to start since you can just look at the buds and get a general idea. Then we’ll get into trichomes.
The following marijuana harvest pictures will guide you, so you know when to harvest your marijuana buds using ‘The Pistil Method’.
See More Pictures of Buds That Are Ready to Harvest!
1st Method to Identify Harvest Time: Pistil Method (Look at the Hairs)
Not Ready for Harvest Pictures
When the vast majority of pistils (hairs) are still white and sticking out straight, a cannabis plant is not ready to harvest.
Way too early to harvest this bud.

These buds still have many weeks to go!
Still not ready. Both potency and yields are extremely low at this stage.
Still Not Ready for Harvest Pictures
We’re waiting for most of the white hairs to darken and curl in. Some of the pistils are starting to turn color on the following buds, but there are still too many white pistils. These buds have at least a few weeks to go before they’ll reach their highest levels of THC. The good news is your buds will get bigger and denser in that time!
Not ready – too many hairs sticking out.
Still not ready, but closer. Some hairs are now curling in.
Does it feel like you’ve been waiting forever? Learn what causes marijuana to take a long time before being ready to harvest.
Ready for Harvest Pictures
- Harvest when 70-90% of hairs have darkened for the highest levels of THC.
Harvest when 90-100% of hairs have darkened for a more calming, anti-anxiety effect as some THC turns to the more relaxing CBN.
With some strains, you may see a bunch of new pistils appear right when you think you’re getting close. This is normal, but it happens more than 3 times you’ve eventually got to just make the decision and chop. Learn how to speed up the time to harvest. You may also be interested in what’s causing buds to take forever to mature?
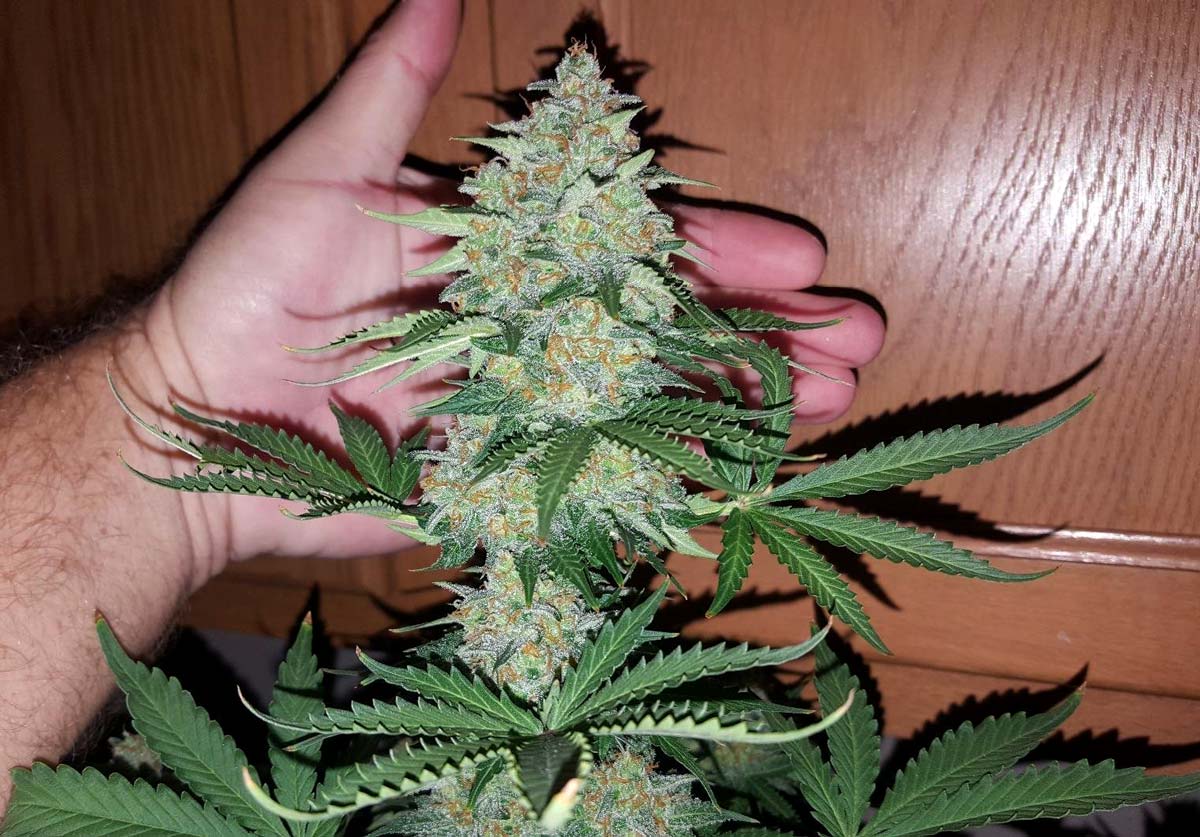
Ready to Harvest – On the Early Side (more “up” effects, lower yields)
Here are examples of cannabis buds that have reached the very beginning of the harvest window.
Don’t harvest buds any earlier than this!
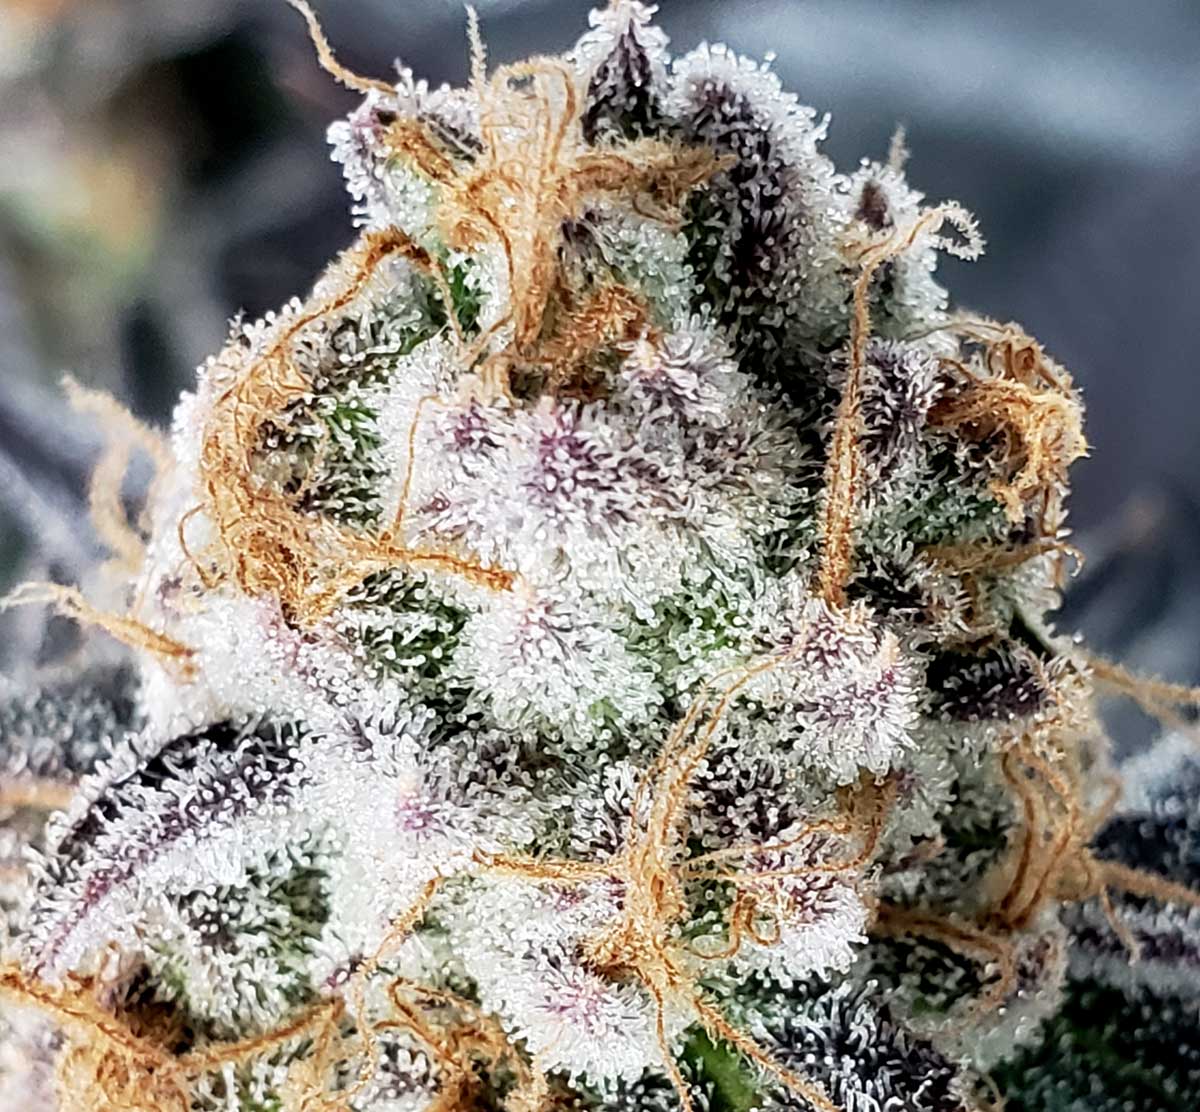
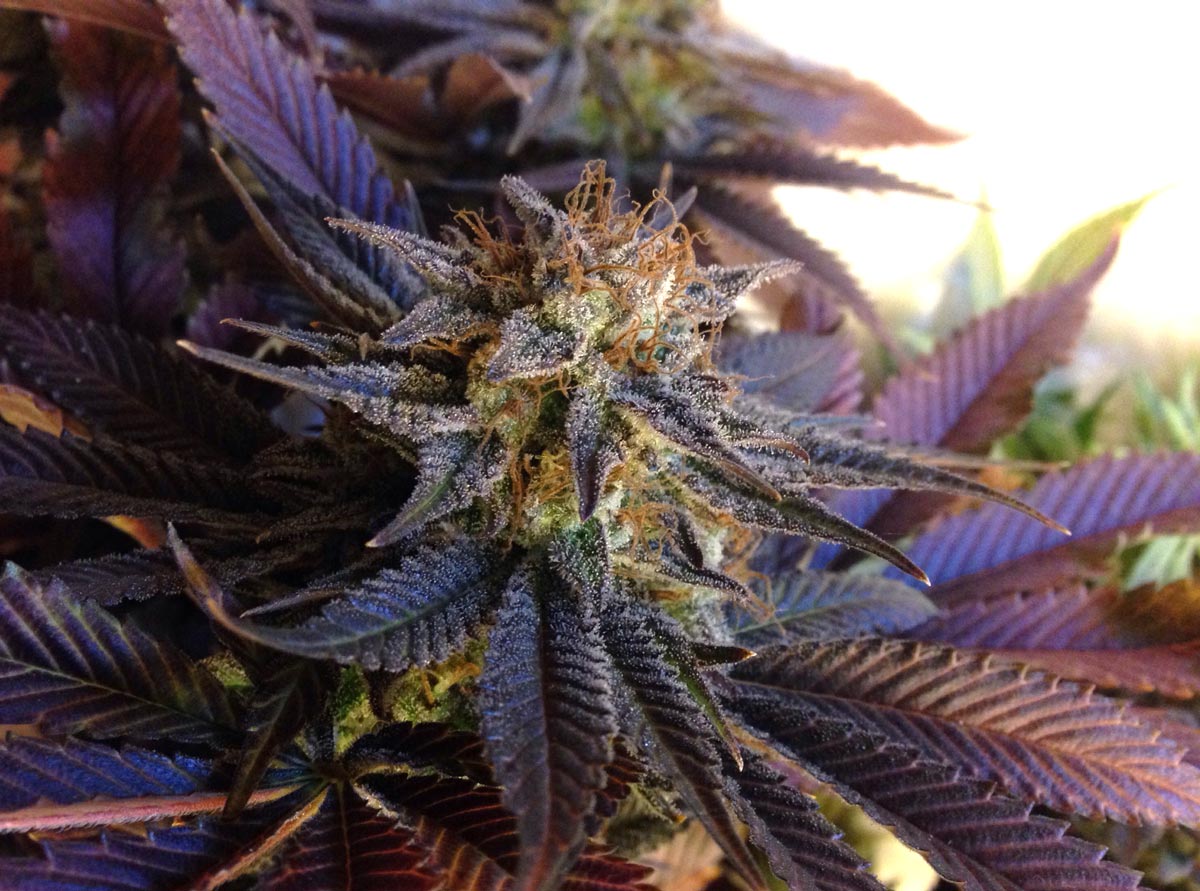
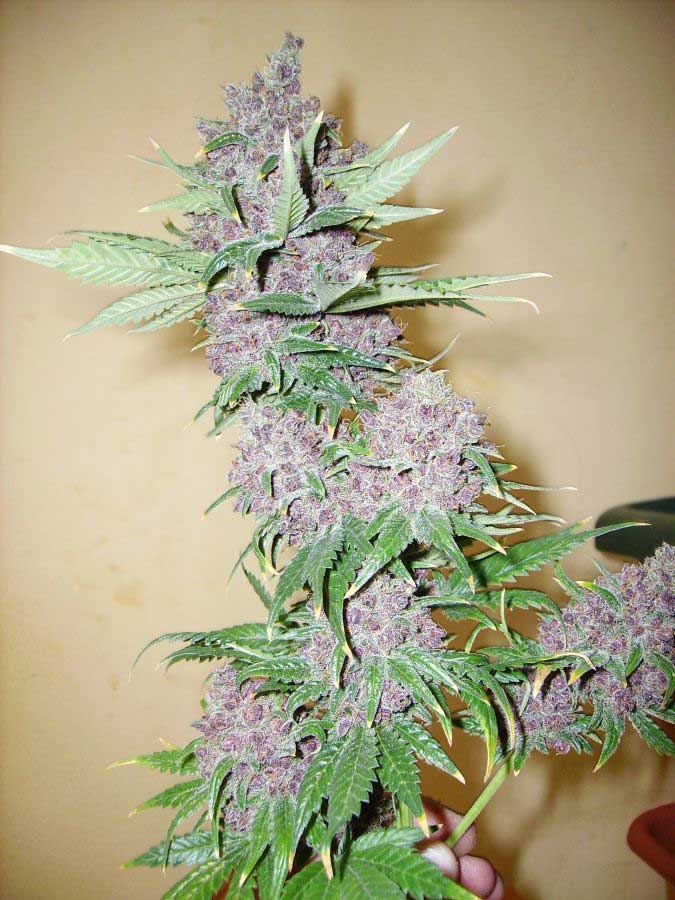
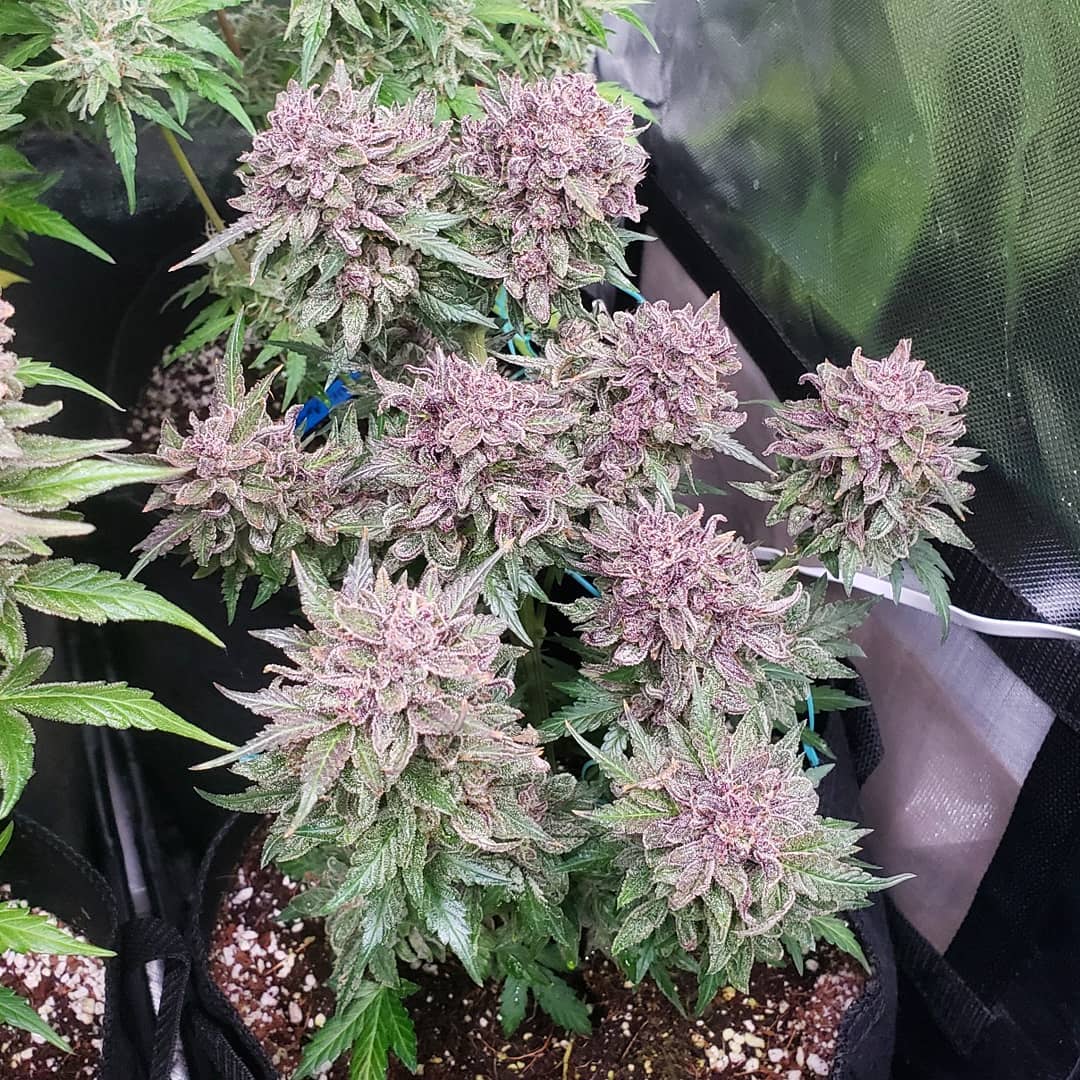
 Mixed Signals Example – This purple bud is on the early side of the harvest window. Although the pistils / hairs have darkened, they are mostly sticking straight out. In this case, you could harvest now. But to maximize potency you might wait a little longer until hairs curl in more and reveal the solid bud underneath. Also, look to the color of hairs on the lower buds (not directly under the grow light) when you’re getting mixed signals like this, as they may be a better indicator of harvest readiness.
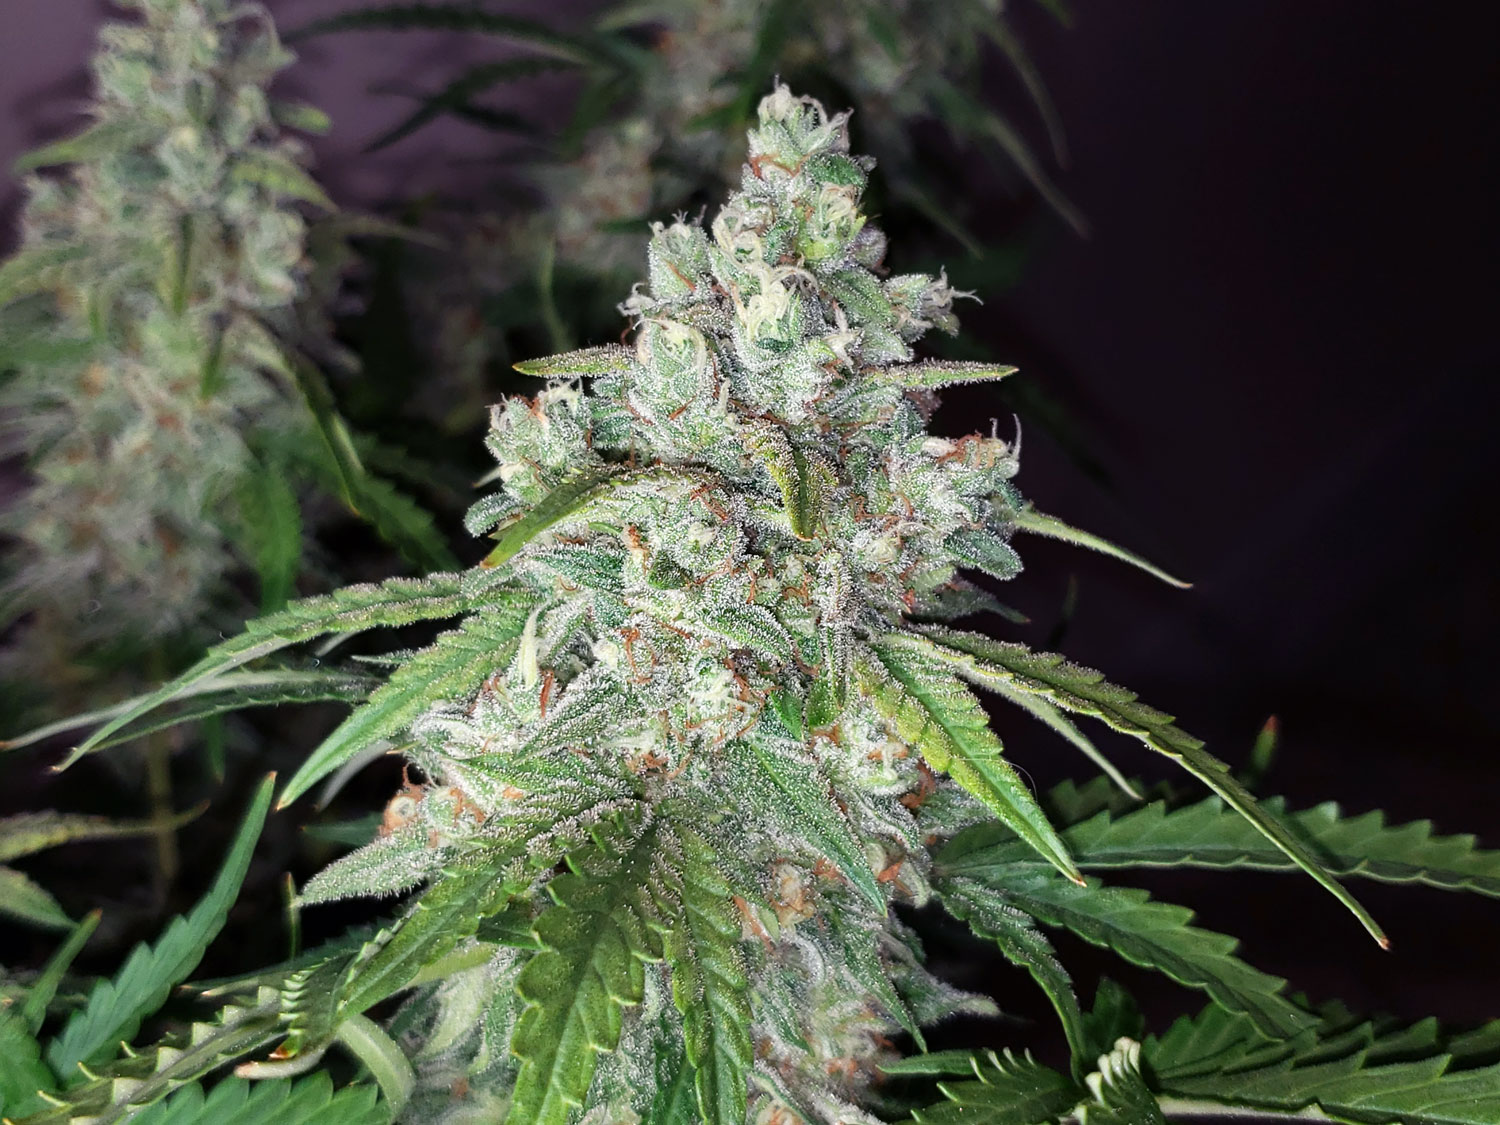
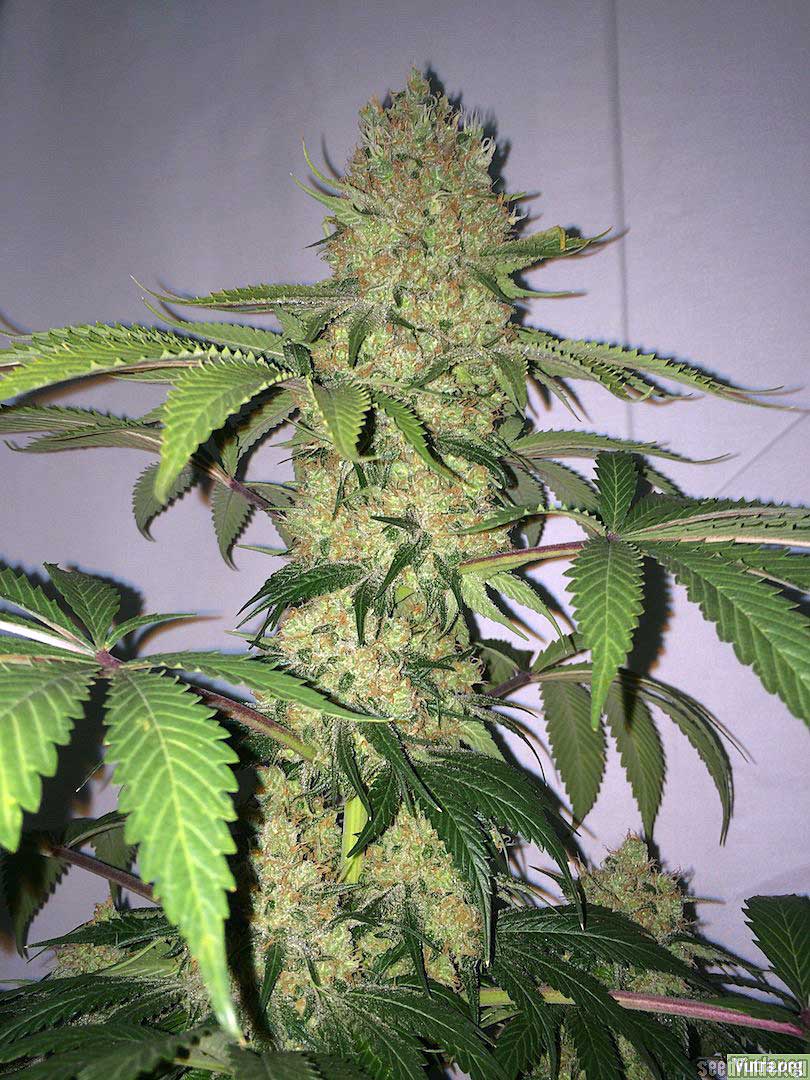
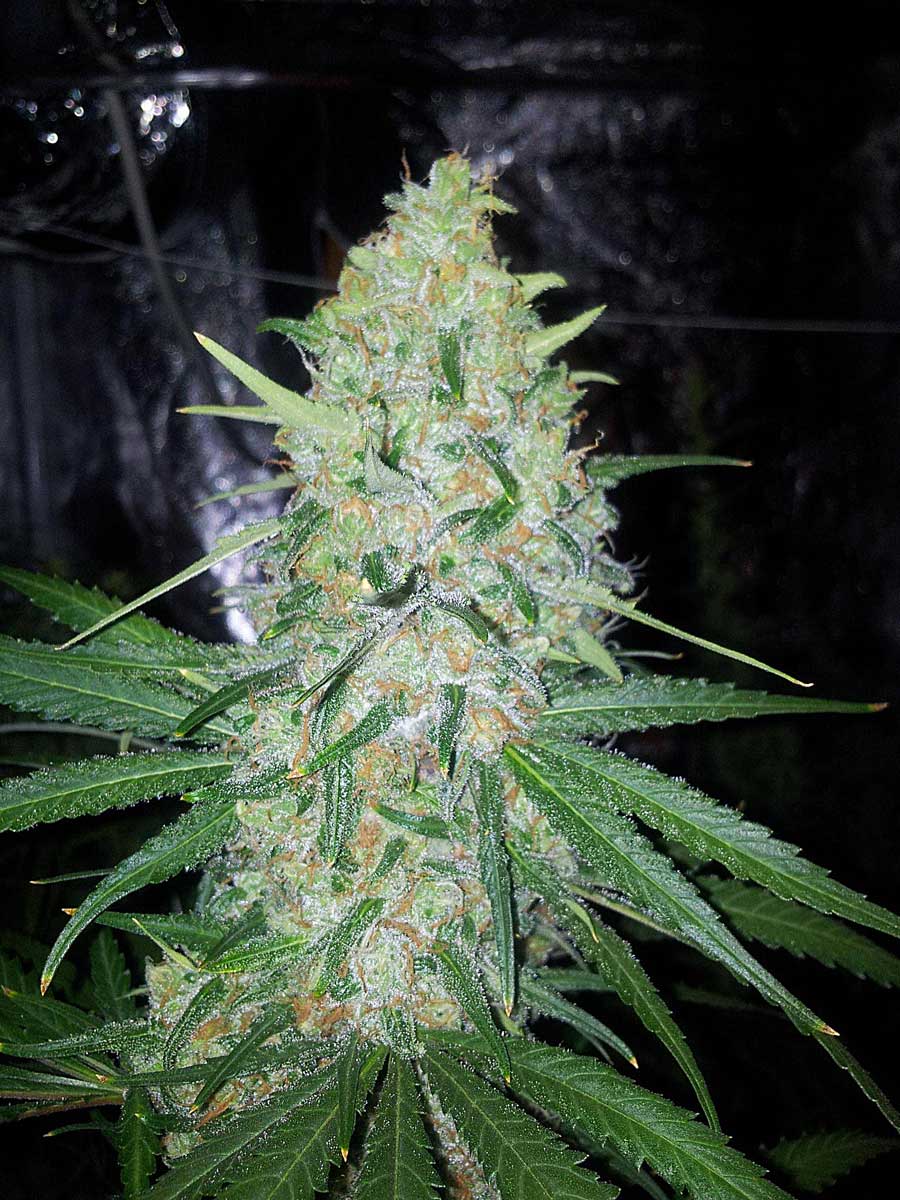
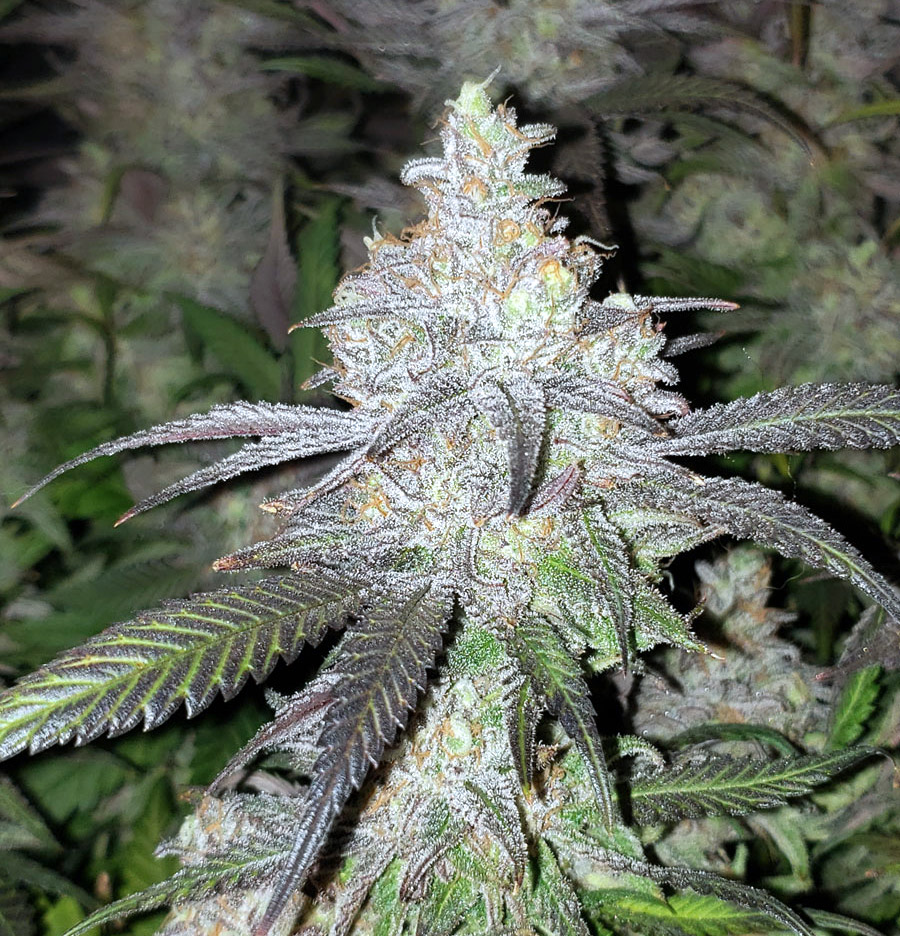
Ready to Harvest – Max Potency in Middle of Harvest Window (only a few white hairs)
This is considered the “prime” harvest window for cannabis plants. This period is when THC levels, other cannabinoids like CBD, and terpenes (smells) in the buds tend to be the highest.
Harvest now for maximum potency.
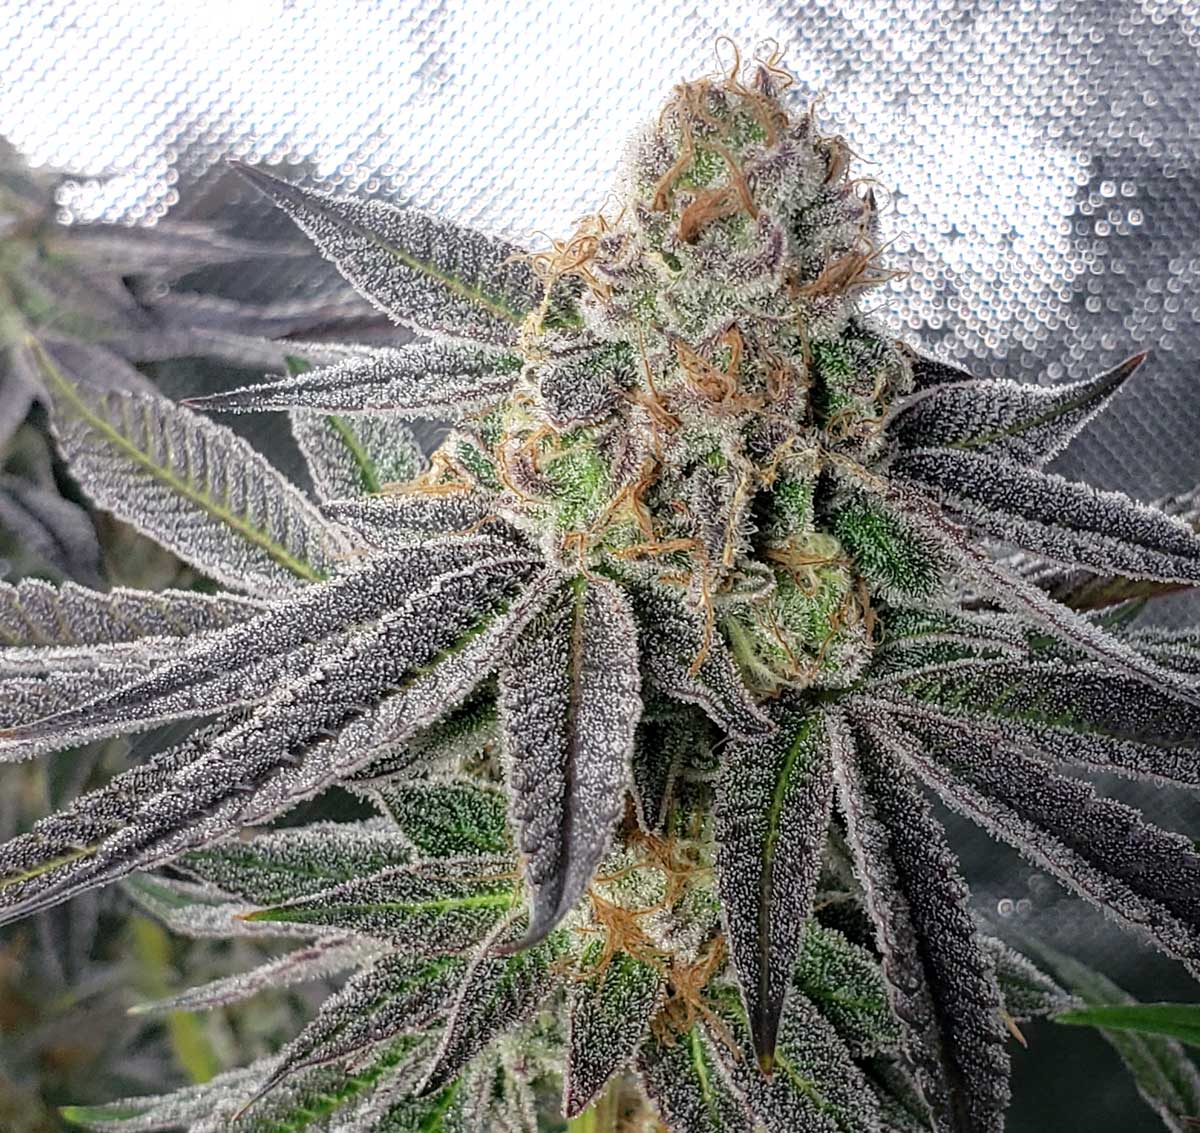
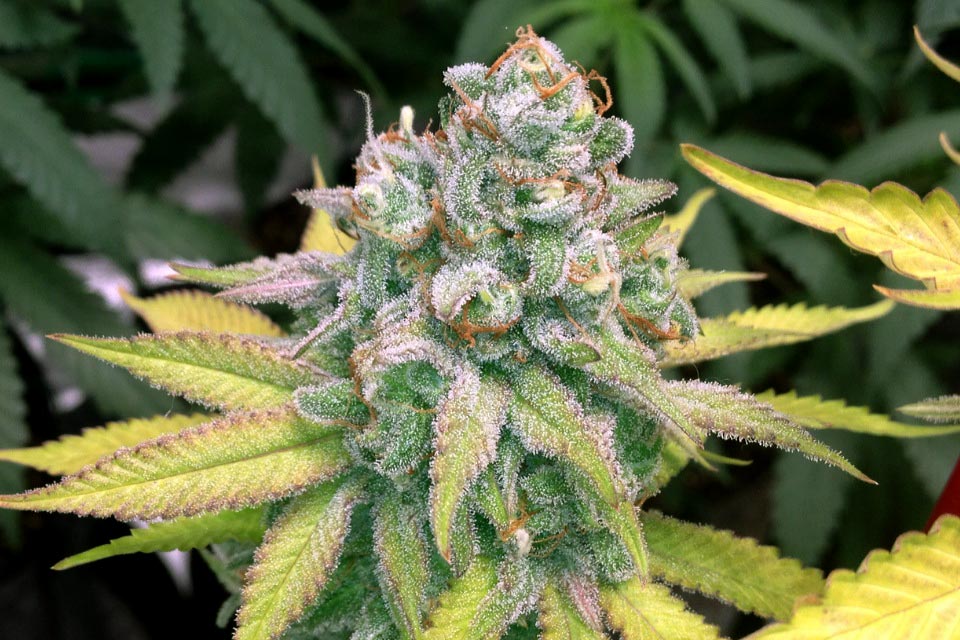
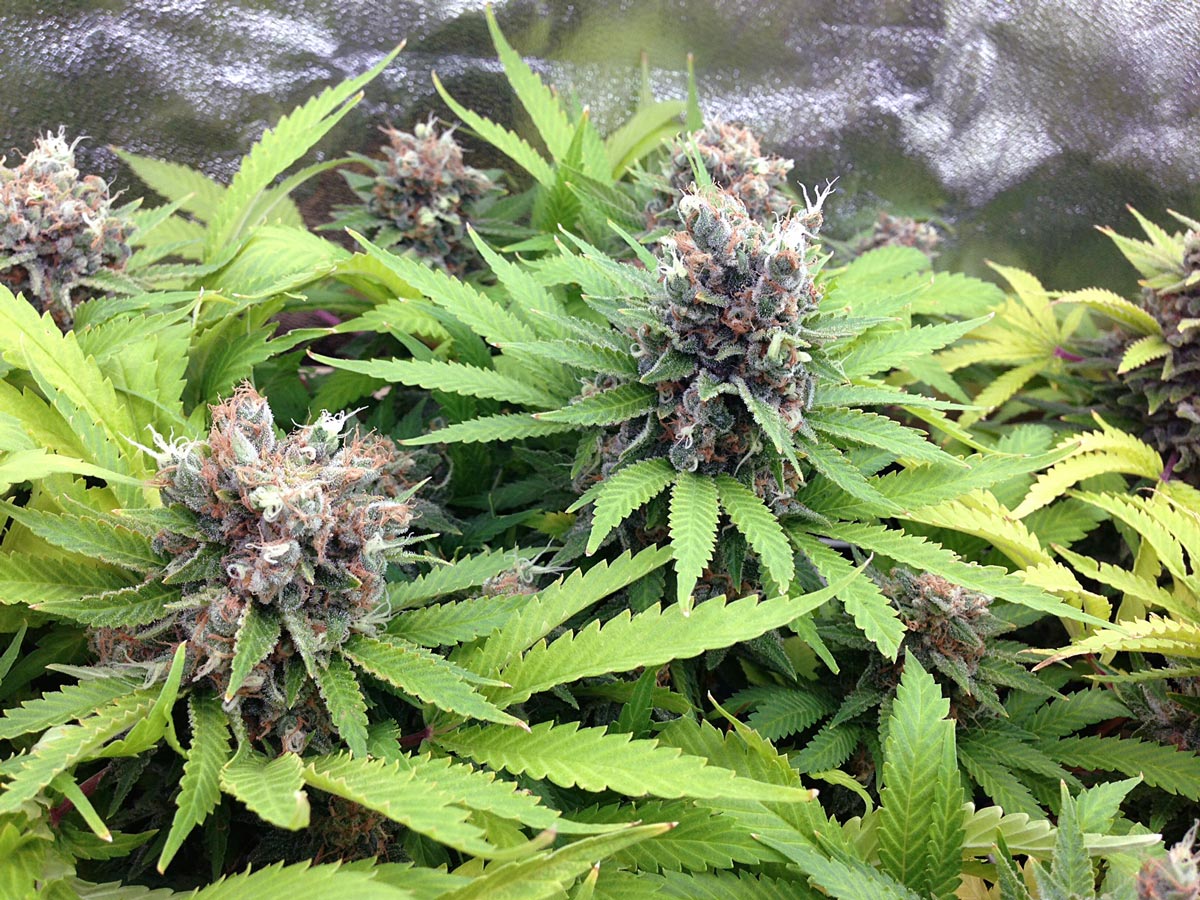
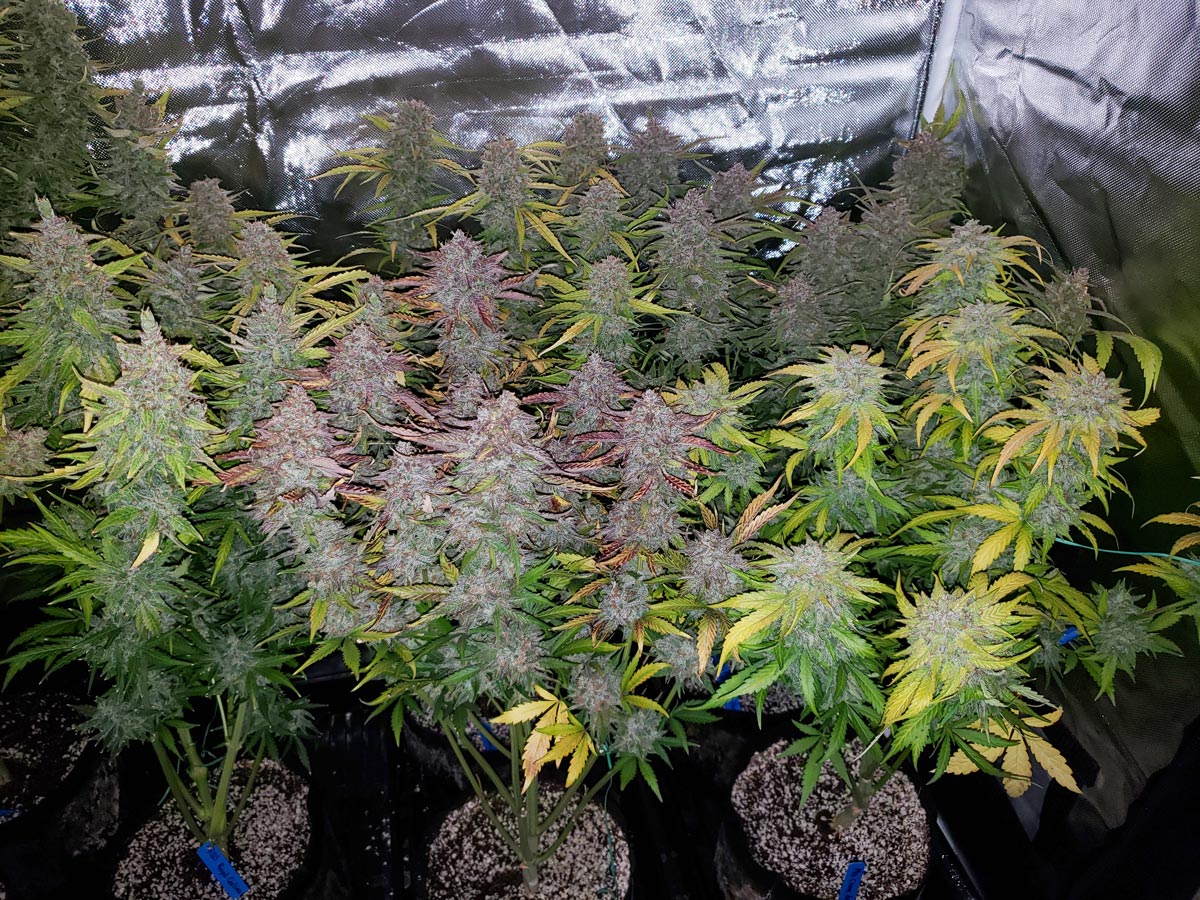
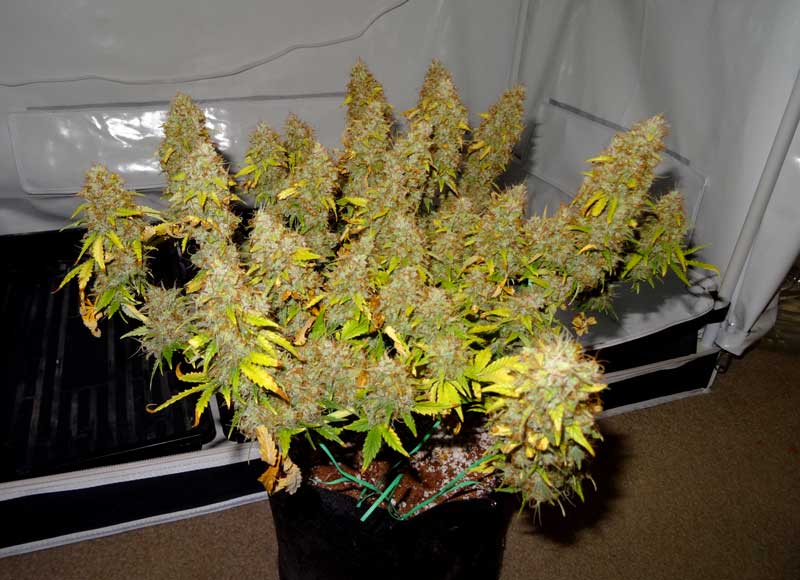
It’s common for cannabis plants to show Autumn Colors once they’re fully in the harvest window.
These cannabis buds are ready to harvest.
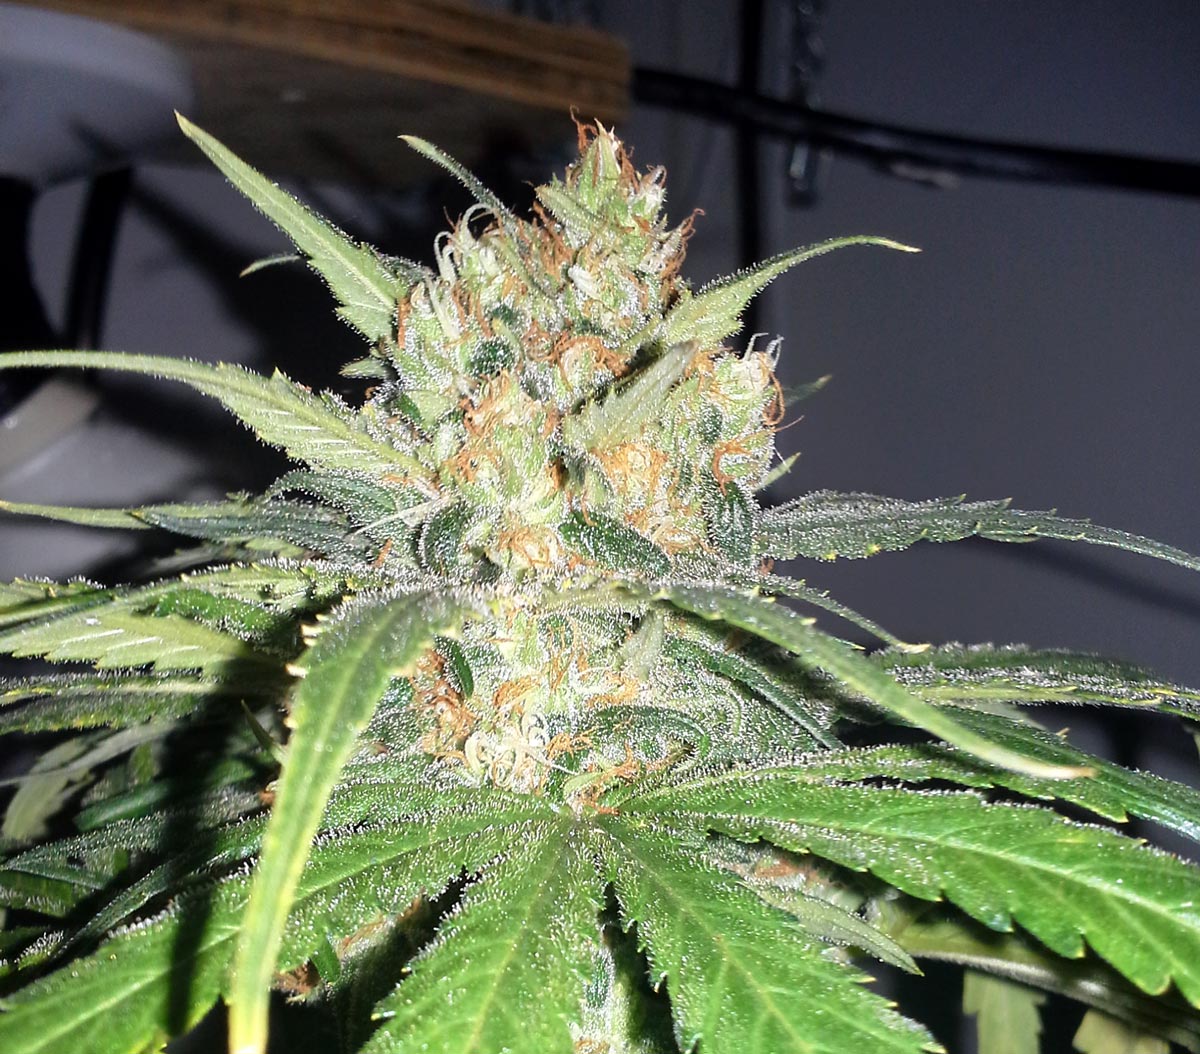
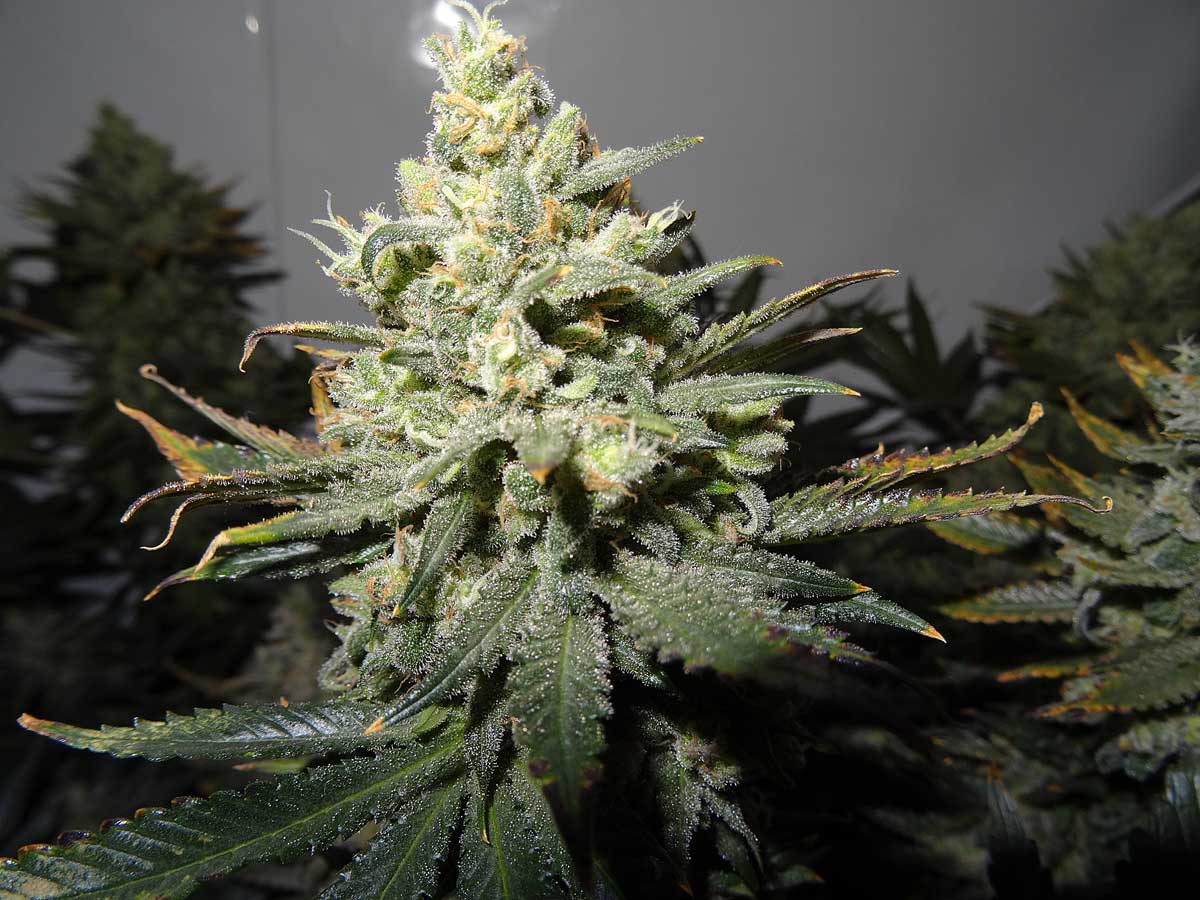
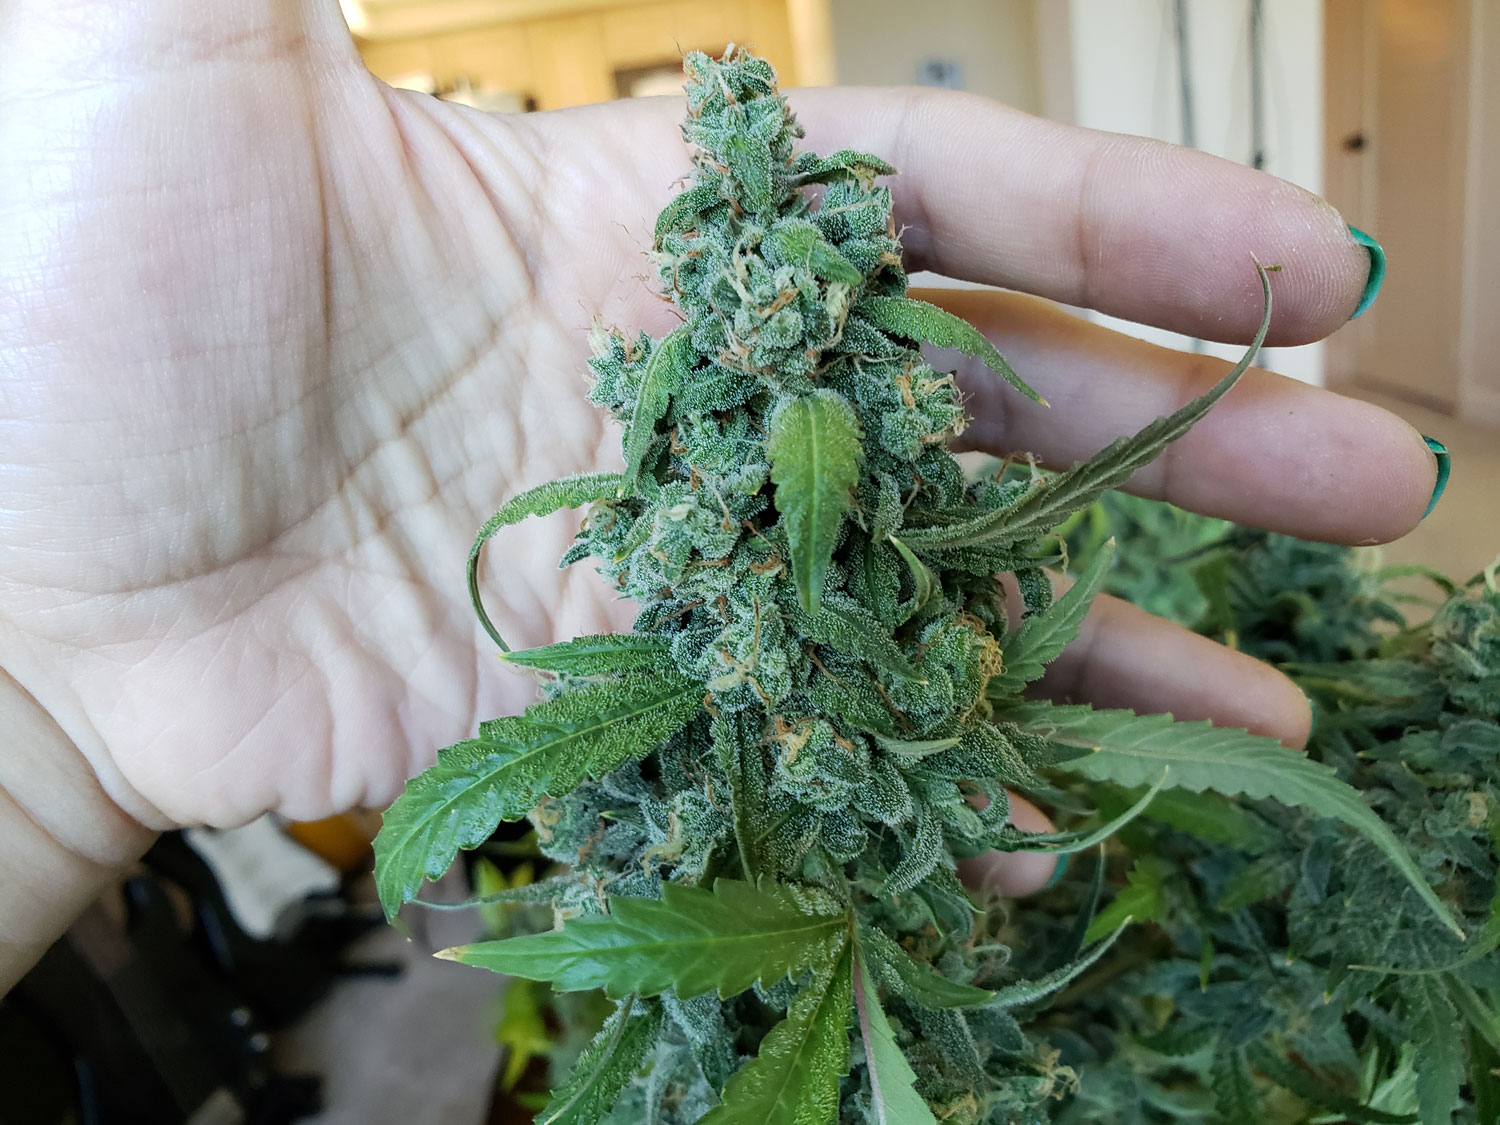
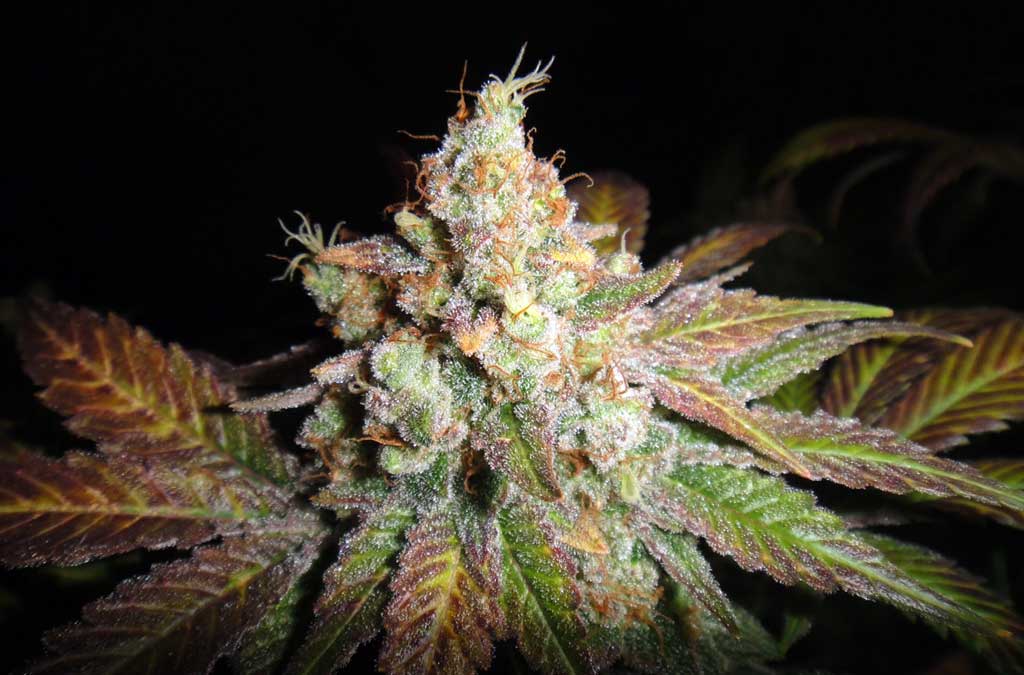
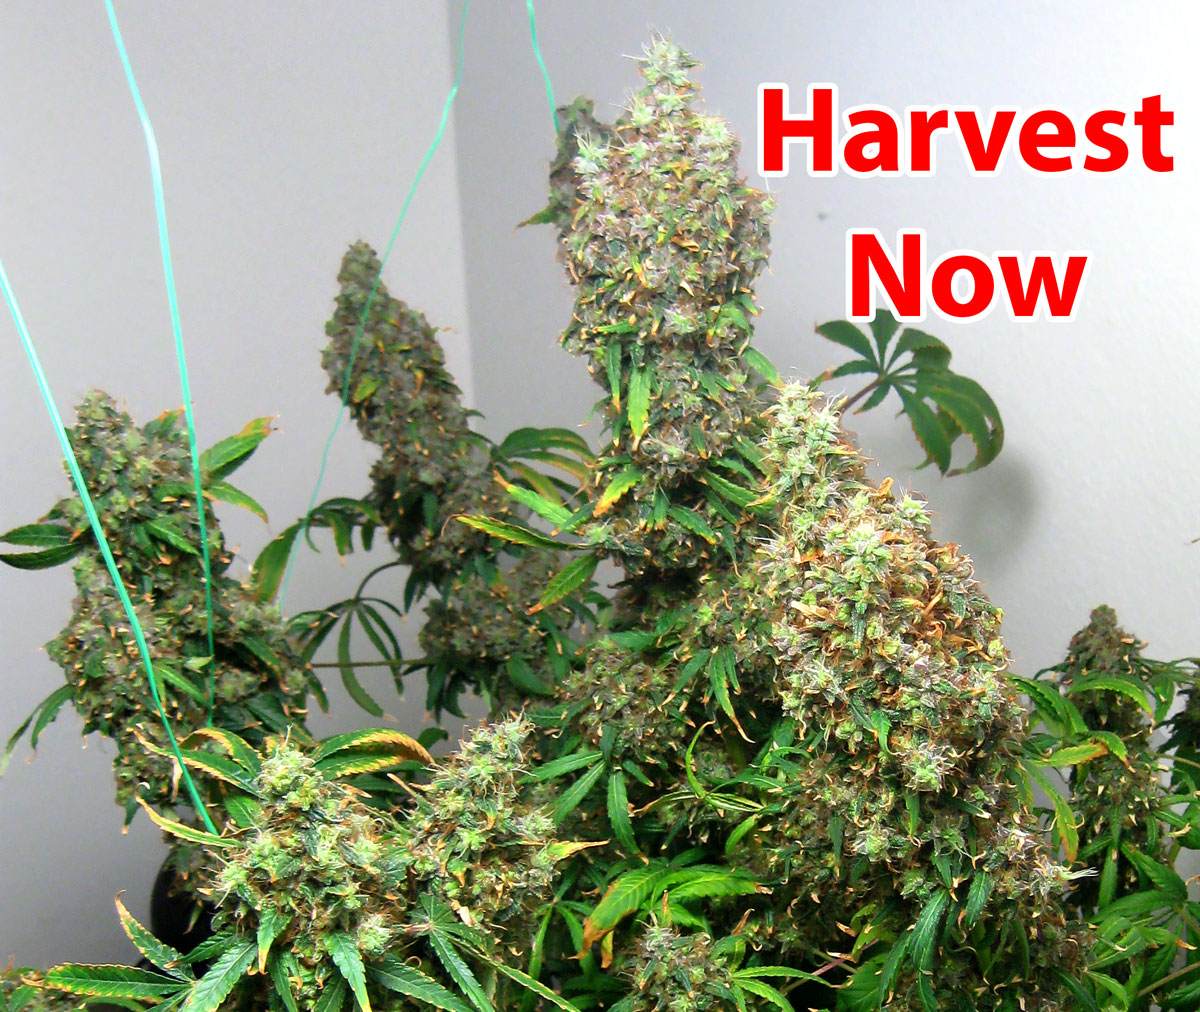
Ready to Harvest – On the Late Side (more of a “down” or body effect)
This is after the “prime” harvest window, which lasts a week or two. At this point, you’re in the “late” harvest window. At this point, plants are not packing on more THC, and after a while, some of the THC slowly starts degrading into the sleepier CBN. That means buds harvested on the later side may have more of a “down” effect, and may be better suited to later at night as opposed to during the day. However, I’ve known many growers who prefer these effects, so it’s worth experimenting to see what’s right for you.

Ready to Harvest – Special Cases (stressed buds)
Sometimes you need to harvest your cannabis even though there are lots of white pistils left. For example, if all the leaves on a plant die (for example if it gets sick or stressed), the yellowing and discoloration starts spreading to the flowers. If you let this go on too long, it can damage the overall quality, potency, smell, and appearance of buds. If you have a sick plant in the late flowering stage that keeps getting worse, keep a close eye on buds and try to harvest before they get too damaged.
This cannabis bud was burned by LED grow lights being too close.
Harvest now, before buds get even more stressed and damaged (in this case from too much light).
The “new” growth is just a trick, because usually when you see a bud getting burned like this the plant is ready to harvest.
Closeup of those light-stressed cannabis buds. Harvest buds now!
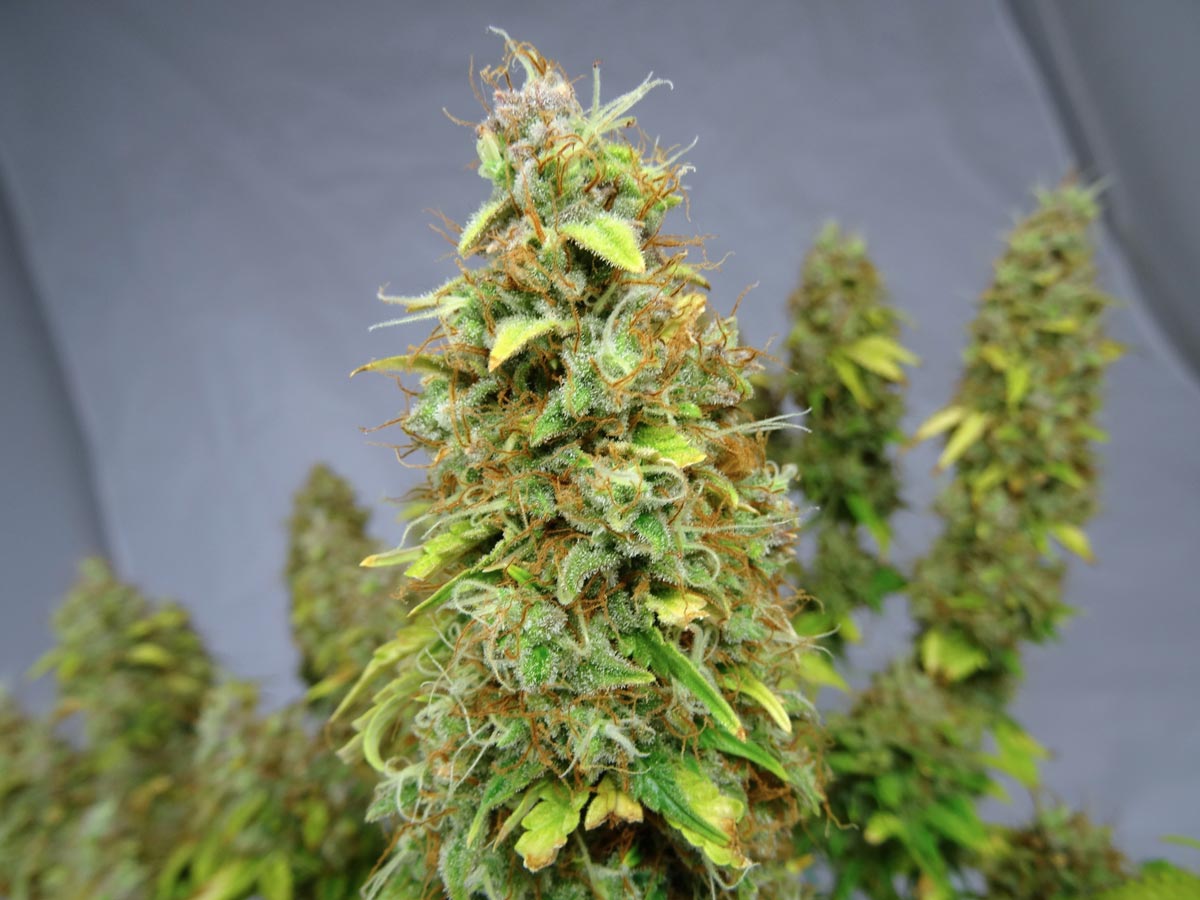
Harvest immediately if random parts of the buds start dying. This may be bud rot, which will keep spreading.

Now the buds on this next plant still have many white pistils, but just about every leaf is yellow or brown. Should you harvest now or wait? This cannabis plant is dying. Cannabis plants cannot recover from this kind of stress so late in the flowering stage, and will keep getting worse.
In this case, it’s a good idea to harvest soon, before the buds start being affected like in the pictures above.
Harvest now if you don’t have any green healthy leaves left. Otherwise, buds start dying, too.
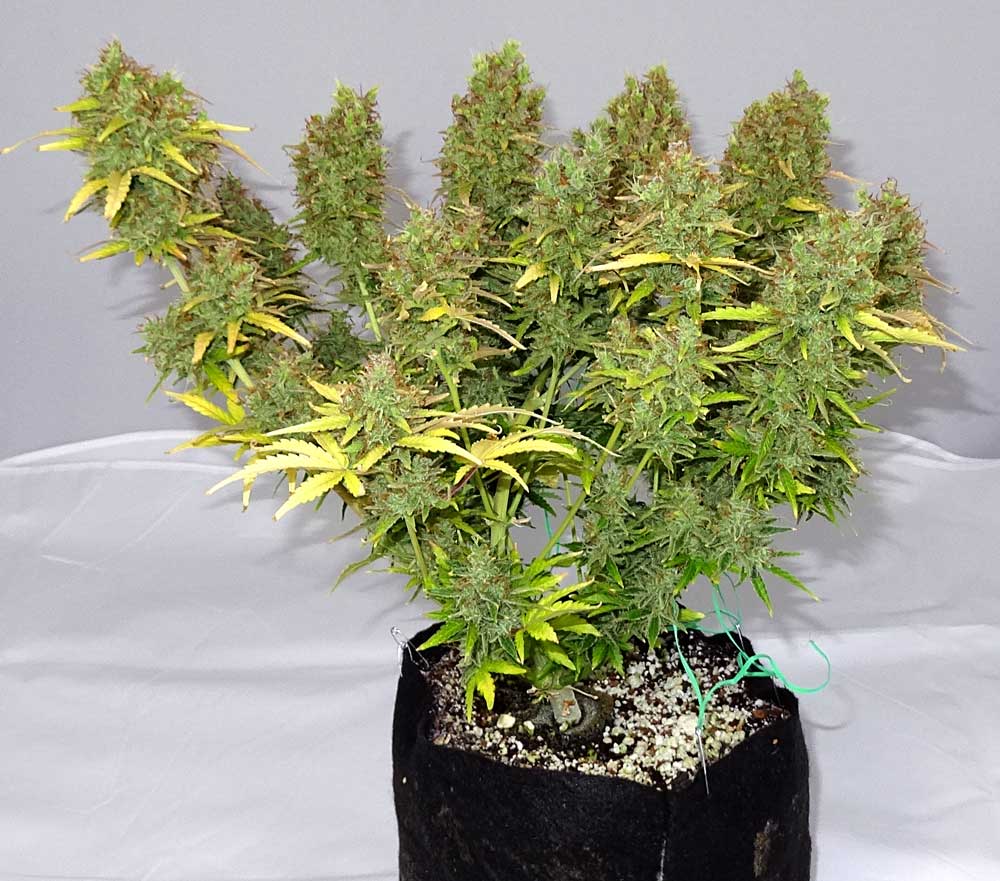
A closeup of those buds. Even if buds don’t look quite ready yet, harvest now because the plant is dying.
Heat or light stressed plants may keep growing lots of new white hairs on top of mature, older buds. In that case, look at the older parts of the bud to determine when to harvest.
“Fist” shaped buds often have light stress.
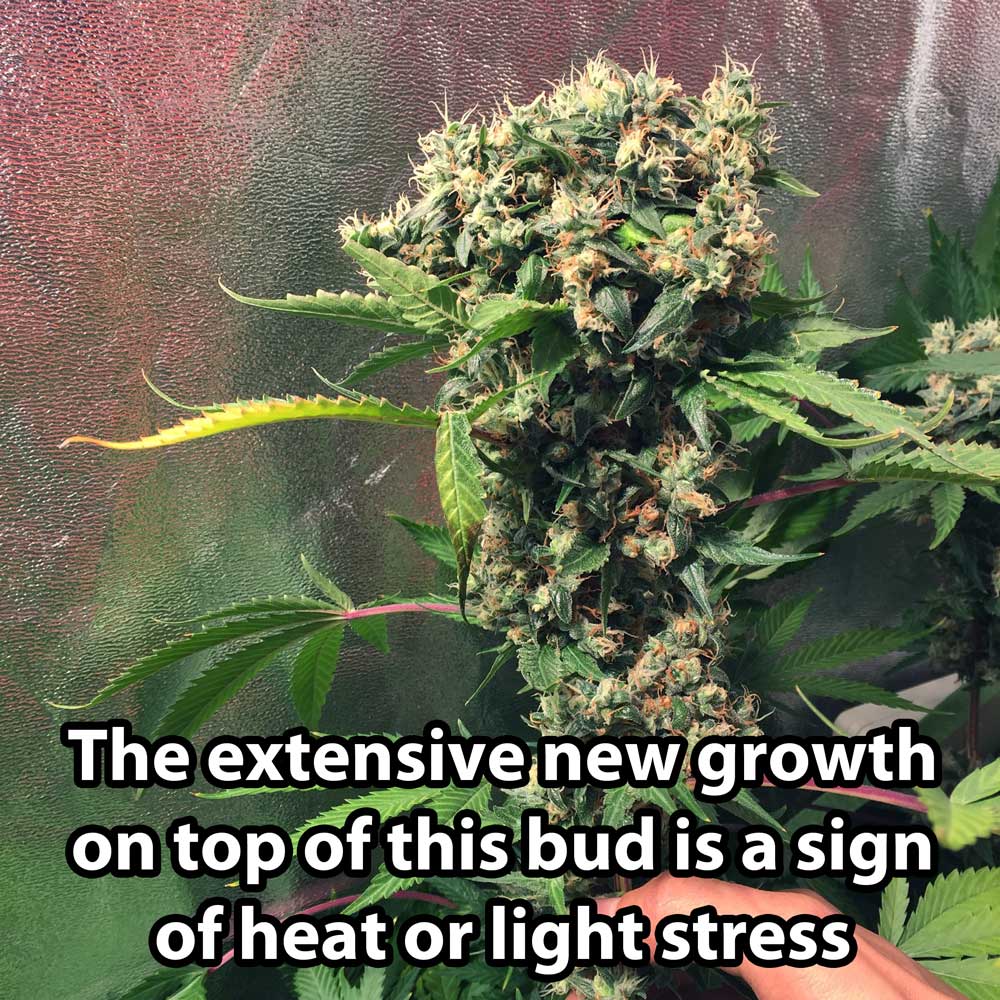
Too much heat and light can cause other problems. Notice the yellow “banana” sticking out of the top middle bud in the next picture. This is a stress response. The plant is making a last-ditch effort to pollinate itself and make seeds before the plant dies. If your buds start popping up with bananas everywhere, it’s time to harvest. Otherwise, you start losing potency/smell and buds may get seedy.
Notice the yellow “banana“. This cannabis bud suffered from extreme heat and light burn. Harvest now!

Click the picture for an extreme closeup!
See More Pictures of Ready-to-Harvest Buds!
With some strains, it is much harder to tell when the time is right. Different strains can look different ways at harvest. For example, some strains can keep most of their pistils white even when they’re ready to be harvested.
You can get some good information by talking to someone who has grown your strain before, such as the breeder. The breeder or growers who’ve grown your strain before can often provide extra insight into what to look for at harvest. You can also search online for pictures of what your strain should look like when it’s fully ripened.
Next, we’re going to go over the 2nd (and more accurate) method of checking your cannabis plants to see if buds are harvest-ready…
2nd Method to Identify Harvest Time: Trichome Method
(how to harvest cannabis using the accurate method)
This harvest method tends to be more precise than looking at the pistils/hairs on the buds of your cannabis plant.
Look at trichomes under a magnifier to harvest cannabis buds with the desired THC levels.
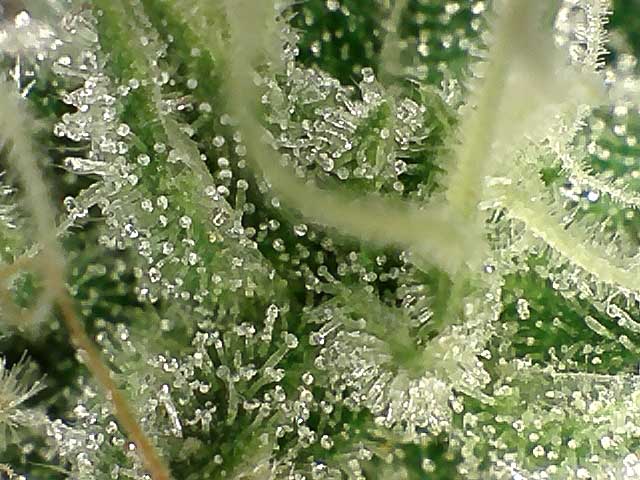
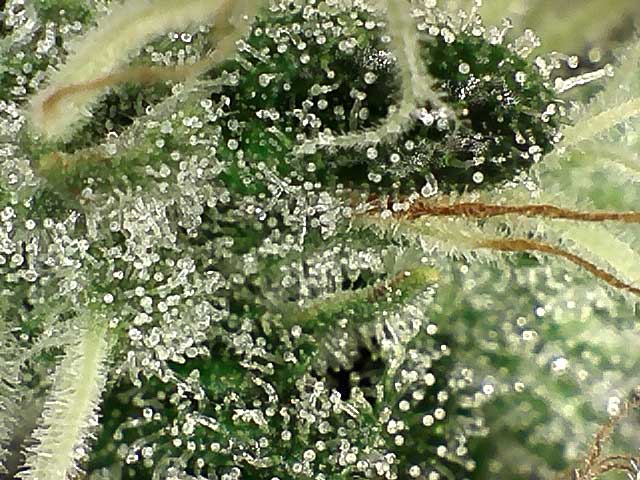
With this method, you look at the glandular stalked trichomes on the buds under a magnifying glass. Trichomes are the mushroom-looking growths on cannabis that are responsible for it being so popular.
In some places, these trichomes are called resin glands. These trichomes are the ‘crystals’, or ‘frosty stuff’ you see accumulating on your bud/leaves. They’re also what makes weed so sticky.
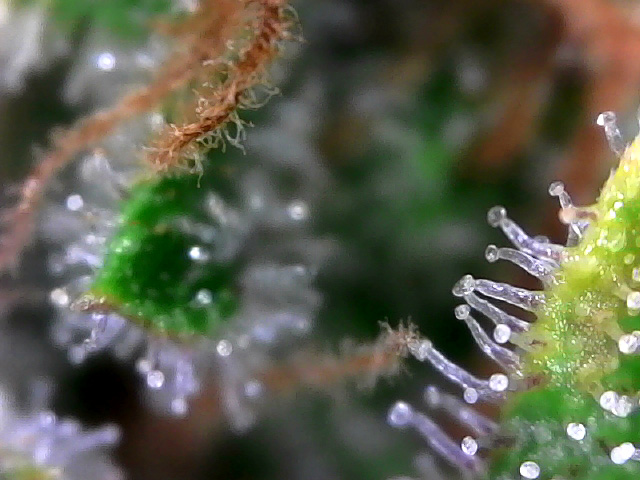
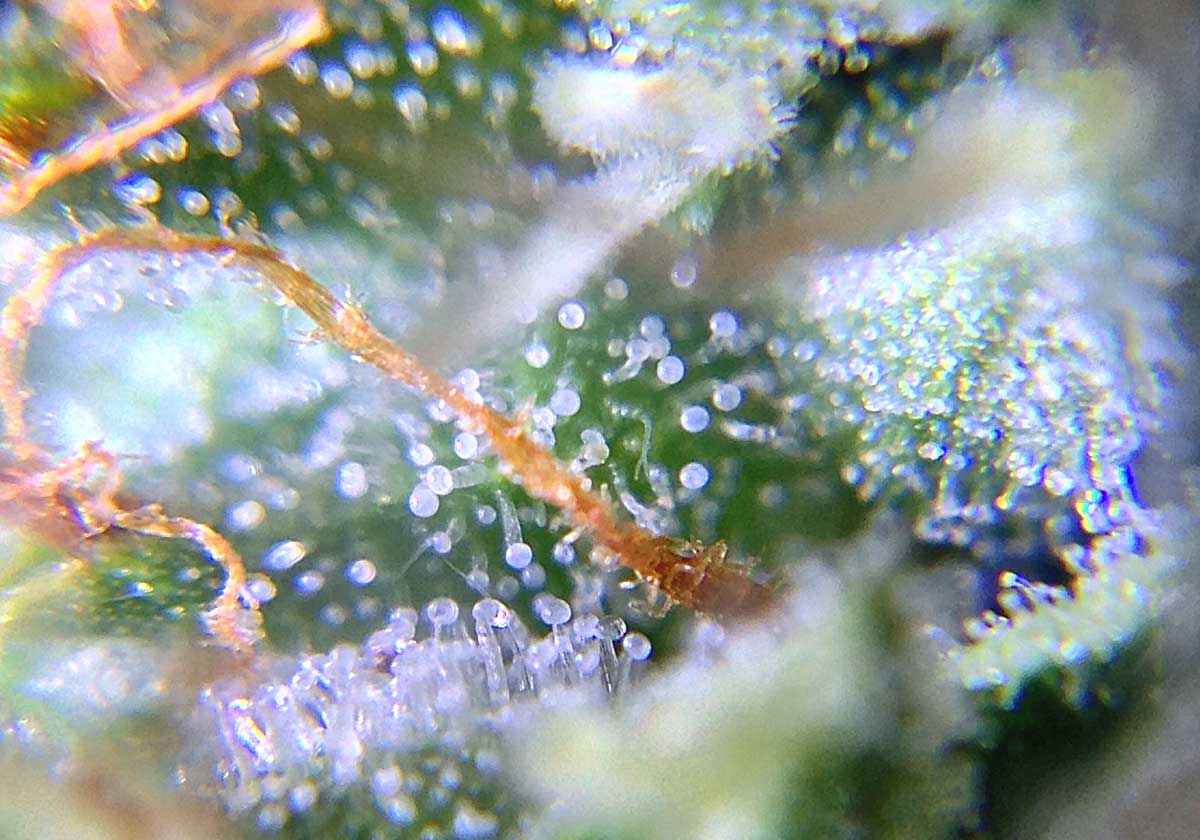
Extreme closeup of cannabis trichomes
The trichomes you’re trying to see look like little mushrooms. You may also see tiny, clear hair-like trichomes without the mushroom head but these don’t affect potency so you can ignore them. You are interested in the trichomes that have a little ball on top.
The little balls on top of the trichomes is where a lot of the THC and other good stuff in cannabis is most concentrated. Since these trichomes are what contribute the greatest amount to bud potency, being able to tell when they’ve reached their highest levels of THC helps you choose the exact right time to harvest your marijuana.
Cannabis trichomes are difficult to see with the naked eye, so you’ll need a jeweler’s loupe or other way to magnify the image in order to use the “trichome method” for determining harvest time. Conversely, some cameras can take ‘macro’ shots that are clear enough to see what stage the trichomes are in but they can be pricey…
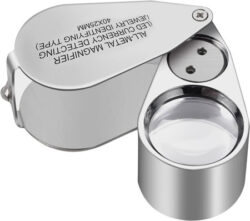
Jeweler’s loupes are relatively cheap to buy online, at a hardware store, or sometimes a jewelry store.
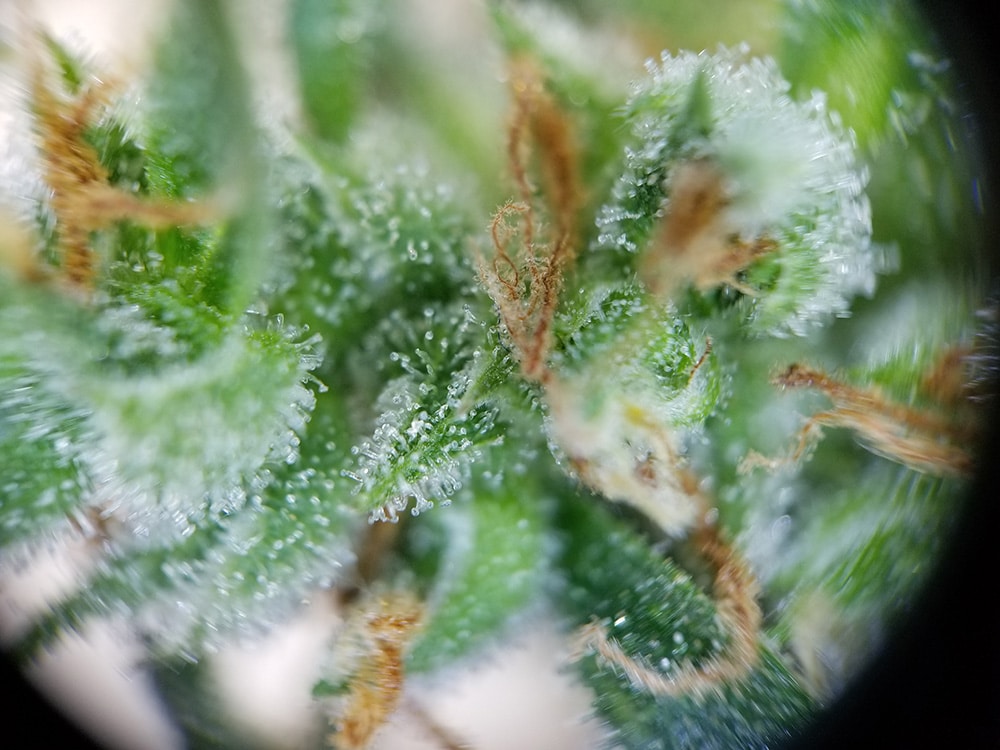
A view of marijuana trichomes through a jeweler’s loupe.

If you put the loupe right up to your buds, you’ll get a better view of the trichomes, letting you better determine their color and shape.
Although a jeweler’s loupe can make trichomes appear bigger, sometimes it’s not big enough. I know I end up squinting a lot when I’m trying to use one, but they are a heck of a lot better than nothing!
Although it’s cheap, this “Wesley Style Jeweler’s Loupe” is one of the best-rated jeweler’s loupes in the under $20 price range. It’s the one I use. However, please note that although it says you get 40x magnification, you don’t get nearly as much as that. However, I’ve found that problem with every jeweler’s loupe I’ve ever ordered. They advertise more magnification than what you get. That being said, for a lot of growers this will get the job done.
Get a Wesley Style Jeweler’s Loupe on Amazon.com
A digital USB microscope typically takes video and produces bigger and more clear pictures of trichomes than a jeweler’s loupe or other small magnifiers. Not only can you see the trichomes better, but you can record videos of them to look over after the fact. These are still pretty cheap, costing $30 on average, and they will give you better results than most other methods for determining harvest.
Here’s an example of a digital microscope we got from Amazon. So far I’ve found most USB microscopes get similar results.
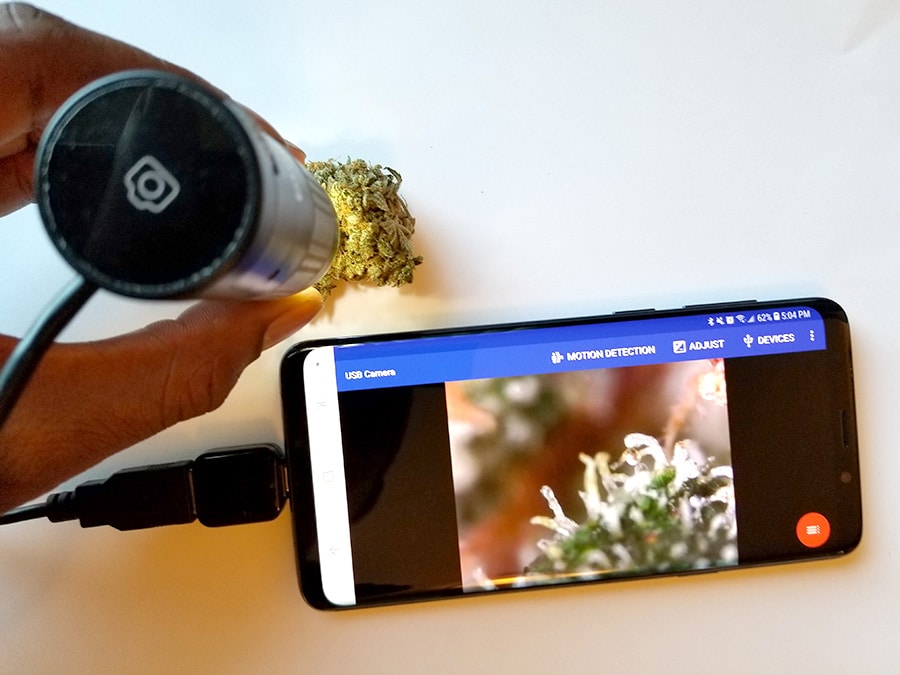
A digital microscope lets you see the trichomes up close and personal. You must hook it up to a device with a screen to see the pictures, such as a laptop or computer. It’s nice to be able to see the trichomes on a screen and take pictures or videos to examine afterward. It can be difficult to really evaluate the trichomes when you’re thinking about getting everything in focus.
Will a USB microscope work with smartphones? Likely yes. Most phones don’t have a regular full-size USB port, but newer USB microscopes often come with an adapter to connect the USB microscope directly to your mobile phone. However, this only works if your phone has a compatible USB port and supports OTG USB (some users may need to get an OTG-compatible camera app). Many USB microscopes (including the one linked above) come with an adapter, but if the microscope you choose only comes with a regular USB cord, or your phone needs a different type of plug, you may need to get an OTG adapter separately. Some Apple phones have ports that need Apple-specific OTG lightning port adapters. Some old Apple and Android phones don’t support OTG at all. Luckily, nearly all iPhones and most Android phones have a nice enough camera you probably will be able to see the trichomes through the regular camera (zoomed in) as long as you keep it still and use plenty of light. When in doubt, contact the seller of the USB microscope as they usually know which phone models their product will work with.
See more examples of magnifiers for examining trichomes (with reviews and pictures).
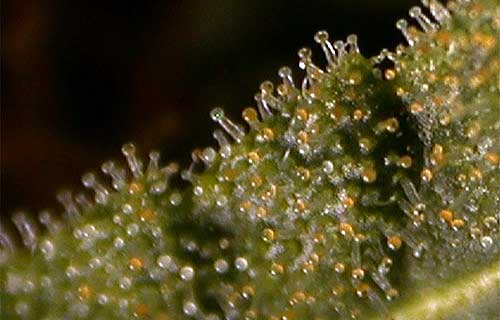
Here’s a guide breaking down when to harvest marijuana buds based on the color of trichomes.
(note: some cannabis strains have trichomes that turn purple or pink instead of clear white/amber/gold/yellow)
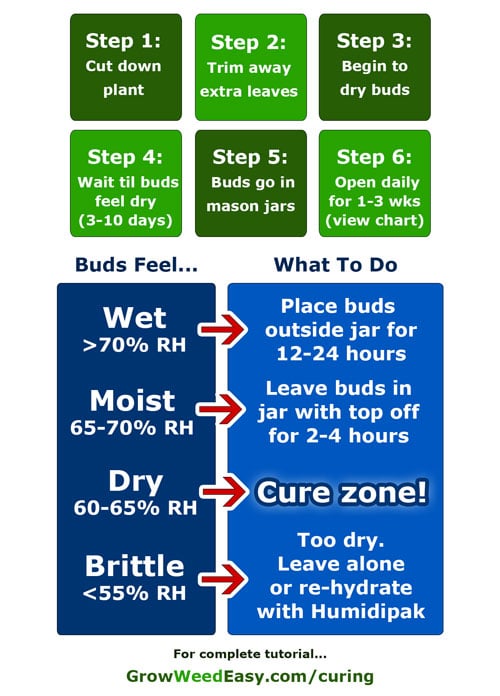
Click to open the picture of “When to Harvest Your Marijuana” guide
Clear trichomes look kind of like glass – Not ready to harvest. At this point, buds are not very potent.
The trichomes in the next picture are also mostly clear, but it can be difficult to tell the difference between clear and cloudy if you haven’t really looked at trichomes before. However, in this example, I don’t even really need to look at the trichomes to know these buds aren’t ready yet. I can clearly see several white pistils sticking straight out in the photo. The only two darkened pistils haven’t even curled in yet.
What if you can’t tell the difference between clear and cloudy trichomes? (these ones are all clear)
Here’s that bud from further away. Nearly all the pistils are white and you can’t really see the solid bud underneath. From just looking at the bud, you can tell there are still several weeks to go. So don’t worry about the trichome color just yet. Assume they’re clear for now until buds start looking closer to harvest.

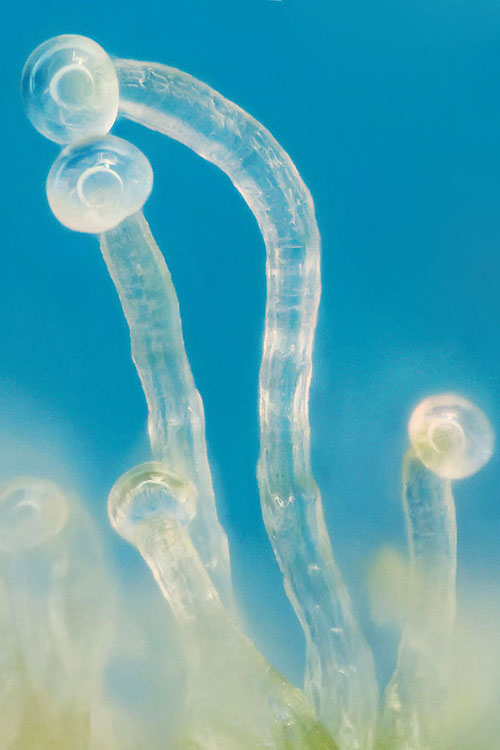
As buds mature, trichome heads turn milky white. They kind of look like plastic. These white trichome heads indicate the highest level of THC and CBD.
Cloudy trichomes indicate the highest levels of THC and CBD
This bud with all-white trichomes has reached peak potency. Wait another week or two for trichome heads to turn amber/golden for more of a relaxing effect.
If given more time, white trichome heads turn amber/golden (for most strains). Amber trichomes have less THC but produce more of a down/body/anti-anxiety effect.
I can’t tell the difference between clear and cloudy trichomes!!!
It can be hard to tell the difference between clear and cloudy trichomes. Especially if you don’t see both types of trichomes at the same time. This is completely normal, and it takes a little experience before it becomes easy.
However, when in doubt, look at this picture gallery of buds that are ready to harvest to compare against the trichomes. If you combine both methods you’ll get the best results. Although looking at your buds isn’t the most precise way to know when to harvest, it does give you a pretty good idea. Try to take everything together. If your buds just have white pistils sticking out, you know for sure that it’s nowhere close to ready, so you also know that the trichomes on the buds aren’t all cloudy yet. It’s only when your buds are getting close to looking harvest-ready that trichomes are going to have something to tell you.
When you’re not sure, use a combination of looking at the pistils and trichomes!
Note: It’s usually a good sign to see lots of trichomes, but trichome production doesn’t always indicate quality. Many classic strains give you outstandingly potent buds even though buds aren’t dripping in trichomes. On the flip side, there are some strains that grow frosty buds yet have low potency. Trichome-encrusted strains are extremely popular these days, especially in the USA, but many amazing strains (like Liberty Haze or LSD) produce incredible effects even though you only see a moderate amount of trichomes. It’s tempting to want to grow the “prettiest” strains, but I highly recommend choosing strains for effects rather than appearance.
Learn everything you could possibly want to know about cannabinoid levels in your marijuana, and what you need to do as a grower to control the potency of the buds you grow.
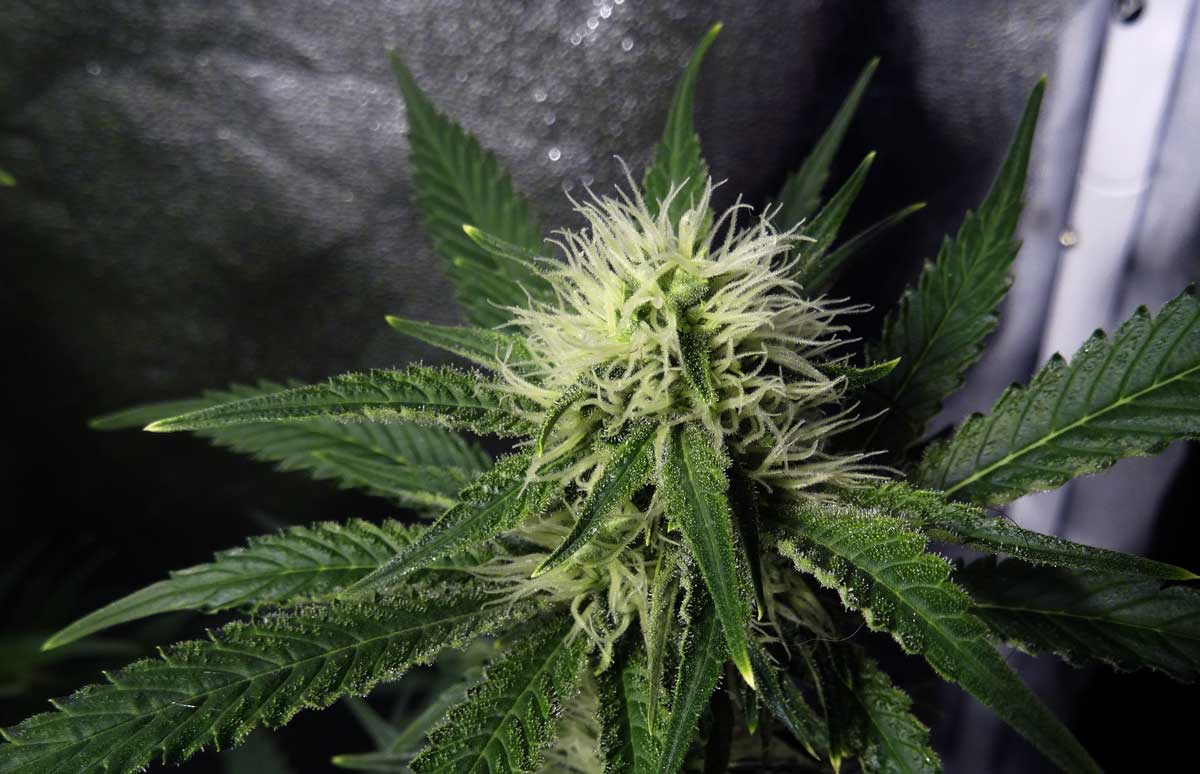
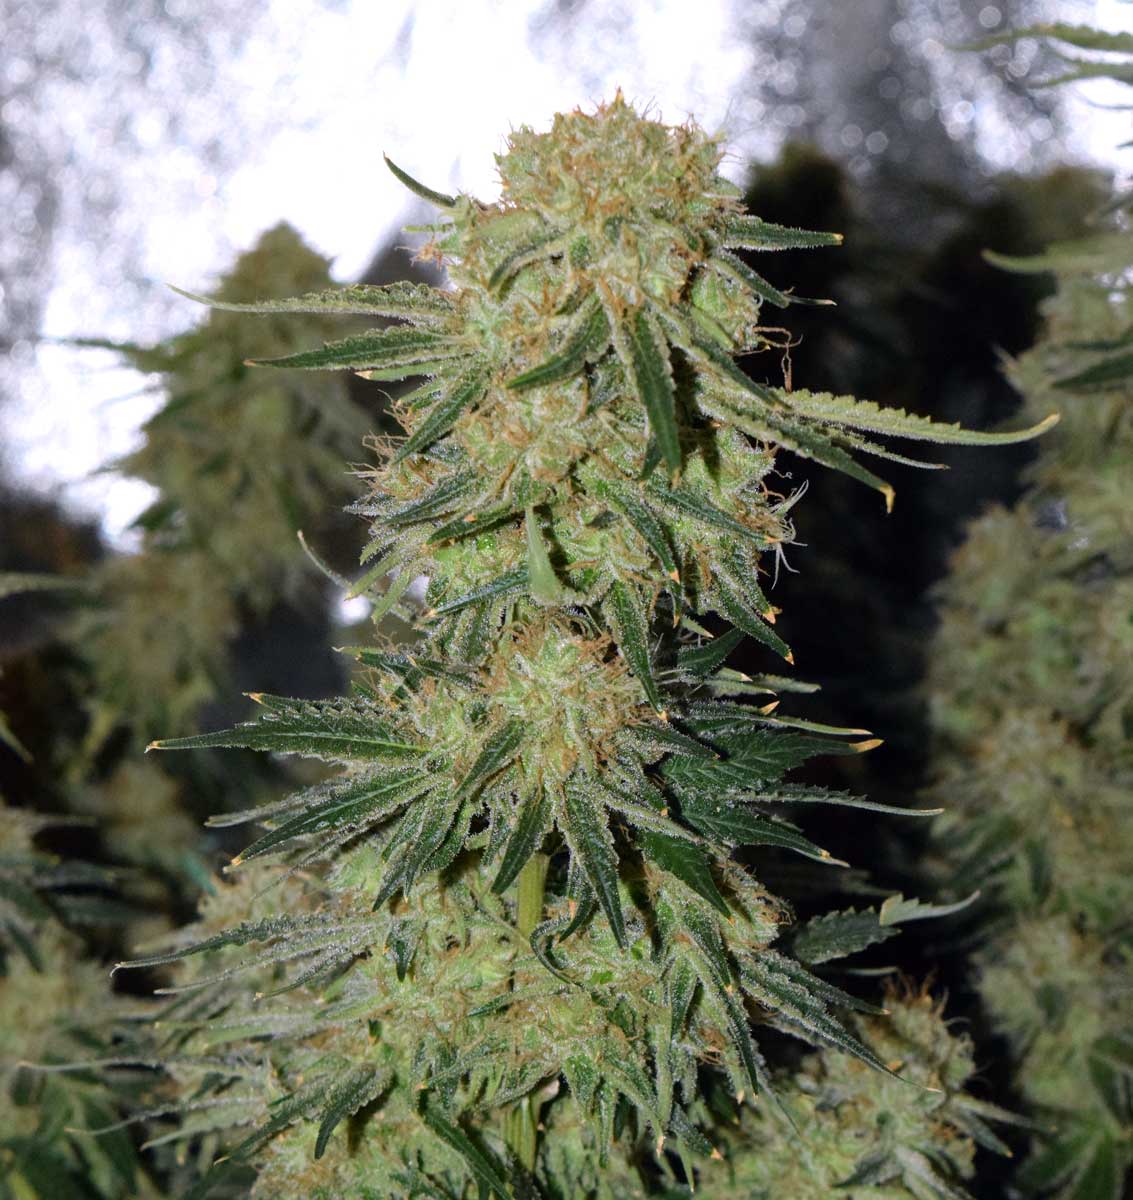
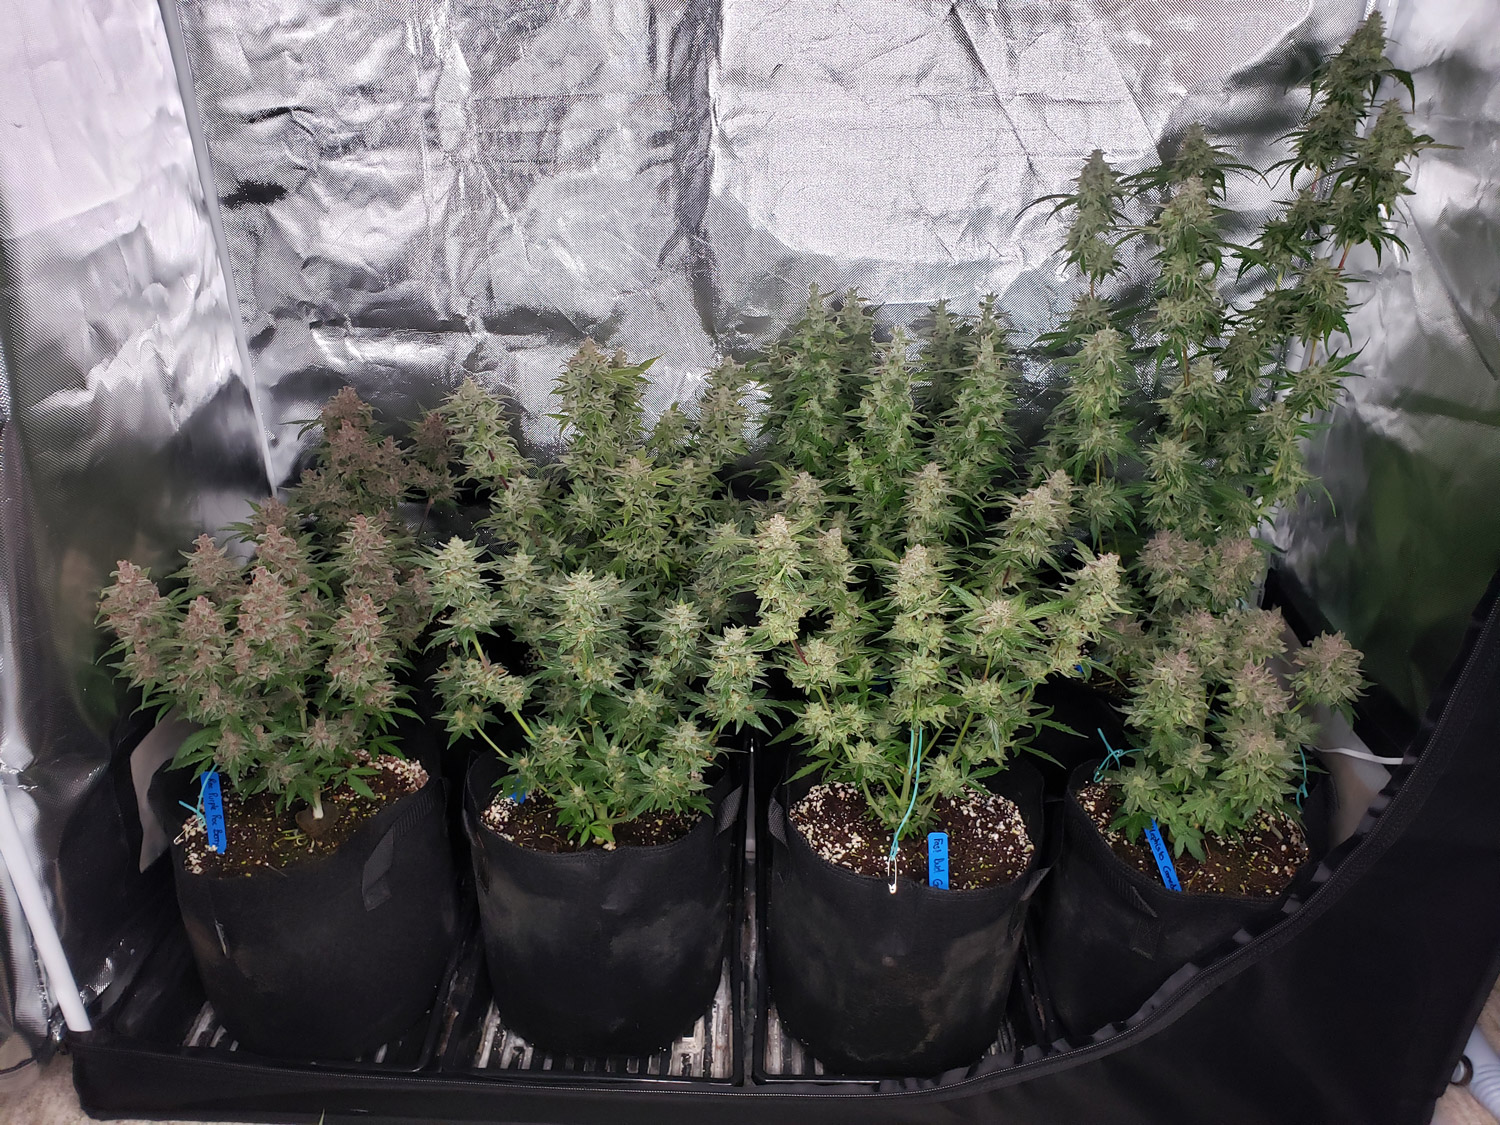
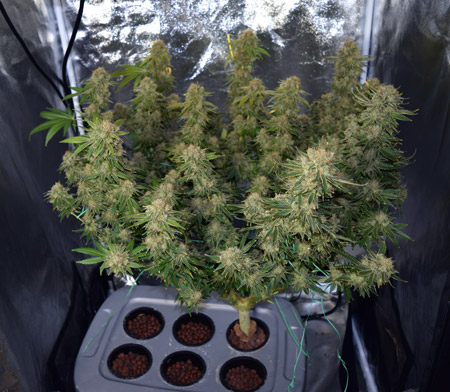
Harvest day is a great day. These were grown with a SF-2000 LED grow light.
When to Harvest Cannabis Cheat Sheet: 7 Tips & Hints
Here are the general rules to remember about harvesting marijuana based on trichomes and the color of the hairs / pistils. Follow these rules to harvest weed at the perfect time, every time.
- Many White Hairs = Not Ready – At first, buds look like bunches of white hairs sticking straight out. At this point, your plant is too young and buds are not ready for harvest. Harvesting now leads to low yields and non-potent harvests. The beginning of the harvest window is some time after your plant stops growing new white hairs.
- Wait Until Hairs Darken and Curl In, Then Harvest – When buds are ready to harvest, most of the pistils have darkened and curled in. Buds usually look solid and have some “heft” to them now. Compare your buds to pictures of ready-to-harvest buds to get an idea of what exactly to look for.
- White Trichomes = Max THC – Use a magnifier (or your smartphone camera with zoom) to look at trichomes for the most precise estimate. Clear, glassy trichomes are not potent yet. The highest level of THC is when most of the trichomes have turned milky white. They look like white plastic. Trichomes that are milky have the highest levels of THC are “ready to harvest” and contribute to more euphoric and psychoactive effects. See pictures of ready-to-harvest trichomes.
- Some Strains Follow Different Color Rules – Some sativa & haze strain trichomes don’t turn amber and never progress past white. Some strains make purple pistils or purple trichomes. Use the GrowWeedEasy.com search bar to find tutorials about what you see on your cannabis plants.
- Harvest Too Early and Get Small, Weak Buds – The most common beginner mistake is to harvest cannabis buds too early. Better to harvest late than too early. Once the harvest window is open, you typically have at least 2 weeks before buds start losing potency.
- Harvest Later for “Couchlock” – The most “couchlock” or sedating effect happens towards the end of the pot harvest window when the trichomes have become a darker color (usually amber/gold). The best results from amber trichomes come from indica strains. The amber/yellow trichomes contribute to a ‘body high’. Some of the THC has converted into less psychoactive CBN, which has calming and anti-anxiety effects. At this point, nearly all of the pistils have darkened and curled in. Harvesting later will increase the sedating effects, but may also start reducing the psychoactive effects.
- Harvest Too Late and Buds May Be Weak – When trichomes start looking grey or withered, the harvest window has passed. Harvest at this point, and buds may make you sleepy without strong psychoactive effects. Usually, it takes several weeks (4 or more) from the beginning of the harvest window for this to happen. It’s much easier to harvest too early than too late.
Want more of a speedy ‘in-your-head’ effect? Harvest your buds earlier, when only half of hairs have darkened and curled in and more than half of the trichomes are part clear/ part milky or mostly cloudy/milky.
For the “strongest” marijuana buds with the most psychoactive effects and the highest levels of THC, harvest when almost all trichomes are cloudy/milky.
For more relaxing, anti-anxiety buds, wait until at least some of the milky / cloudy trichomes have darkened to amber. More amber = more relaxing, though the effects may be somewhat less psychoactive. Remember, curing your buds properly for at least 2 weeks to a month will also give them more of an anti-anxiety effect.
When growing your own marijuana plants, you can certainly sample buds off your plant at different stages to get an idea of what your preferences are. It’s okay to cut off pieces at a time!
The hardest part of growing cannabis for many new growers is waiting for the right time to harvest.
Try not to harvest early
There is a strong tendency for new cannabis growers to harvest their plants early due to excitement.
Unfortunately, this often results in low yields, low density, and low-potency buds.
What can you do if you think buds are ready to harvest, but not sure? If you are feeling excited about harvesting your marijuana plant, identify the buds on the plant that look the most done. Cut them off and dry them. Now you check the bud potency for yourself. This allows the other buds on the plant to continue maturing.
Harvesting the buds in stages (starting off slowly with small batches) can really help abate the excitement.
When in doubt, listen to your gut. Using both methods together will help you pick the best time to harvest, but only YOU know how you want your buds to turn out. This means that even the best methods are just general guidelines. But hopefully, you’re now closer to getting your bud the way you want it.
Happy growing!
Nebula Haze, Co-Founder of GrowWeedEasy.com
This harvest tutorial is part of our “how to harvest cannabis” series:
Flushing > Harvest > Trimming > Drying & Curing
Learn how to cure buds without guesswork!
Now you’re ready to harvest your own plants!
Jump to…
How To Get To Harvest As Fast As Possible
How Do THC, CBN & CBD Relate to Marijuana Potency?
How to Grow Cannabis in 10 Steps
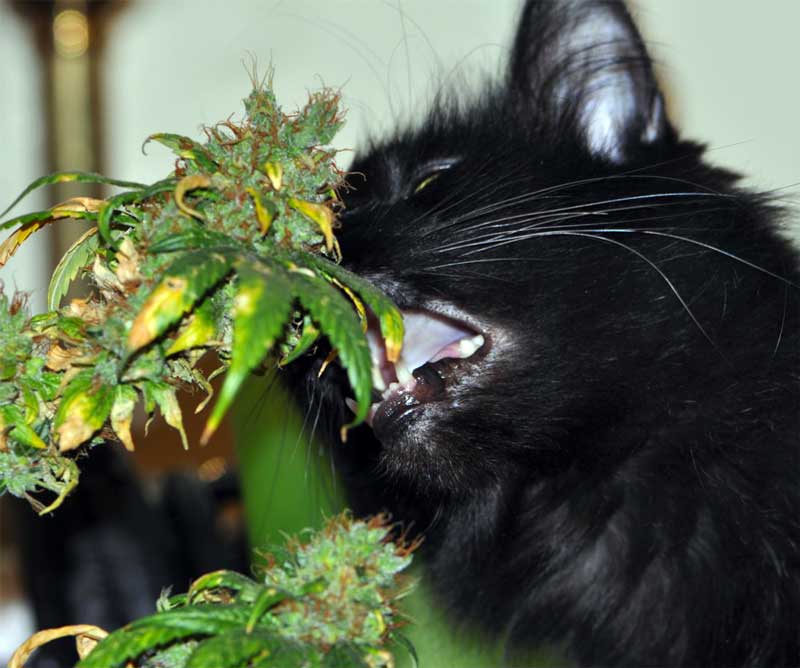
Cat and Dogs May Nibble on Your Plants!!!
Some cats and dogs love eating cannabis plants! They may lick or chew your plants around the leaves or buds, often at the absolute worst time. Many clones and small plants have been lost to these surprising cannabis pests 🙂 Once your pet gets a taste, you may have a monster on your hands. So if you have pets, make sure you keep them far away from your marijuana plants!
Some Cats & Dogs Love Cannabis – Protect Your Plants!

🌟 $200 Off Special Offer: Enroll today in Home Grow Masterclass!
FOR SERIOUS GROWERS ONLY
I know you are dedicated to growing the best cannabis possible or you wouldn’t be reading this right now.
Cannabis plants are quite a bit more complex than a regular house plant, but my partner Sirius and I have dedicated years to showing the world that learning how to grow isn’t as crazy complicated as a lot of growers make it seem.
Still, you need to learn this plant’s language if you want to grow high-quality buds and get great yields.
So you could spend years learning the hard way…
Or you can take the shortcut to consistently producing outstanding results by learning from real growers who have done all the work for you.
Our course will show you how to grow a sea of fat, dense, beautiful buds that you feel proud of. At home!
If you simply follow our highly-rated, 5-week course, we give you literally everything you need to know, and walk you through each part step-by-step. Developed by expert home growers and honed with hundreds of students since 2019, our course ensures you’ll achieve great results on your very next harvest.
Learn How To Grow Top-Shelf Weed at Home!
Your buds will be covered in so many THC-filled trichomes they look like this under a magnifier!

This course is recommended for growers who want to go pro with their growing skills. The investment will pay you back over and over via increased yields and saved time/frustration.
If you’re ready to grow professional quality buds at home for as cheap and easy as possible, look no further than this ultimate guide to growing.
Ready to Go Pro With Your Garden? Invest In Your Future Yields Today!
You came at the perfect time.
🌟 $200 Off Special Offer: Enroll today in Home Grow Masterclass!
👉 Start Your First Class TODAY!