by Nebula Haze
Introduction to Crop Steering for Cannabis Growers
What is cannabis Crop Steering? “Crop steering” means manipulating your cannabis plant and environmental variables to increase plant growth, yield, and bud quality. Essentially, you take everything cannabis growers have learned about getting the best results from a cannabis garden and use this knowledge to guide the plant’s physiological processes.
Crop steering uses science and efficiency-based methods to achieve big yields of potent cannabis buds with less money, time, and effort.
Crop steering can help indoor and outdoor cannabis growers, though indoor growers typically have a lot more control over their environment and can utilize it to the greatest effect.
Two main types of cannabis crop steering
- Control the Environment – First, learn how variables in the environment affect the way cannabis plants grow, including light, temperature, humidity, and more. Then take this knowledge to encourage plants to grow the way you want (fast-growing with big potent buds).
- Specific Crop Steering Techniques – Directly manipulate the cannabis plant with pruning, training, environmental manipulation, watering techniques, and other specific tactics.
Today’s article will cover both types in detail so you gain complete control over your cannabis grow and the resulting harvests.
Environmental Variables in Cannabis Crop Steering
The environment has a huge effect on how cannabis plants grow, and also how their buds form. By giving the right environment, you can naturally encourage your cannabis plants to grow the way you want.
For example, it’s common for home cannabis growers to ignore excessive heat in the grow space. If the plants survive, it should be fine, right? The problem is that cannabis plants grown in a hot environment tend to grow slower, be more likely to suffer from mold, bud rot, or bugs, and also have reduced yields with lower bud potency.
Here are the most important environmental variables to consider when it comes to steering how your cannabis plants tend to grow.
Light
Light plays a crucial role in crop steering. The most important factors are the light schedule (when lights turn on and off) and the actual quality of the light (including intensity and spectrum).
Light schedule
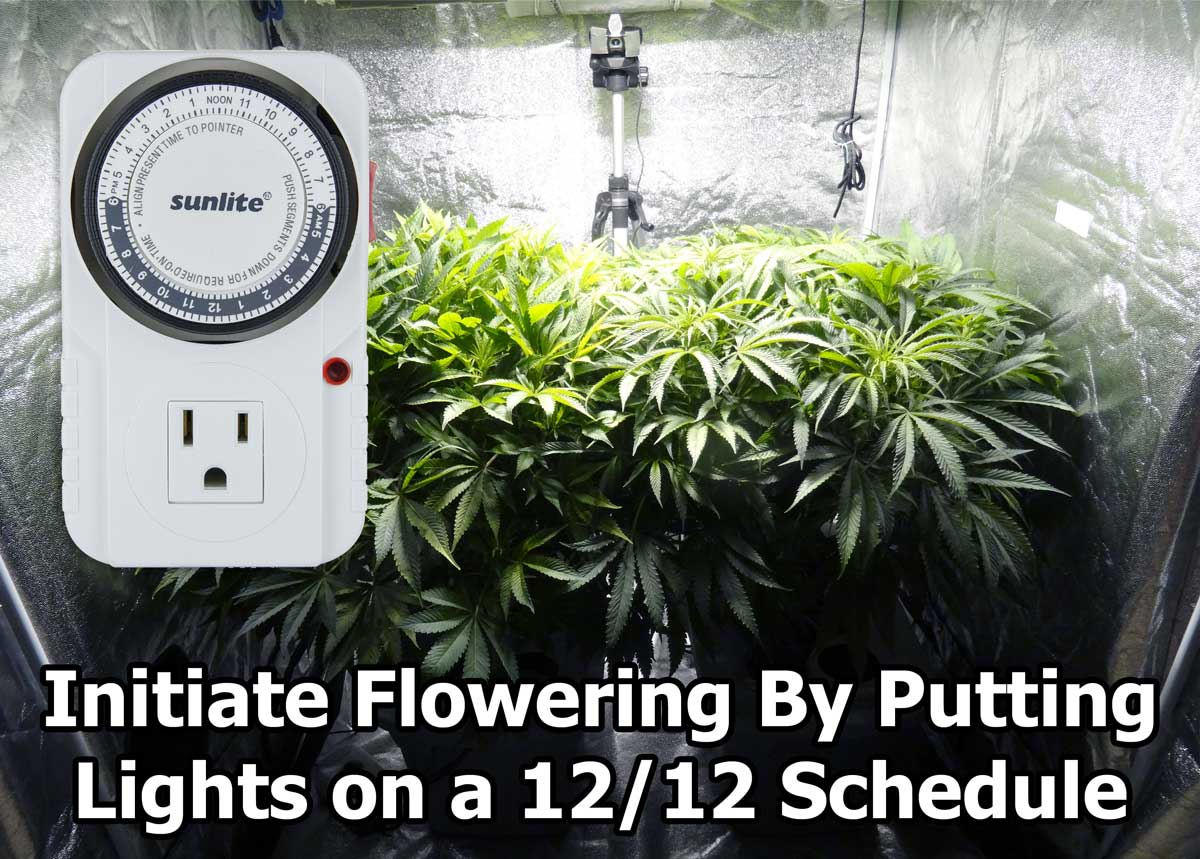
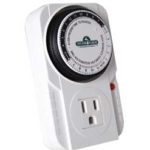
You can manipulate cannabis plants by changing their light schedules in various ways. For photoperiod strains (most strains) the light schedule also determines when the plant starts making buds (starts “flowering”).
- Vegetative Stage: Provide 18-24 hours light/day in vegetative stage (first stage of life). For autoflowering plants, you would provide this light schedule from seed to harvest.
- Flowering Stage: Switch to 12/12 schedule (or similar) to induce the plant to start the flowering stage, which is the second stage of life when plant starts making buds. The most important part is to ensure the plant is getting long uninterrupted night periods of 12+ hours darkness per day. Some growers will give longer nights (for example a 11/13 or 10/14 schedule), which can cause some strains to mature faster in the flowering stage. More info below.
Quality of Light
This includes the intensity of the light and the spectrum. Your quality of light is mostly influenced by the grow light you choose, though the distance you keep the light from your plant also has a big effect.
- Color Spectrum – Use wide-spectrum high-quality grow lights that are designed for a plant like cannabis and tested on live cannabis plants.
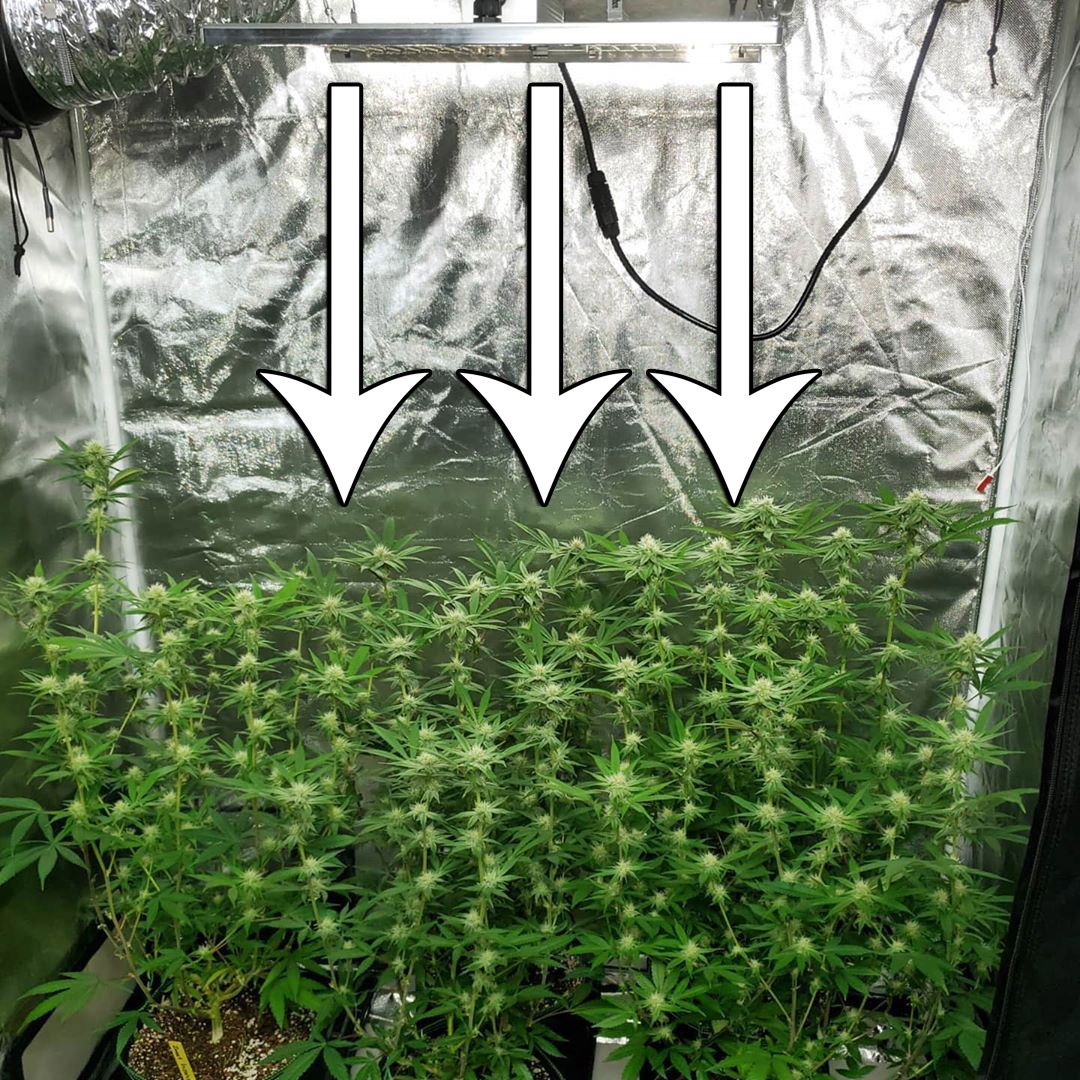
- Light levels – Your goal is to maximize light levels, especially in the flowering stage to the top main buds. This is done by training plants to grow with many buds at the same distance from the light, and otherwise to keep the grow light as close as you can without stressing out the plant.
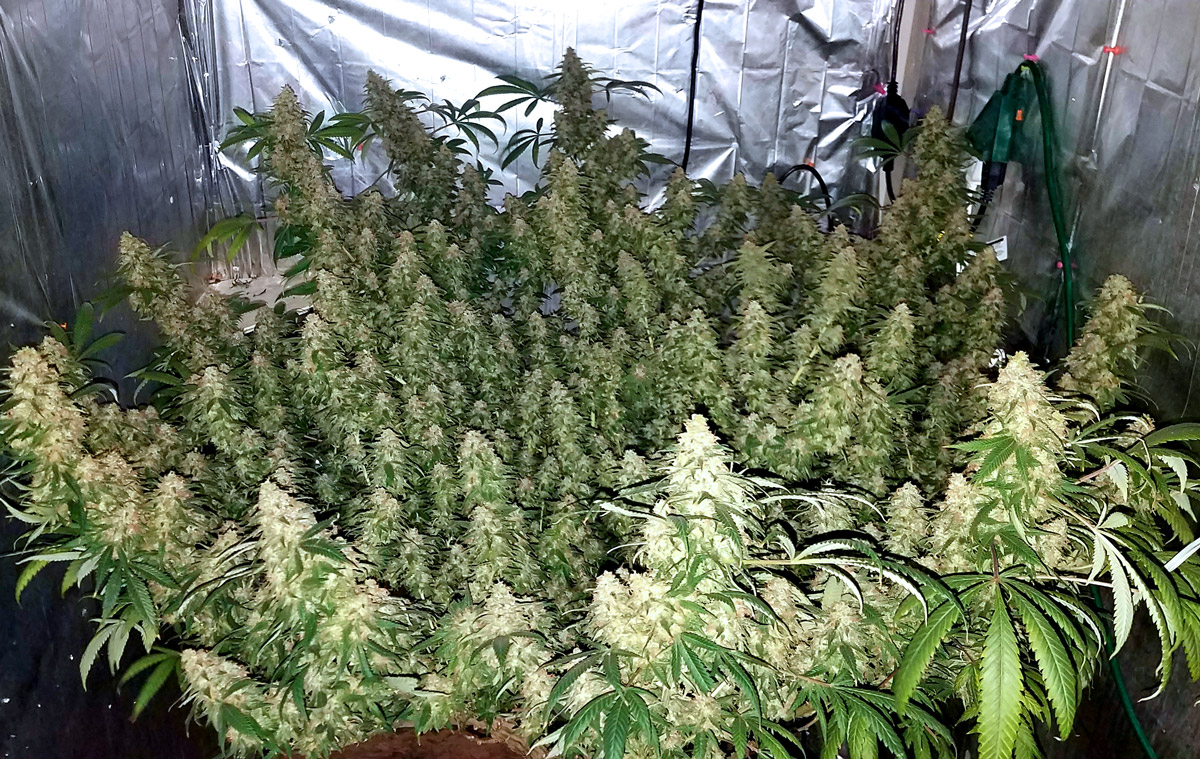
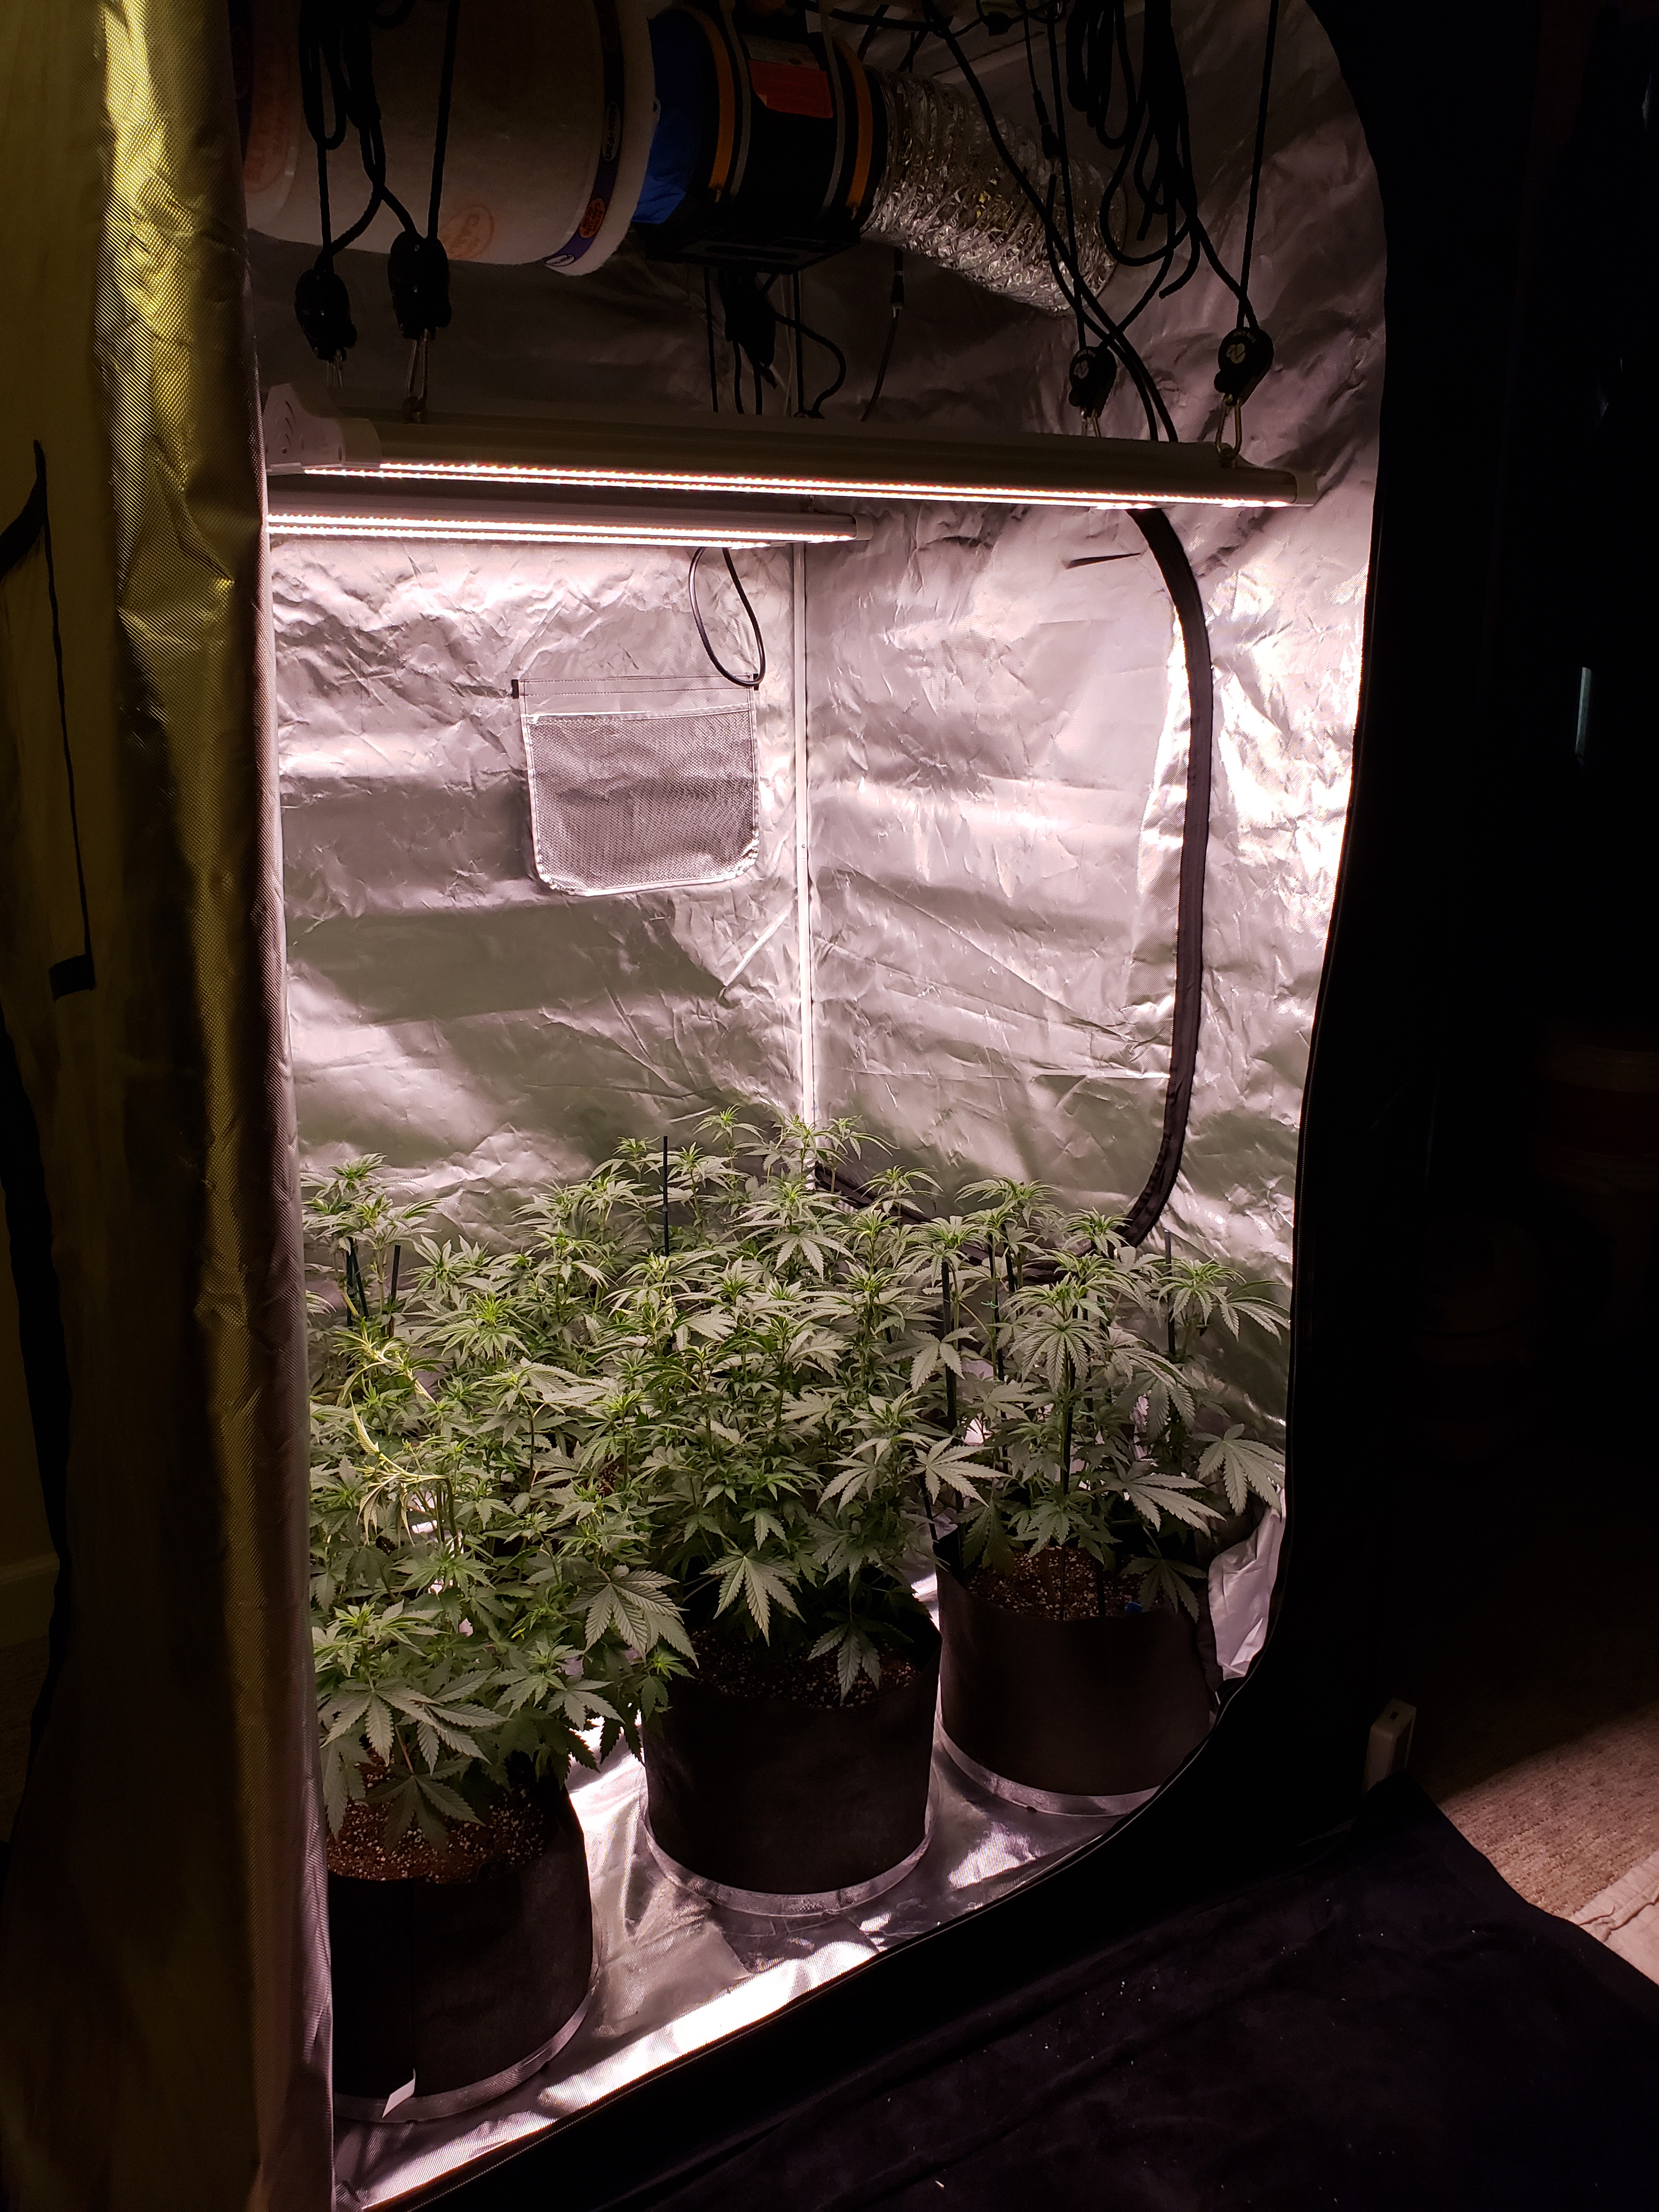
Here are happy cannabis plants under good LEDs with a wide spectrum of light.
Temperature
Temperature is often ignored but has a surprisingly big effect on how your cannabis plants grow, as well as how buds develop.
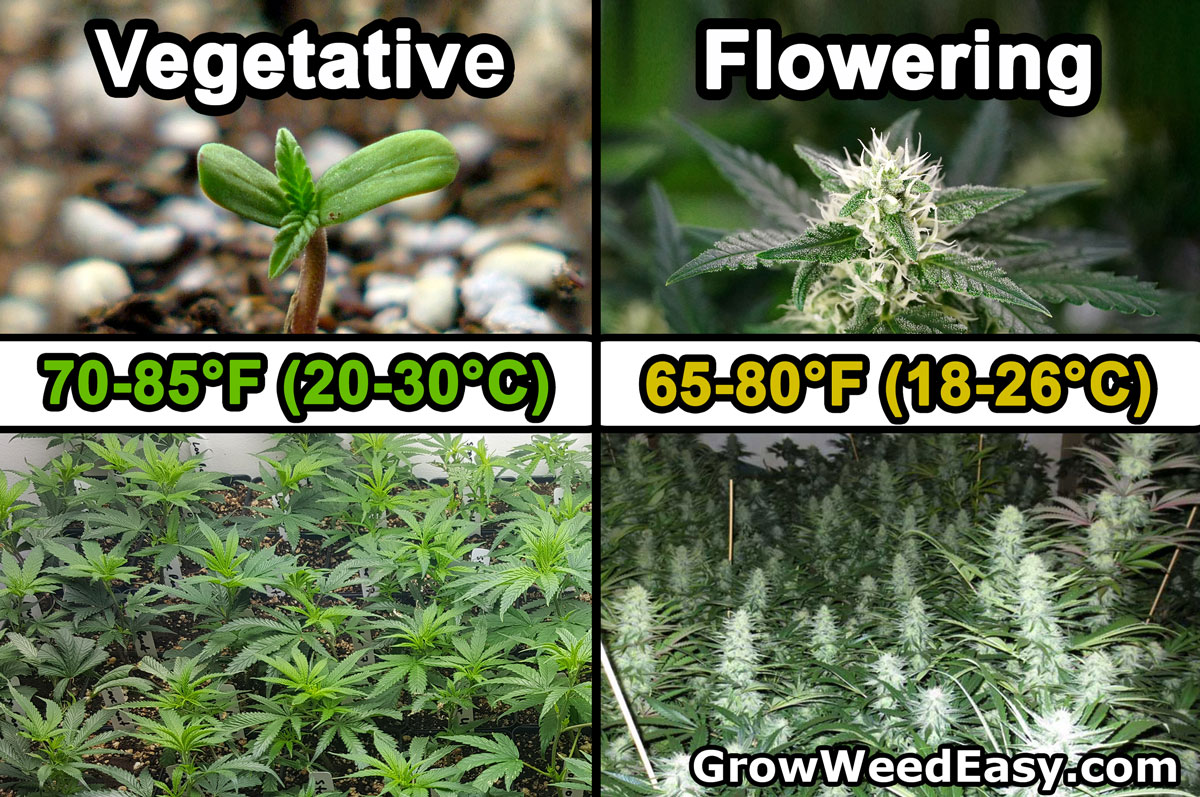
Ideal temperature
- Vegetative Stage: 70-85°F (20-30°C)
- Flowering Stage: 65-80°F (18-26°F)
When to keep it warmer?
- Warmer temperatures tend to enhance photosynthesis (this process is essential for plant growth and is how the plant turns light into energy). Like our stomachs digest food, leaves “digest” light and turn it into the sugar that the plant uses to grow. Keeping plants warms makes it easier for them to do more photosynthesis, which essentially gives more energy/food for plants to grow.
- That means plants tend to grow faster and buds tend to get bigger when the temperature is on the warmer side of the recommended range.
When to keep it cooler?
- Cooler nighttime temperatures can help control excessive stretching and maintain compact growth.
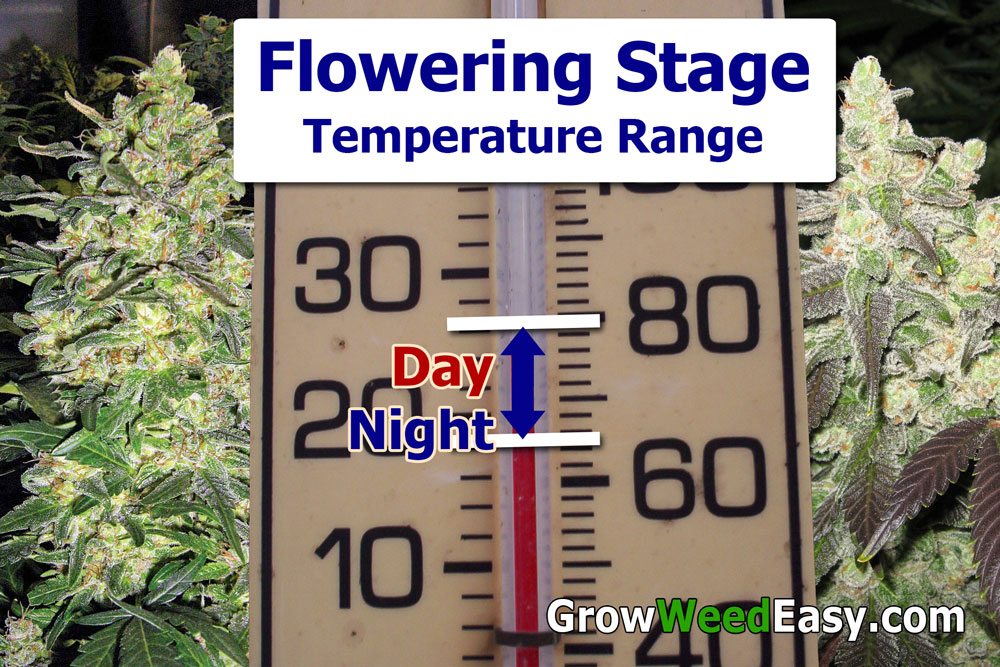
- During the last 2-3 weeks before harvest, keep temperatures under 75°F (if possible) to enhance bud density, potency, and smell. Cooler air towards the end of flowering also helps prevent bud rot because the fungus that causes bud rot doesn’t grow well under 75°F.
It’s good to have a thermometer in the grow space so you can know whether your plants are getting the ideal temperature range.
Humidity
Most thermometers also display relative humidity. Like temperature, humidity has an effect on how cannabis plants grow and buds form.
- Low humidity – Low humidity may stress out younger plants, but they typically can adjust and get used to it. As plants get older, low humidity helps prevent unwanted mold, powdery white mildew, and bud rot.
- High humidity – Young cannabis plants can handle high humidity, but it slows their growth. If the sides of the grow space are getting wet from the humidity, it’s likely your plants are growing slower than they could be. Once plants start flowering, high humidity causes problems with bud formation including low density and bud rot.
Tips about humidity
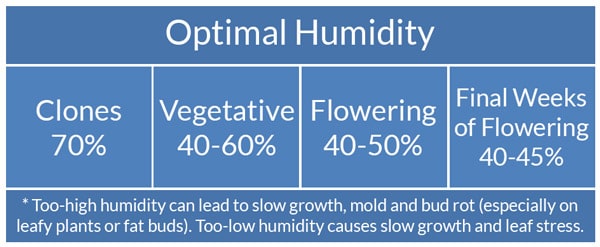
- Keep the humidity between 40-60% for the fastest growth (the only exception is new clones, which need high humidity until their roots form).
- Try to keep under 50% during the last 2-3 weeks before harvest, or as soon as you start noticing buds/colas are thicker than 1.5-2″ wide. Fat colas are most likely to get bud rot or mold, and keeping the humidity under 50% RH (especially combined with not-hot air) will greatly reduce the chance of bud rot.
Nutrients
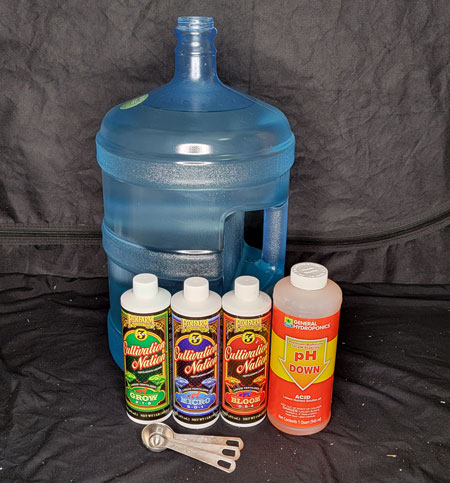
Use a cannabis-friendly nutrient system to get the best results. What nutrients work best for growing cannabis?
- Vegetative Stage: All-purpose nutrients work well in the vegetative stage
- Flowering Stage: A Bloom nutrient formula is ideal for bud development in the flowering stage. Bloom nutrients typically contain low amounts of Nitrogen and plenty of Phosphorus and Potassium
Giving cannabis plants the right nutrients will help buds grow as big and potent as possible. But be careful not to go overboard!
Water
- Water cannabis plants properly.
- Avoid overwatering and (more rare) underwatering.
- Always make sure to adjust the pH of your water before giving it to plants. Otherwise, they will show nutrient deficiencies (yes, even if you’re using the right nutrients) because the pH actually changes the molecular form of some nutrients (some forms are easier for the plant roots to absorb than others).
Make sure to always adjust the pH of your water to prevent cannabis nutrient deficiencies in the flowering stage.

Crop Steering Techniques for Cannabis Cultivation:
1.) Light & Air Temperature
Vegetative Growth Promotion and Flowering Induction
Vegetative stage
- 18-24 hours of light per day
- More light = faster growth, however, you get diminishing returns after 18 hours of light a day
- More light = more sensitive plants (when the leaves are working 24/7, they’re more prone to nutrient problems and are less resistant to heat stress or other issues)
- A lot of light maximizes growth rates, up to a point. After a certain point, more light only causes more stress to the plants.
- Maintain optimal temperature and humidity
- High Nitrogen and abundant other nutrients to promote healthy growth.
Flowering stage
- The industry standard is to reduce the light cycle to 12 hours of uninterrupted darkness, however, there are more examples of light schedules below and each has its own pros and cons
- Switch to Bloom (lower Nitrogen) nutrients once buds start forming

Lighting Adjustments
- Adjust the light intensity to control plant height and promote shorter growth.
- In general, try to keep your grow light as close as possible to plants without causing stress. This maximizes the amount of light that gets to the plant, increasing growth rates, reducing stretching, and maximizing bud size in the flowering stage.
- However, if you can’t control the heat, it’s better to turn down the power of grow lights and have a good environment/temperature even if it means reducing the total amount of light. If you turn down the power of the grow light, you can often keep the grow light closer to still maximize the amount of light to the plants.
- Monitor temperature and adjust light to optimize photosynthetic rates.
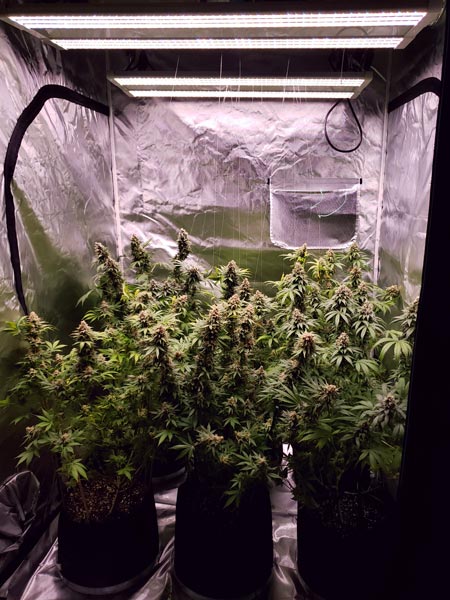
Keep your grow lights the right distance from your cannabis plants to get the best growth. Close, but not too close.
Alternative Light Schedules
Most growers give a 12/12 light schedule to initiate the flowering stage and keep plants in the flowering stage until buds are ready to harvest. However, there are also some alternative light schedules.
Longer nights for a shorter flowering stage – 11/13 or 10/14 light schedule
- Essentially, these give plants an extra 1-2 hours of darkness per day
- This mimics the light schedule outdoors in mid-to-late autumn
- This “tells” the plant essentially that “winter is just about here” which encourages the plant to develop buds faster
- Reduces yields overall by reducing both the number of hours of light a day, and also by reducing the overall number of days spent in the flowering stage making buds fatter. However, you also get a subsequent reduction in electricity use as your grow lights are on much less often.
- For some strains, especially equatorial or long-flowering strains, you may need to give longer nights in order to get buds to “finish” or become fully mature.
Shorter nights for bigger yields – 13/11 or 14/10 light schedule
- Essentially, give plants 1-12 extra hours of light per day
- Most cannabis strains will still flower and make buds under a 13/11 light schedule, and many will flower even under 14/10.
- Tends to increase yields, because plants get more hours of light a day, and also may take a little longer before they’re ready to harvest.
- Some strains (especially haze, sativa, or long-flowering strains) will not flower under these schedules, or it may cause them to start making buds but the buds will never “finish” or become fully mature.
- Tends to work best if you gave the plant 24 hours of light a day during the vegetative stage, to increase the change and cause the plant to immediately start flowering.
- May need to drop down to 12/12 light schedule to get buds to fully finish if it seems like they keep putting out new white hairs
- Warning: Increases the chance of accidental re-vegging especially for certain strains.
Cannabis plants under ideal temperature and light conditions.

2.) Optimizing Photosynthesis with Carbon Dioxide (CO2) Supplementation
Supplementing extra CO2 (carbon dioxide) into the air can increase growth rates and yields because it gives plants the ability to do more photosynthesis. Typically CO2 is supplemented by sealing the grow room to avoid letting CO2 out and using tanks of CO2 and a regulator to slowly release it into the air to maintain CO2 levels between 1200-1500 parts per million (ppm) during the daytime.
Note: CO2 helps with photosynthesis and therefore does not provide help at night. Therefore most growers will turn off CO2 supplementation at the same time as when the grow lights turn off, or even a little earlier.
Learn more about how to supplement CO2 for cannabis plants.
Growers use a CO2 monitor attached to a tank of CO2 to regulate the CO2 levels in the cannabis grow space.

3.) Crop Steering Techniques: Flushing
Flushing Schedules and Nutrient Management
Flushing is a common practice during the final weeks of flowering. It involves feeding the plants with plain water to remove excess nutrients and enhance smoking quality. It’s important to adjust flushing time based on strain, growing medium, and nutrient regimen.
Here are some general guidelines based on your grow medium:
- Soil: Stop giving nutrients for 1 week before harvest.
- Coco: Stop giving nutrients for 3-5 days before harvest.
- Hydro: Stop giving nutrients for 1-3 days before harvest
Extra tips
- Flushing too early hurts yields. Some growers don’t flush, or flush only for a very short amount of time. That’s because tapering off on nutrients too soon can rob plants of necessary nutrition during the crucial last few weeks of bud fattening.
- It may be okay not to flush. If you aren’t overfeeding your plants, you can likely get away without flushing. When you’re giving nutrients at the right level, there shouldn’t be any nutrient buildup in your plants. The advantage of not flushing is that it tends to maximize yields.
- That being said, try to give at least a small flush if possible. If you have the chance, it’s good practice to water plants at least once with plain water before harvest so the plant can use up extra nutrients.
4) Nutrient Selection and Control
Effect of Organic and Synthetic Nutrients on Crop Steering
Choose between organic and synthetic nutrient options based on your growing preferences.
- Organic nutrients release slowly
- Synthetic nutrients offer precise control
As long as you give cannabis plants the right amount and ratio of nutrients, the bud quality is comparable. When everything else is equal, your environment has a much bigger effect on bud quality than the exact source of nutrients used.
It’s important to find nutrients that work for you and your goals, but remember that there is no #1 “best” nutrient for growing weed. Even among the top growers on earth, including cannabis cup winners and world-famous breeders, you’ll see that every grower has their own favorite nutrient regimen, and they’re all different. Don’t worry too hard about finding the “best” nutrients as much as finding great nutrients and learning how to use them. Here’s the nutrient system I use.
Choose a high-quality source of nutrients. Both organic and synthetic sources of nutrients produce great weed when used properly.

Balancing Precision and Risk in Nutrient Control
Follow nutrient manufacturer guidelines and adjust nutrient ratios as needed. Always watch what your plants are telling you, and pay more attention to that than what the bottle says. Giving plants the right amount of nutrients is important because nutrient deficiencies or problems reduce the plant’s ability to do photosynthesis. When your cannabis leaves are not green and healthy, plants tend to grow slowly and buds don’t get as big or potent as they could.
So on the one hand, in order to maximize results you want to maximize nutrient absorption. On the other hand, be cautious not to over-fertilize, as too much nutrients can lead to nutrient burn or lockout, which also reduces growth rates and yields, and can hurt bud quality. Think of nutrients like a multivitamin for your plant, as opposed to “food”.
When to increase nutrients
- Plants are growing fast – When plants are growing fast vegetatively (especially the first few weeks after the plants start flowering) they often need higher levels of nutrients than normal. However, most cannabis nutrient schedules already recommend increasing nutrients during this “transition” phase.
- Under strong grow lights – Plants under strong grow lights tend to need much higher levels of nutrients than plants under weak or small grow lights.
- Certain strains use more nutrients than others – Genetics affects nutrient needs. For example, tall and stretchy plants often need higher levels of nutrients compared to plants that tend to be more slow-growing and squat.
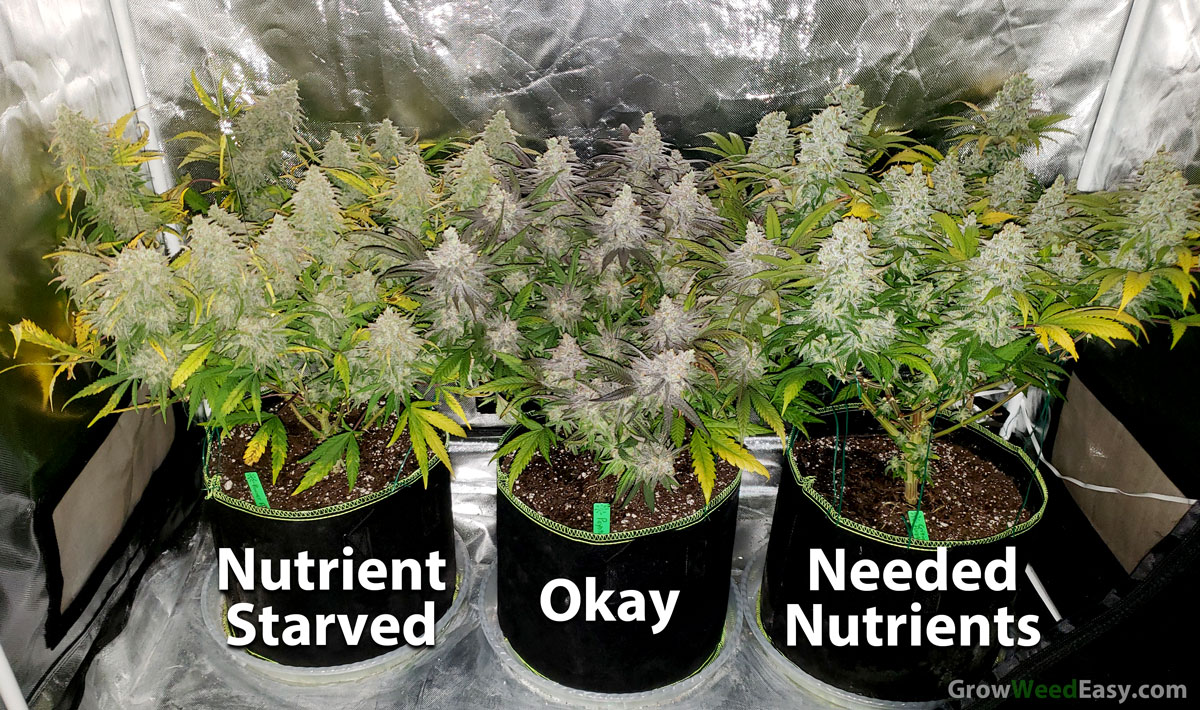
- When big buds are forming – You’ll notice that when a plant is growing really big long buds, it often looks more pale than another plant in the same grow space growing smaller buds. Bud formation takes a lot of nutrients. So be on the lookout when you have a really high-yielding productive plant for signs of that plant needing higher levels of nutrients overall.
- Plants look pale all over – When a plant looks pale, lime green, or yellow all over, that means it is hungry for nutrients. Another sign is the lowest leaves will start turning yellow, then brown, then fall off on their own. This is the plant “abandoning” the bottom leaves and taking the nutrients to use for other parts of the plant. When you see this happening a lot, it means the plant is cannibalizing itself for nutrients.
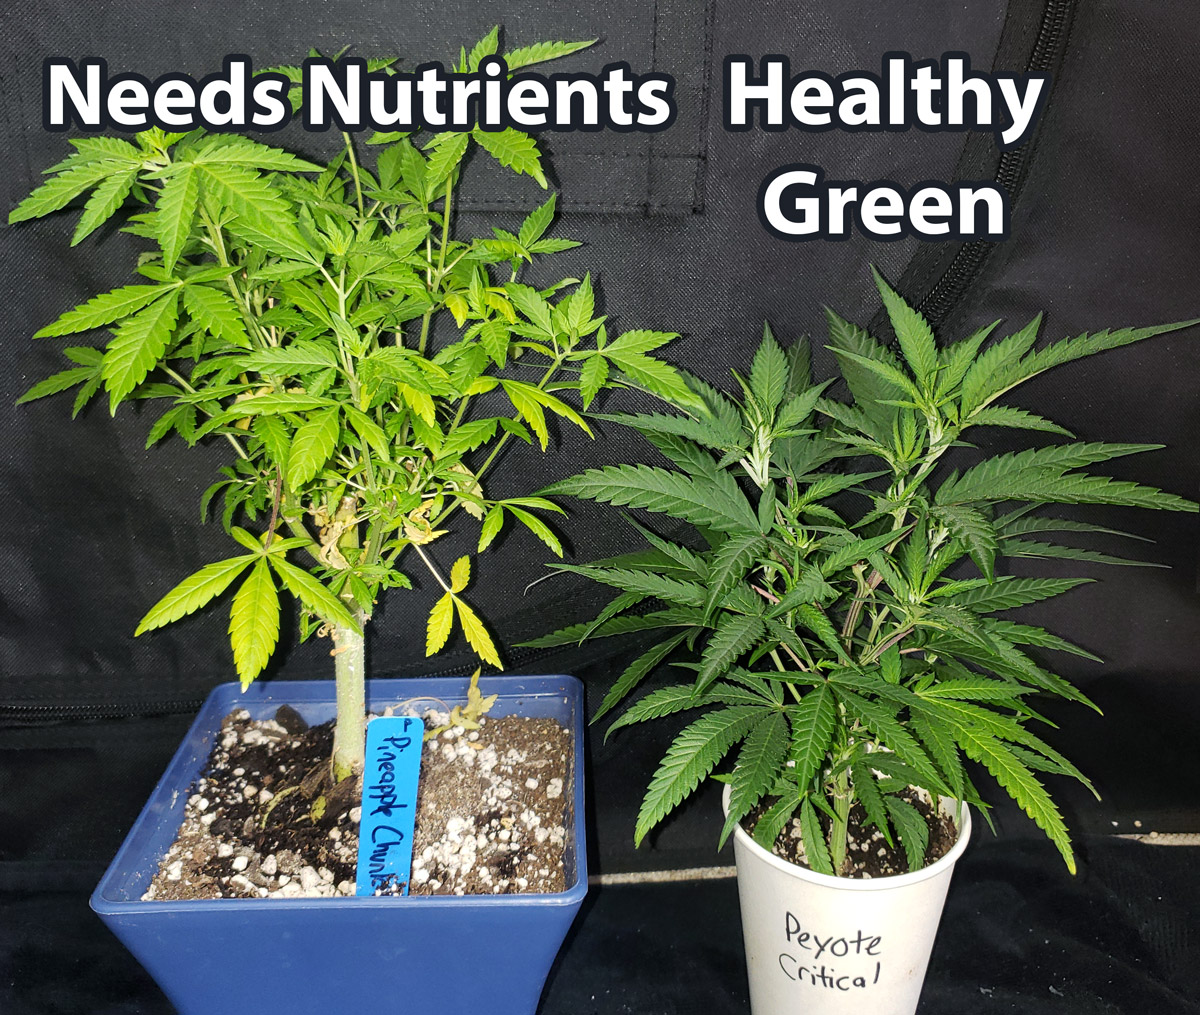
When a cannabis plant is growing big buds, it tends to need and use more nutrients than its sibling plants with smaller buds. Watch the overall color of the plant to determine whether to raise or lower nutrient levels.
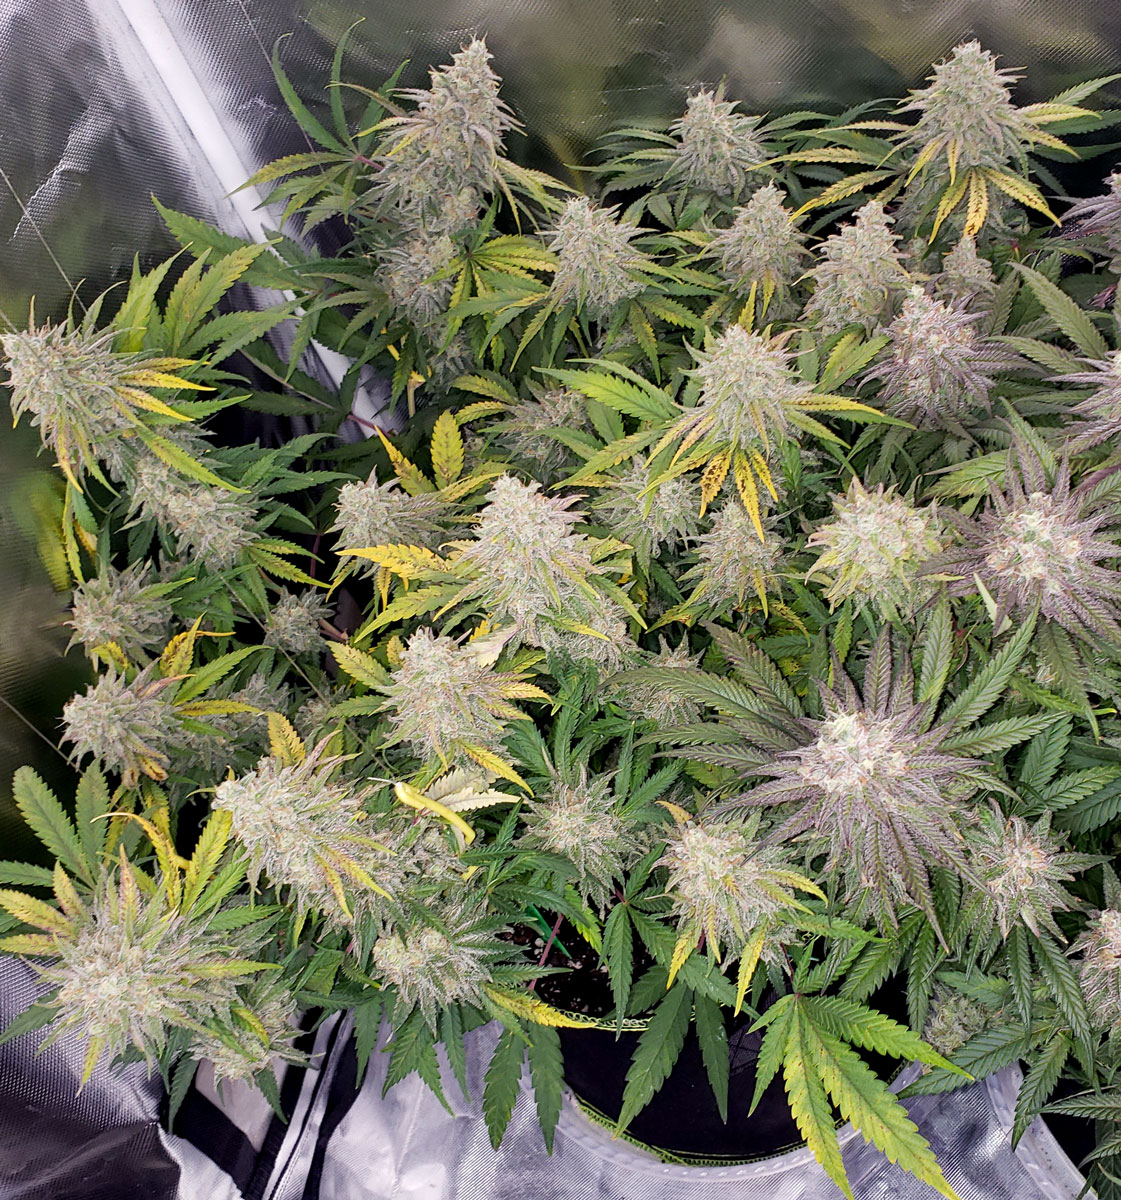
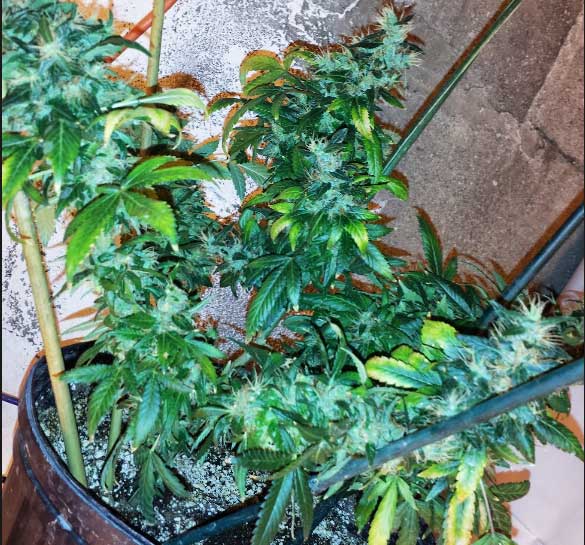
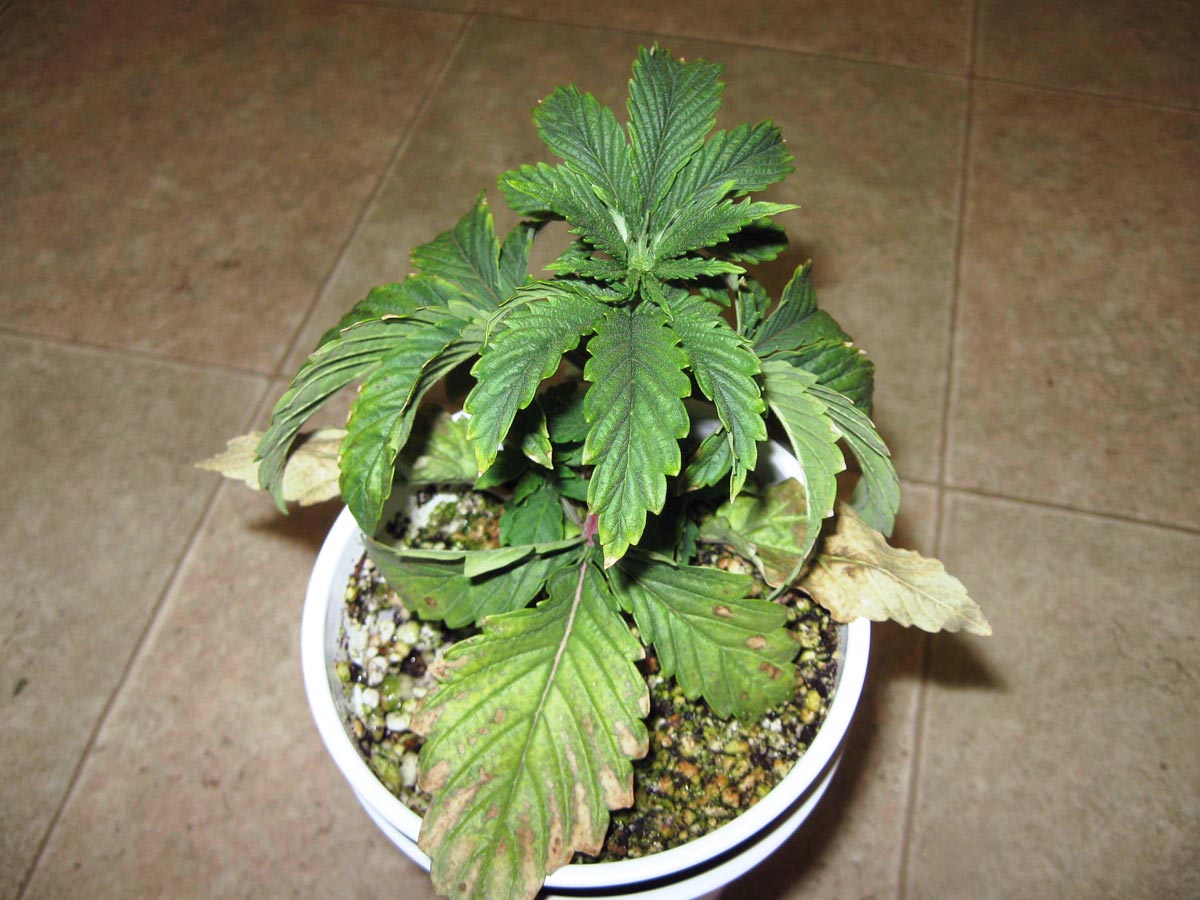
It can be confusing sometimes to tell whether your nutrient deficiency is being caused by incorrect pH or lack of nutrients. For example, these plants are starting to turn yellow even though they have several weeks left before they’re ready to harvest. Is it a pH problem, or do the plants need more nutrients overall?
If you look closely, you’ll also see lots of brown spots. This is typically a sign the pH is too low. However, the widespread yellowing also shows that the plant is not getting enough nutrients overall. In this case, the plant had two problems. It needs a boost of extra nutrients to help support the massive bud growth from this high-yielding strain, and the pH at the roots was too low, which was causing further lockout and nutrient problems.
This flowering cannabis plant has a pH problem (causing the brown spots) and needs more nutrients overall (causing the widespread yellowing).
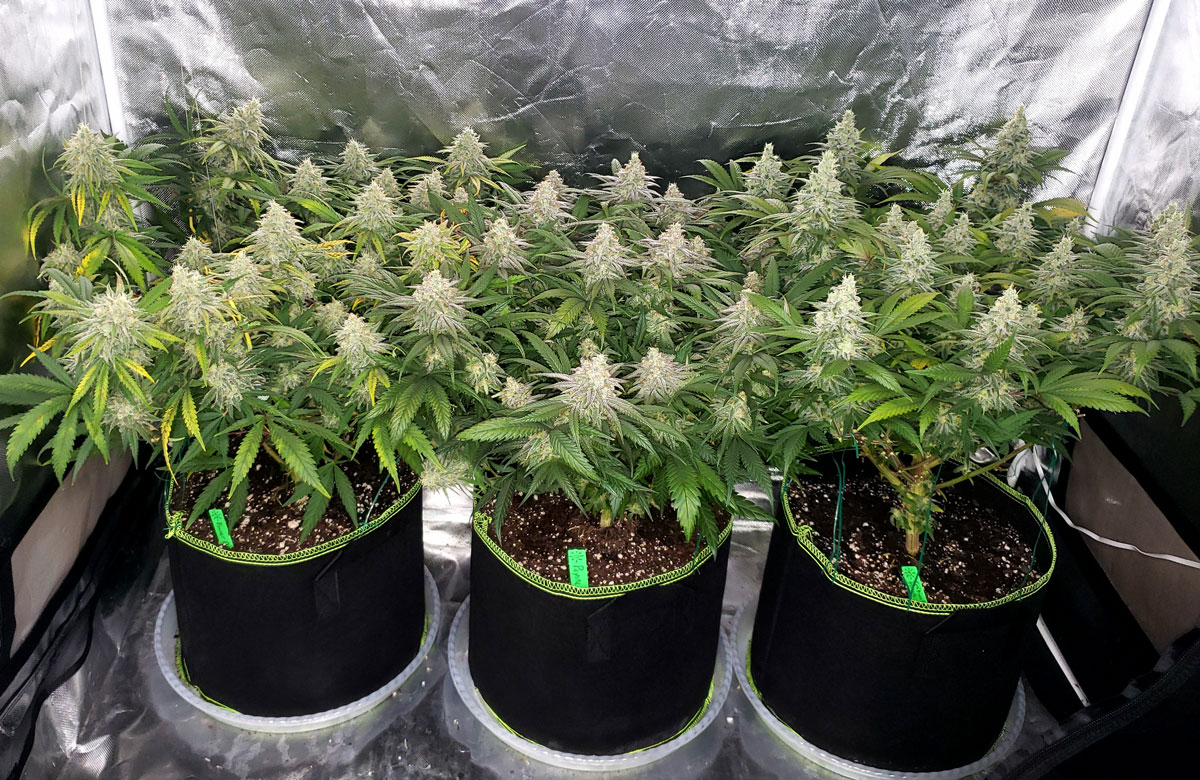
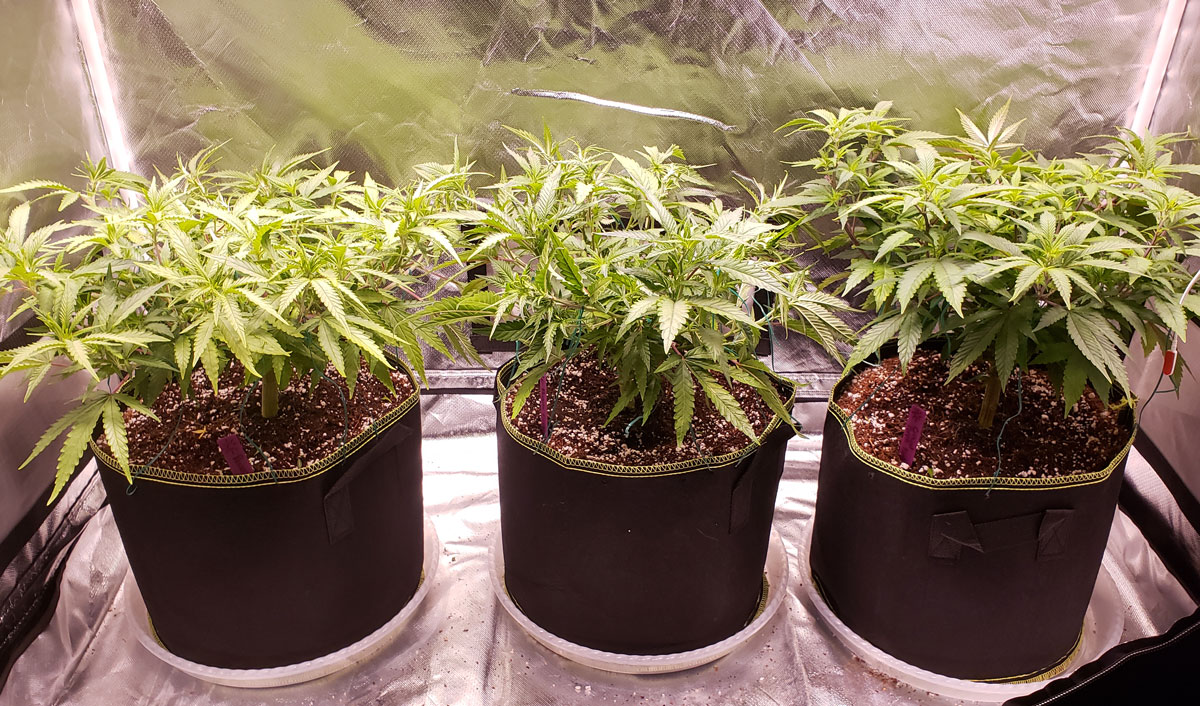
At harvest, it’s clear the side plants (and especially the left plant with huge buds) needed overall much higher levels of nutrients during the flowering stage, in addition to fixing any pH problems.
When to reduce nutrients
- Nutrient burn – When you see the tips of leaves turning brown and crumbly. However, just remember that sometimes you have other issues, like too high or too low pH at the roots, which can look like nutrient burn. If you’re not sure, check out this tutorial: Is this nutrient burn (or some other problem) on my cannabis plants?
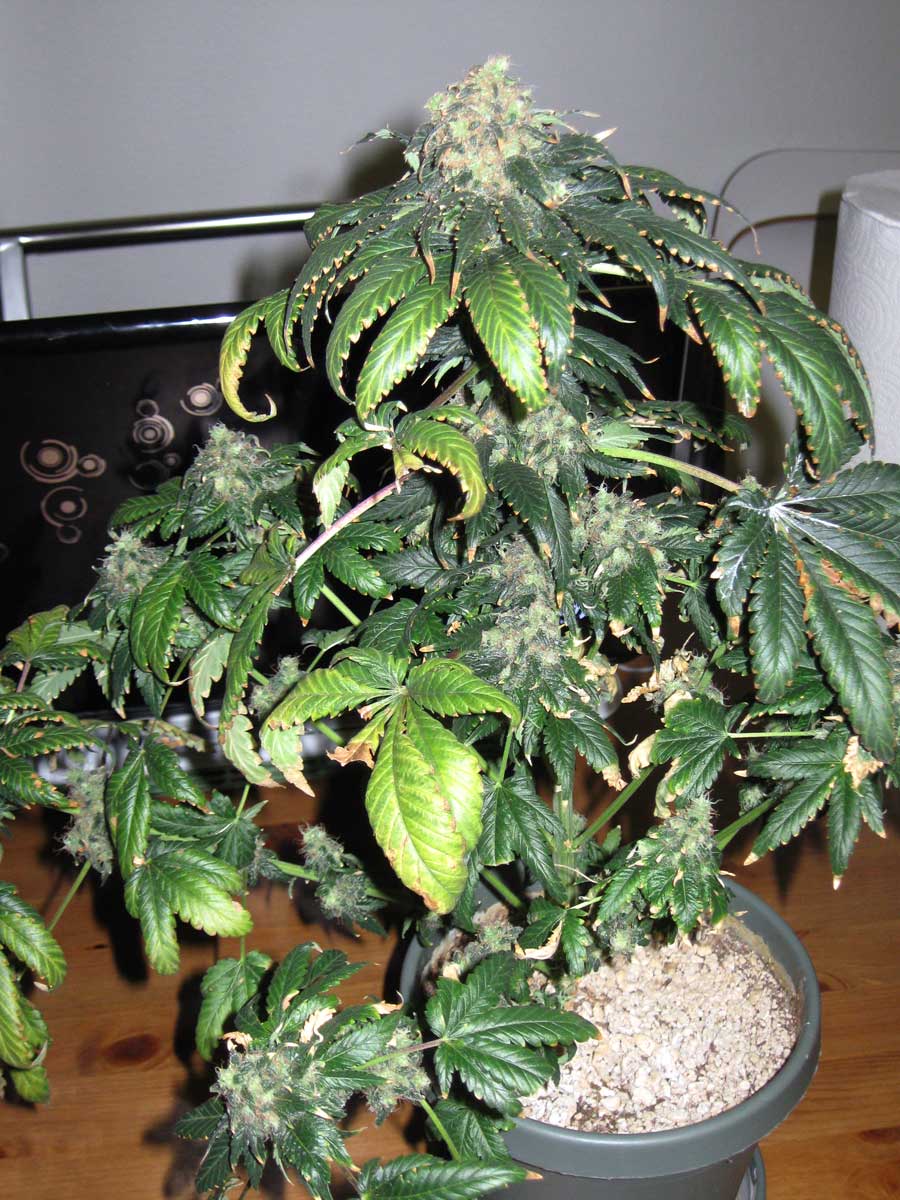
- Most leaves appear dark green (Nitrogen toxicity) – Picture below. When a plant is getting too high levels of nutrients it tends to turn dark green. You may also see nutrient deficiencies or even yellow leaves, which is the result of nutrient lockout.
Nutrient burn is a common symptom that the plant is receiving too high levels of nutrients for the current growth rate, size, and environmental conditions.

When a cannabis plant’s leaves are dark green all over, that means you need to reduce the amount of nutrients.
Too much nitrogen (and overall too-high level of nutrients) during the cannabis budding phase tends to reduce yields and bud size overall.
Integration of Biostimulants for Improved Outcomes
Biostimulants are formulations that contain beneficial microorganisms, such as bacteria, fungi, and other microbes, along with their metabolites and byproducts. In some cases, they can enhance plant hardiness/resilience, improve nutrient uptake, and help overall plant health.
Some of the benefits of using biostimulants for cannabis are:
- Increased absorption of nutrients
- Help soil to retain moisture
- Faster metabolism
- Bigger stronger plants
- Increased CEC (Cation Exchange Capacity)
- Larger roots
- Better nutrient exchange
- Reduced agrochemical inputs
Biostimulants give growers greater control over plant growth. For example, seaweed extracts are rich in minerals, vitamins, hormones, and antioxidants that stimulate plant growth and resistance.

Some of the best biostimulants for cannabis are:
- Beneficial microorganisms, such as:
- Mycorrhizal fungi – This fungi forms a symbiotic relationship with the roots of cannabis plants, increasing their surface area and enhancing their ability to absorb water and nutrients. They also help to protect the plants from drought, salinity, and certain pathogens.
- Rhizobacteria – These bacteria live in the rhizosphere, or the area around the roots of cannabis plants. They help to fix nitrogen, solubilize phosphorus, produce plant hormones, and suppress soil-borne diseases.
- Humic and fulvic acids – organic compounds derived from decomposed plant and animal matter that improve soil structure and nutrient availability.
- Seaweed extracts – rich in minerals, vitamins, hormones, and antioxidants that stimulate plant growth and resistance
- Protein hydrolysates – amino acids derived from animal or plant proteins that enhance plant metabolism and stress tolerance
- Biopolymers – natural or synthetic polymers that can act as soil conditioners, water retainers, or biodegradable mulches
- Inorganic compounds – such as silicon, iron, or calcium, which may improve plant structure, photosynthesis, or nutrient uptake
Learn more about common cannabis supplements.
To incorporate biostimulants into your cannabis grow, you can follow these steps:
- Choose the biostimulant product that suits your needs and preferences. You can find these online or in specialty stores. It’s highly recommended to consult with cannabis growers who are already using a product before incorporating it into your garden. This is a big topic outside the scope of this article but let us know if you want to learn more about biostimulants. If there is enough interest we will create a full tutorial on biostimulants. Regardless, whatever you do choose…
- Read the label carefully and follow the instructions for application rate, frequency, and method. Some biostimulants can be applied as a soil amendment, a foliar spray, a root drench, or a hydroponic solution.
- Monitor your plants for any signs of improvement or adverse effects. Adjust the dosage or frequency as needed.
Unless otherwise noted, the best time to use biostimulants for cannabis is during the vegetative stage and the early flowering stage, when the plants need the most nutrients and growth factors. Be extra careful which biostimulants you use during bud formation and especially towards the end of the flowering stage, as some biostimulants may get deposited into the buds and remain there after harvest.
5.) Root Zone Temperature & Watering Frequency
Effective Management of Root Zone Temperature
Maintain an appropriate root zone temperature to optimize nutrient uptake and overall plant health. Keep the root zone temperature within the range of 68-77°F (20-25°C).
Plants tend to grow slow and droopy when their roots are cold, for example, if sitting on cold ground or in a cold room.
On the flip side, when roots are hot, they are more prone to root rot and other root problems, which can cause drooping, nutrient deficiencies, and slow growth.
If you can maintain a happy root temperature, plants become much more resistant to other problems. For example, some growers will put a pot inside of another pot to help shield the plant roots from temperature fluctuations. This can be especially helpful outdoors when the temperature can change dramatically, and/or the sun can beam on the side of plant pots and cook roots.
Some growers use heating mats or water heaters to regulate the root zone temperature. Hydroponic growers may use a “water chiller” to cool reservoir water and protect roots from root rot. The main goal of any method is to keep your roots at a nice happy temperature.
Watering Frequency
Adopt irrigation strategies that align with the plant’s growth stage and current water needs.
- Vegetative Stage: Cannabis plants need a lot of water to grow vegetatively. Water deeply and relatively frequently in the vegetative stage to support vigorous growth. Of course, you should still avoid overwatering your plants, and don’t ignore constant droopiness.
- Flowering Stage: Cannabis plants tend to drink a lot of water at the beginning of the flowering stage due to the massive vegetative growth in the flowering stretch. However, plants tend to drink less after that while they focus on bud formation. There is some evidence that putting light stress on the plants by allowing the grow medium to dry out a little more between waterings can help encourage bud development in the late flowering stage. You never want to underwater your plants, but as buds get fatter, you may notice you can wait an extra day between waterings, or give a little less water at a time.
6.) Plant Training, Pruning, and other Physical Manipulation
Managing Plant Height, Shape, and Branching
Control plant height by using cannabis plant pruning techniques such as Low-Stress Training (LST) or High-Stress Training (HST). Prune selectively to shape the plant and promote even branching, ensuring optimal light penetration and airflow.
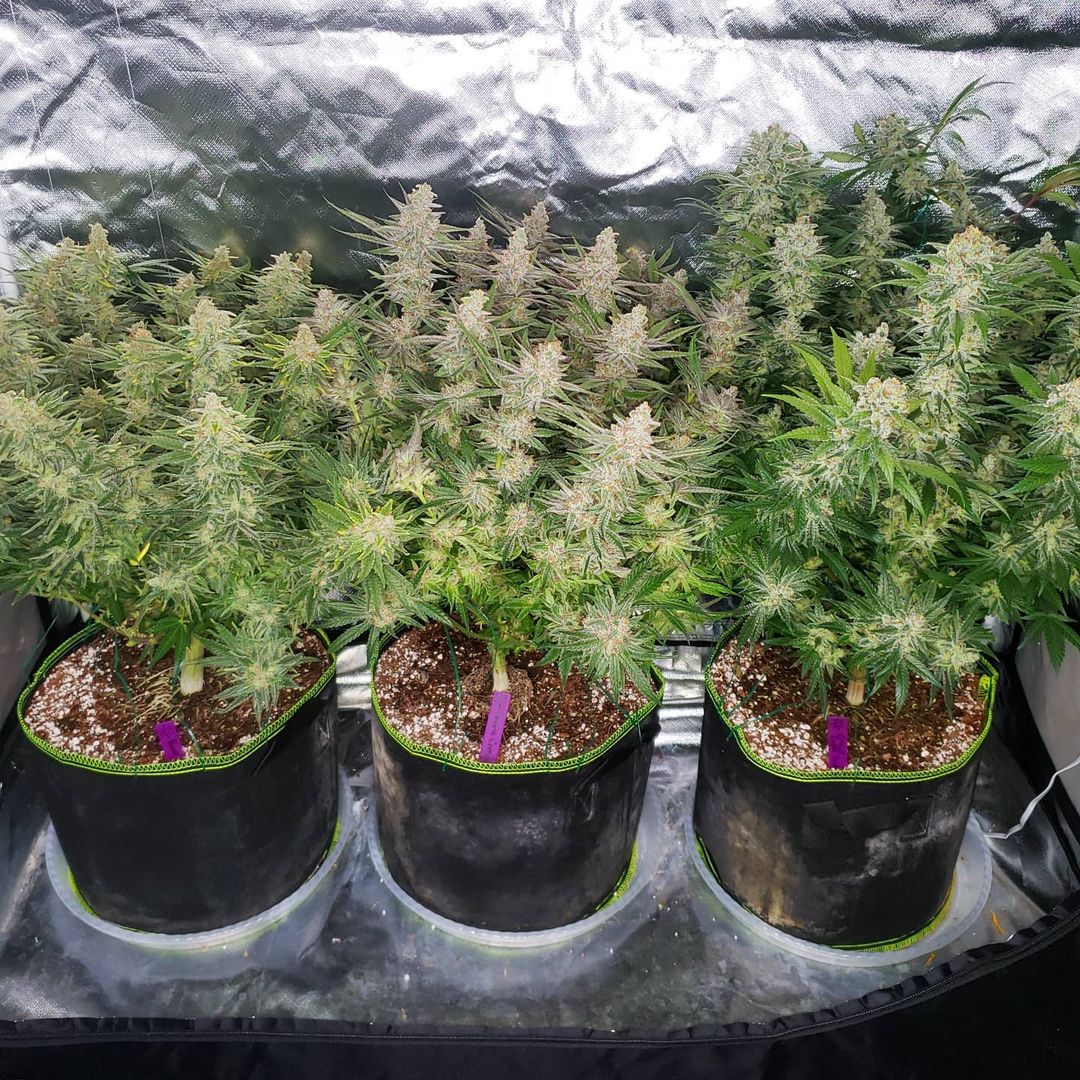
The goal of cannabis printing is to create wide flat plants with even branching. Ideally, each branch should be the same distance from the grow light.
If you created the flat tabletop structure in the vegetative stage, you should be rewarded with many evenly spaced main buds in the flowering stage.
This plant structure naturally produces more top-quality main buds than if you allowed the plants to grow naturally.
Learn the most useful ways to train your plants to maximize bud yields and quality.
Defoliation as Part of a Crop Steering Strategy
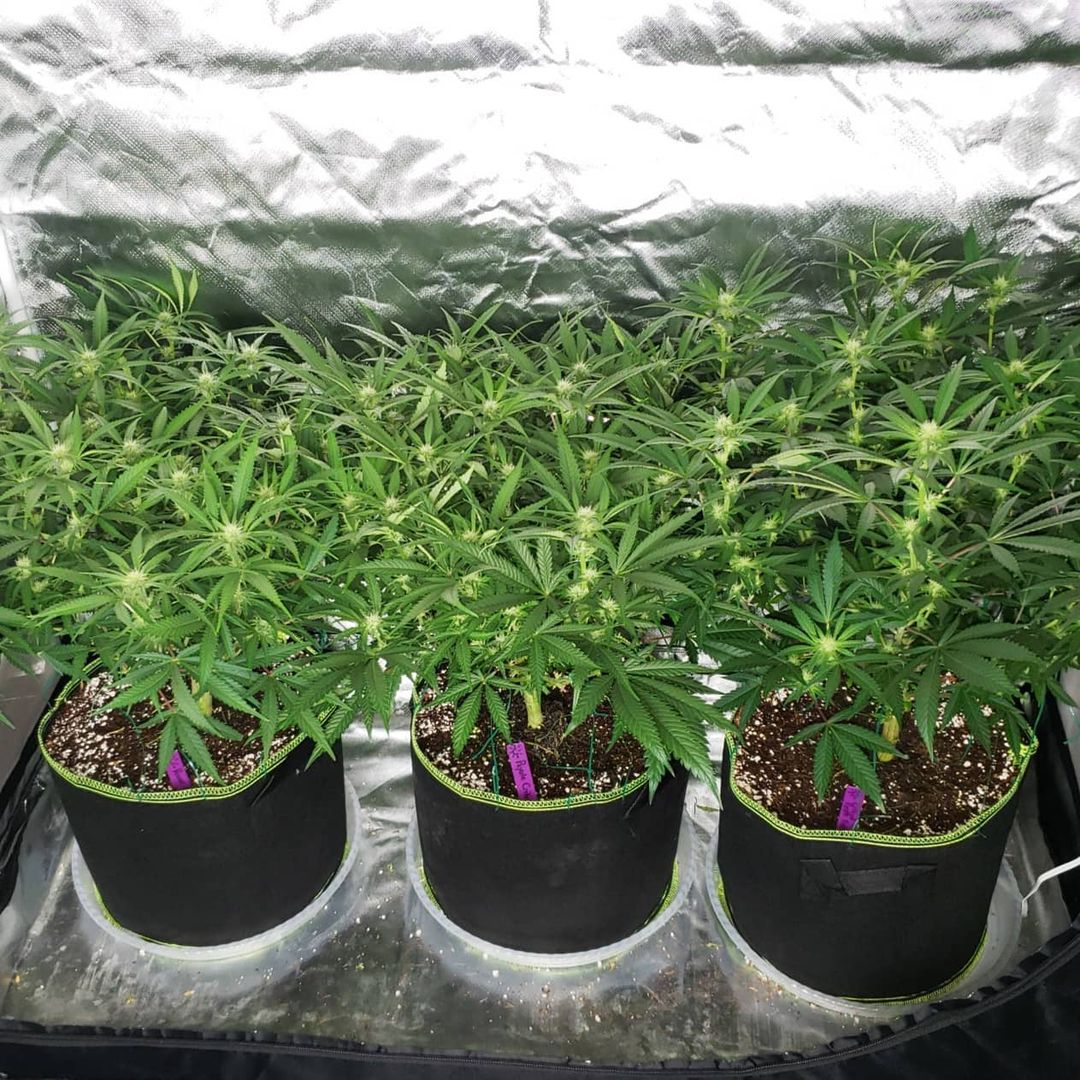
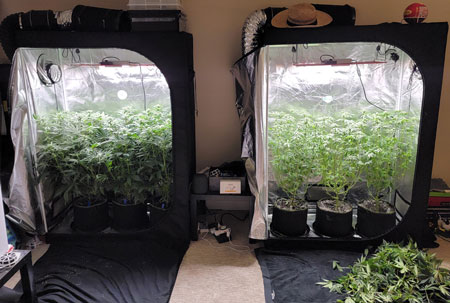
Defoliation means removing select leaves on the cannabis plant. This is done to improve light penetration, maximize light levels on main buds, and increase airflow within the plant canopy. It’s recommended to prune the lower leaves and those blocking light from reaching bud sites. Be careful not to overdefoliate, as this can stress the plant. Many growers choose to defoliate plants on a set schedule in order to avoid the chance of taking too much or too little.
The plants in the left tent are too leafy. The plants in the right tent were defoliated. Defoliating plants strategically can increase yields, bud density, and even bud potency!
7.) Pest and Disease Management in Crop Steering
Role of Healthy Plants in Pest and Disease Resistance
Maintain healthy plants through proper crop steering practices to increase resistance against pests and diseases. Healthy plants are more robust and less susceptible to infestations.
Prevention and Quick Identification are Key to a Bug-Free Garden
The most important aspect of keeping a bug-free cannabis garden is to prevent bugs from getting to your plants. Outdoors, that can be difficult (which is why many outdoor growers use integrated pest management to help control bugs) but indoors it is a lot more straightforward to protect plants from bugs.
- Start from seeds instead of clones. Introducing clones from another grow space is the #1 way growers get hard-to-get-rid-of pests like spidermites or broad mites. If you must introduce clones, keep them quarantined away from your grow room for 2-3 weeks to ensure they’re healthy and pest-free. To be extra safe, always start from seeds.
- Seal the grow space from the outdoors. Make sure you don’t have holes in your window screens or other ways for bugs to get into the grow space.
- Avoid going from outdoors directly into the grow space. For example, don’t check on your plants the moment you get home from visiting the park or doing lawnwork. You don’t want to accidentally bring bugs to the grow room.
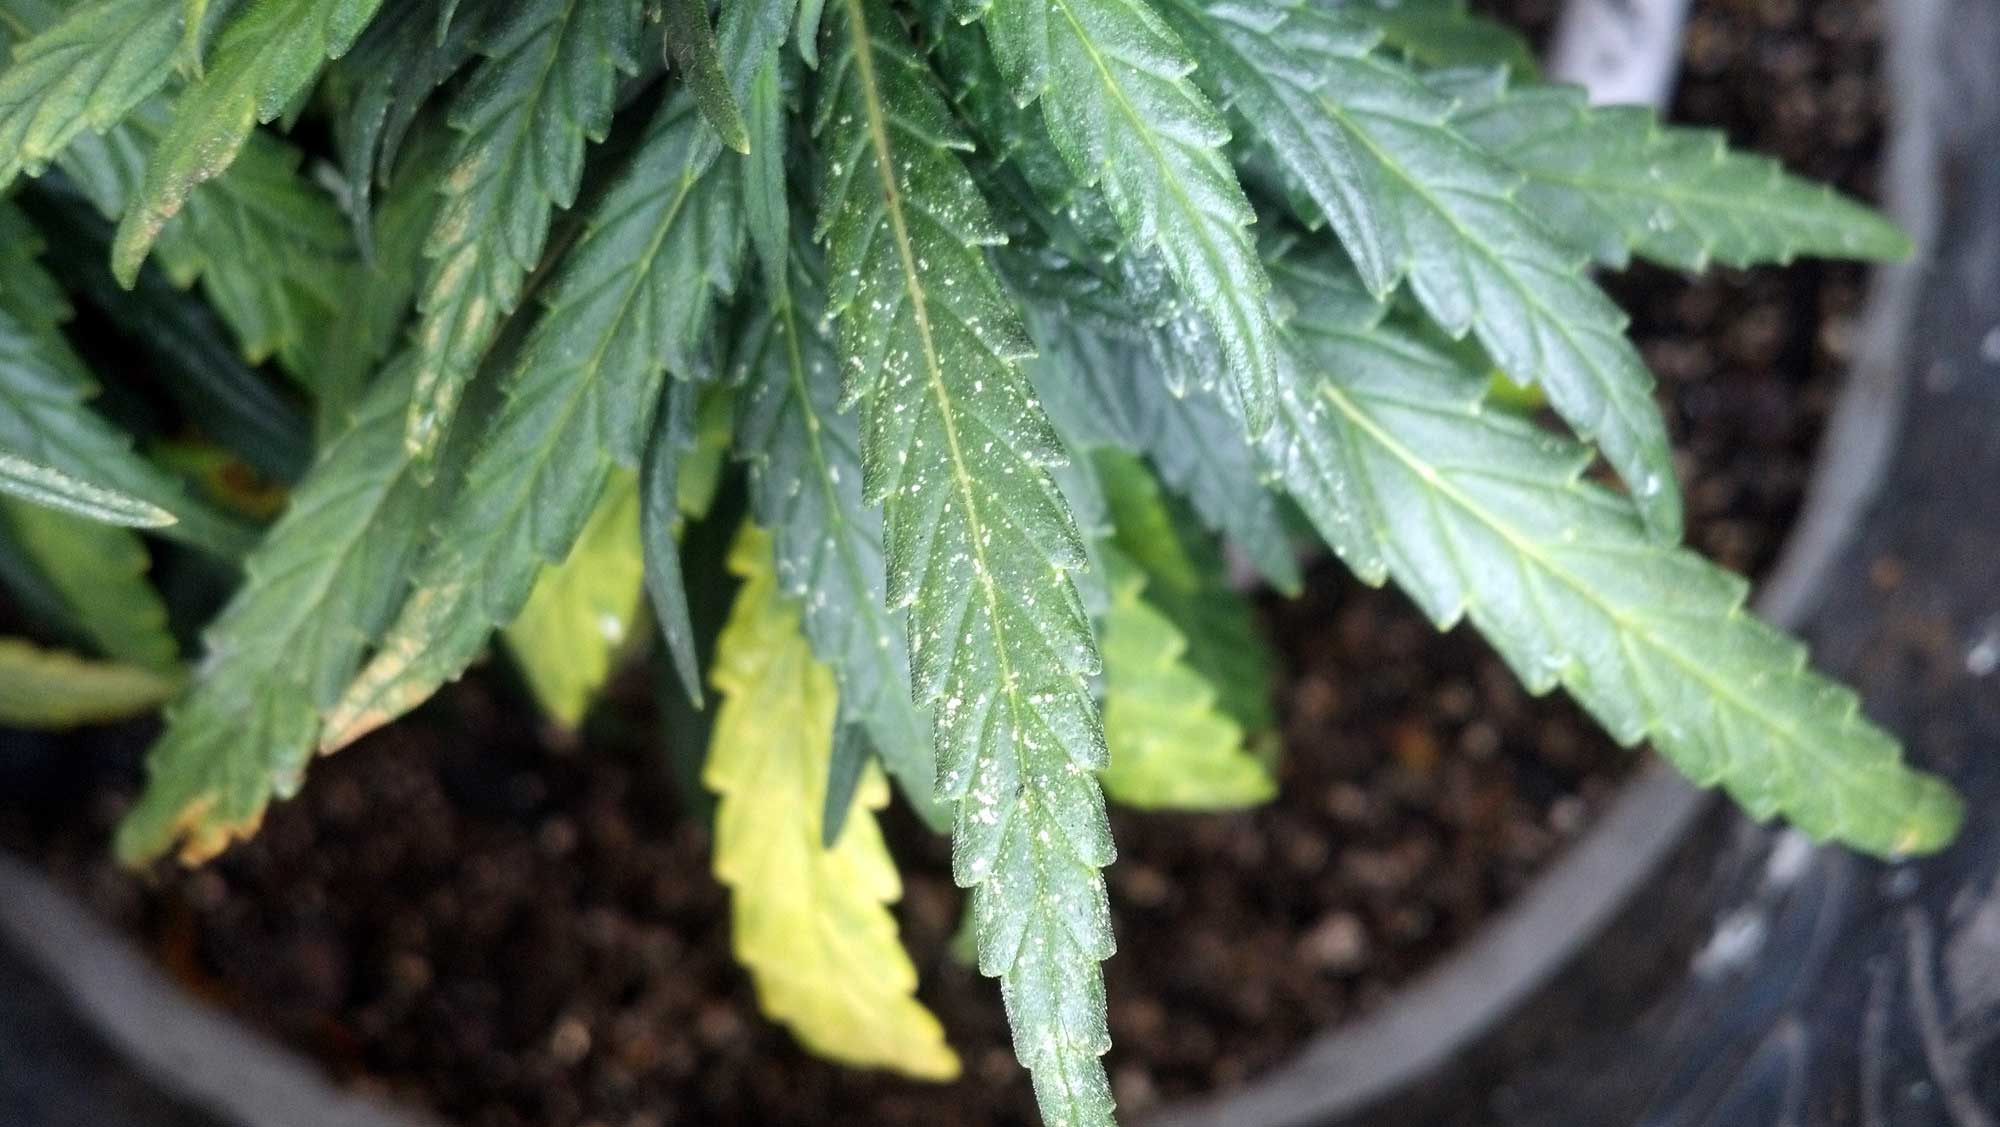
- Check plants daily for problems. It’s good to check plants every day for any type of problems, and during your daily check, pay attention for the signs of bugs such as webbing, spots in the leaves, bit marks, slime trails, or other common signs of pests.
- React immediately if you see something. Don’t wait a few days. If you suspect your plants have bugs (or any other problem), act now! The longer you wait, the harder it is to fix any problem.
Diagnose the most common cannabis pests!
Don’t ignore the signs of bugs. Act quickly!
Last Tips for Successful Crop Steering
Use a Comprehensive Approach Throughout the Plant Lifecycle
Apply crop steering techniques consistently from propagation to harvest. Each stage requires different care and adjustments to optimize plant growth and yield.
Adapt Techniques for Different Cannabis Strains
Different cannabis strains may respond differently to crop steering techniques. Observe and adjust techniques based on strain characteristics to achieve the best results.
Avoiding Over-Steering and Stressing Plants
Crop steering is a blend of scientific knowledge and practical experience. It requires an understanding of plant physiology and the ability to adapt techniques to individual plants’ needs. Exercise caution to avoid pushing plants too hard in one direction. Gradual adjustments and careful observation will prevent stress and ensure healthier plants.
Use Monitoring, Record-Keeping, and Gradual Adjustments
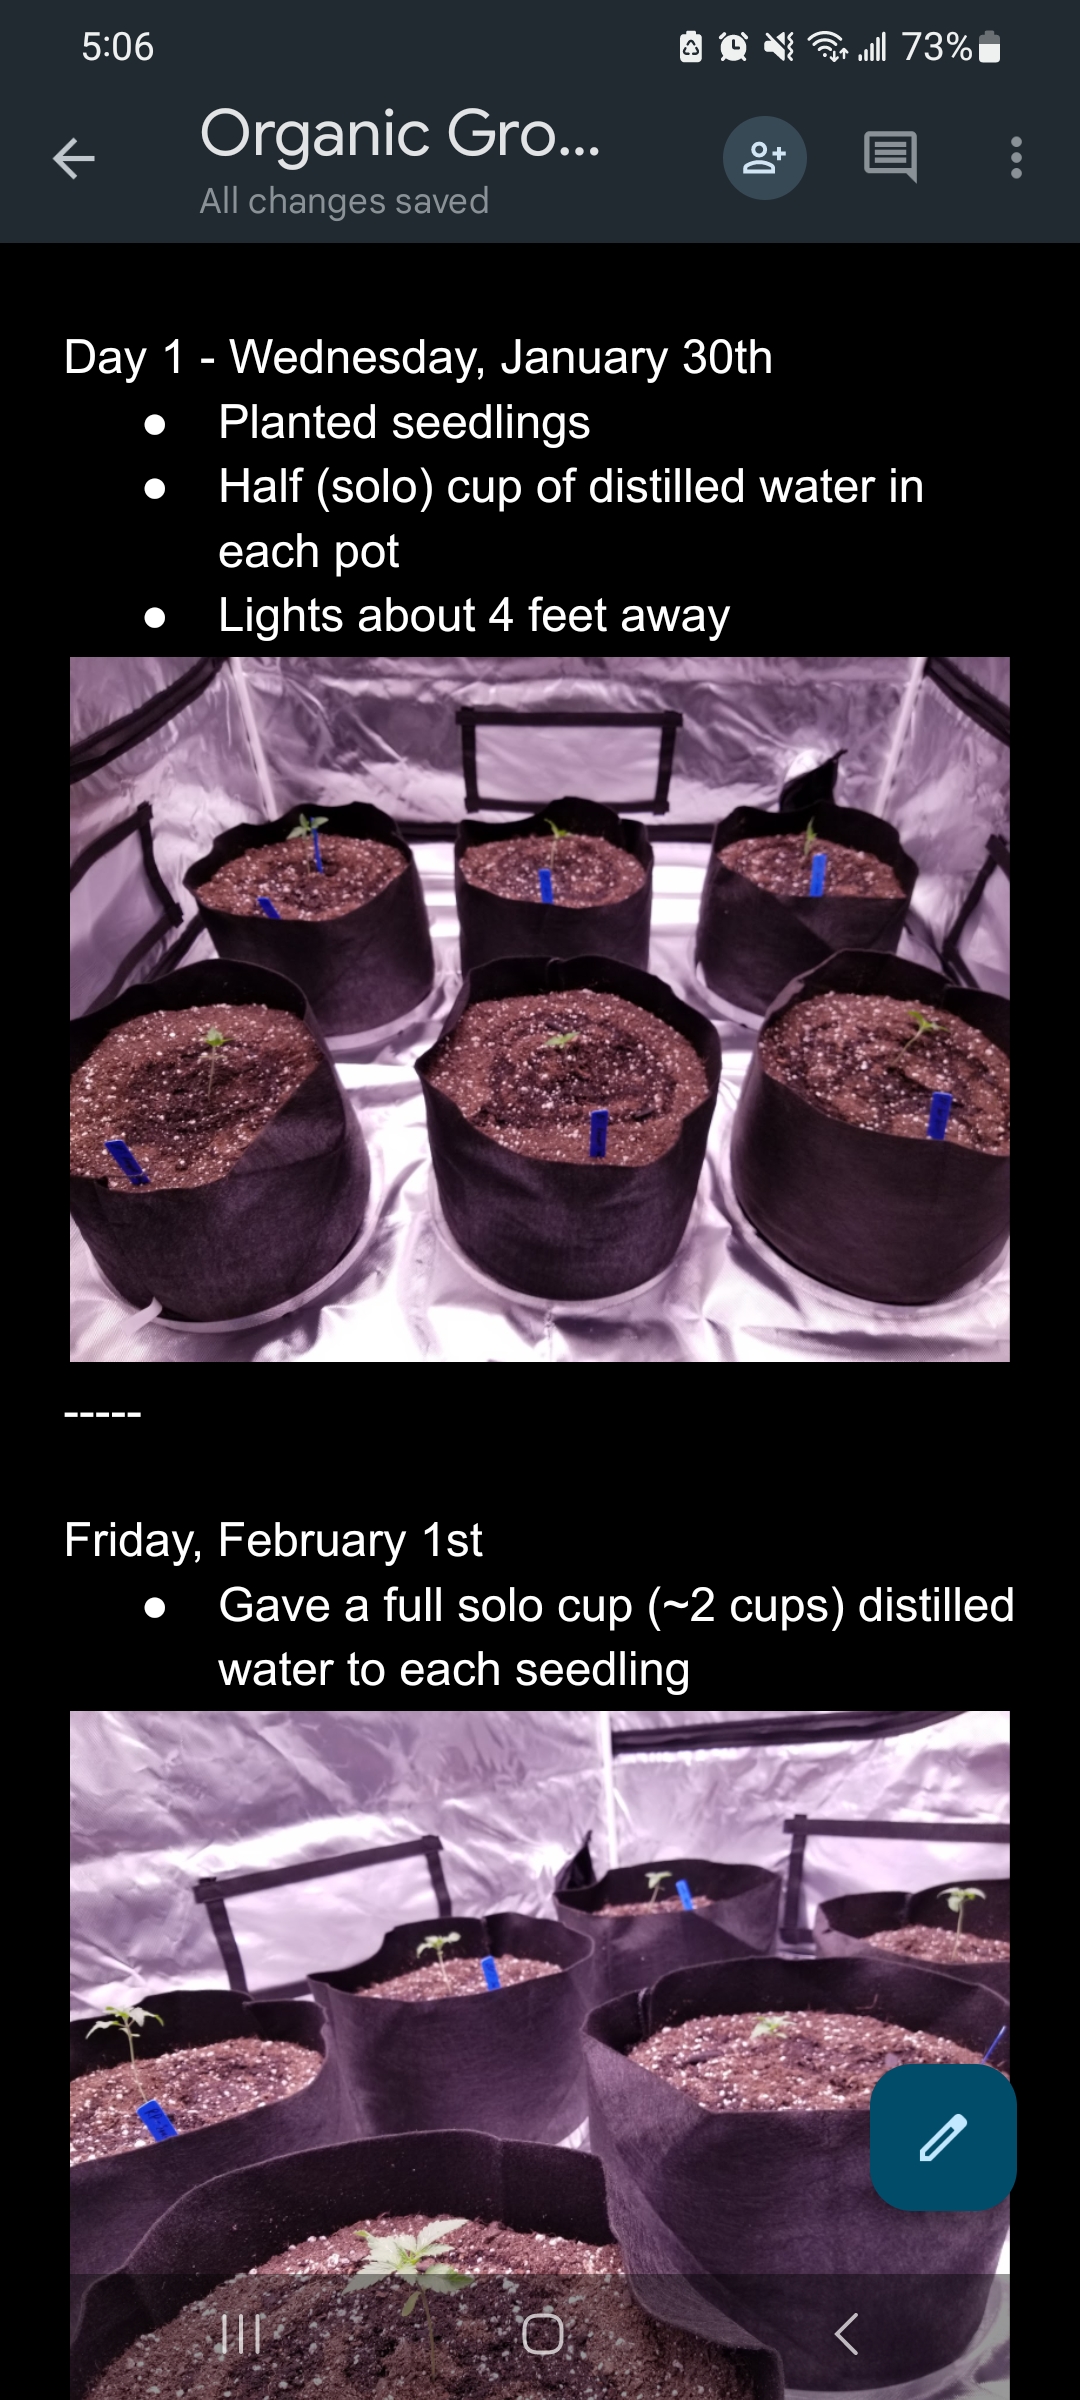
I highly encourage you to keep a grow journal, even if just hand-written notes on a piece of paper. You will never regret taking too many notes! But it’s very common to wish you had taken more. Note-taking helps you regularly monitor plant health, environmental conditions, and nutrient levels.
Taking notes about your grow (even very basic ones) can be helpful later. These days I usually make a Google Doc for each new grow and take a quick note here and there from my phone, often snapping a picture for reference. But even that’s relatively high tech. Before that, I would write entries on a piece of paper and that worked great too.
Keep a record of observations and adjustments made to refine your crop steering techniques over time!