by Sirius Fourside
Table of Contents
Introduction to HID Grow Lights
Which Size HPS Grow Light? (get estimates for yields & electricity cost)
The Different Components of an HID Grow Light System
Setting Up & Using Your MH/HPS Grow Light
- How Far Away Should MH/HPS Grow Lights Be From My Plants?
- How to Control Odors
- How To Set Up Exhaust System
Get a Complete Grower’s Shopping List for 400W or 600W MH/HPS Grow Light! (includes setup cost, estimated yields, electricity cost, and more!)
First of all, you should know that an HID (High-Intensity Discharge) Grow Light System isn’t the right choice for all cannabis growers. Just like any other cannabis grow lights, MH/HPS grow lights have pros and cons.
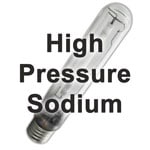
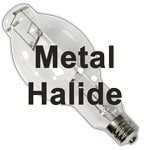
Many people choose HID lights because they are ultra-powerful grow lights, including the incredibly popular “Metal Halide” (MH) and “High-Pressure Sodium” (HPS) grow light combo for growing cannabis.
Yes, this type of system has been used for decades and gets great results, bigger yields, and tends to be easier to maintain than just about any other grow light system for growing marijuana. That’s why the MH/HPS combo is often referred to as the “golden standard” grow lights for growing cannabis…
(Wait, where can I buy seeds?)
Though there are lots of awesome benefits, this system requires a relatively large initial investment and tends to take a little bit more time right in the beginning to get things set up compared to certain other grow light options.
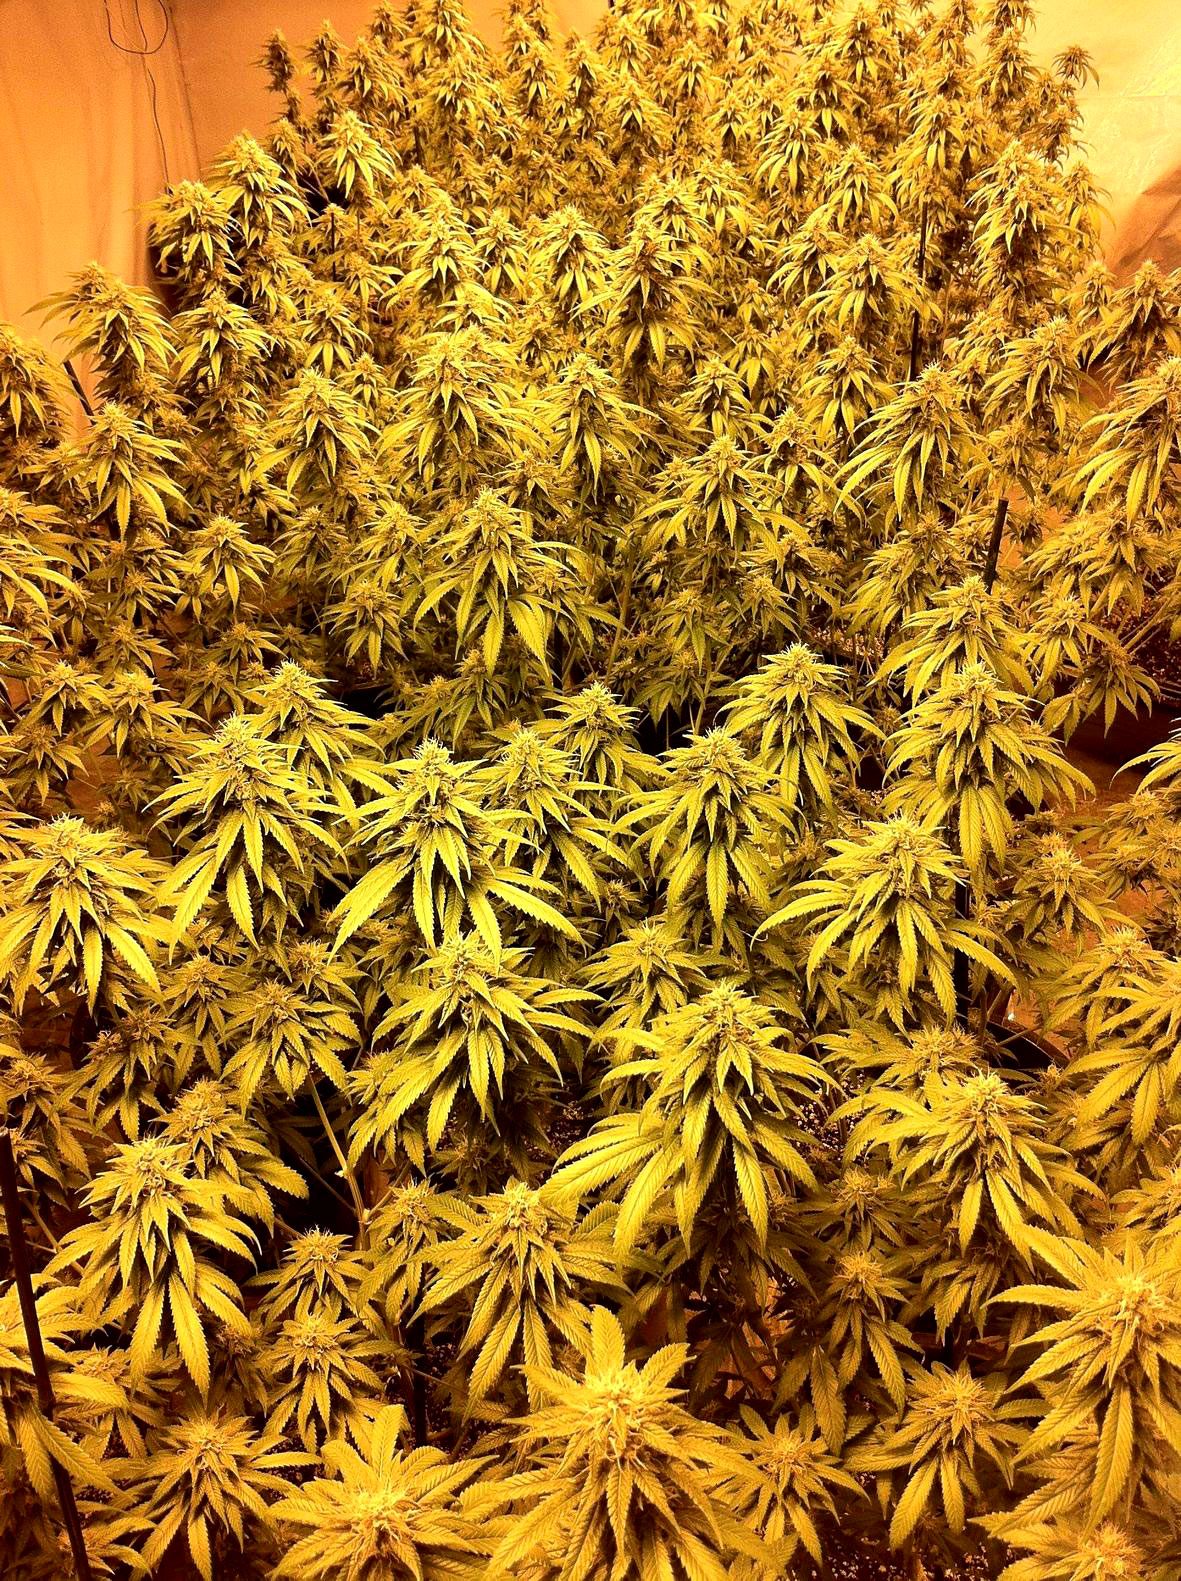
Yet it’s worth it when you can grow rows of high-yielding marijuana plants like the ones displayed here to the right. These plants were grown using an HID grow light system. The High-Pressure Sodium (HPS) lights are what make flowering plants look golden in pictures, though the plants look normal under regular light.
When I originally started growing weed, I was worried about excess heat, high electricity bills, and making sure I was as stealthy as possible.
I didn’t want to spend a whole bunch of money on grow equipment when I wasn’t even sure what to expect!
I can assure you that as long as you follow the instructions on this website, you definitely are going to make it to harvest! But if you’re not sure which setup is right for you, it’s hard to get started. Here’s a really quick breakdown of the different MH/HPS sizes:
MH/HPS Grow Lights
As a general rule of thumb, HID grow lights like Metal Halide (MH) and High Pressure Sodium (HPS) are most suitable for relatively larger grows where there is at least 5 feet (1.5 meters) of height in the grow space, though it’s recommended to use a taller space for the best results. This is because MH/HPS lights have to be kept fairly far from the plants.
MH lights are generally used in the vegetative stage of growth (when plants are young and growing just stems and leaves), while HPS lights are considered optimal for use during the flowering stage when cannabis plants are producing buds. HPS lights can be used for the entire grow and will still get great results. Modern ballasts often allow a grower to interchange MH and HPS bulbs, but it’s important you look for this feature if you want to use a combination of both MH and HPS. Learn more.
HID grow lights get better penetration into the plant canopy than almost any other type of cannabis grow light and therefore tend to produce long, thick colas when the growing conditions are right. The power and color spectrum of HPS grow lights tend to get better yields than any other type of grow light for the amount of electricity used, with the possible exception of some of the modern LED grow lights.
Note about mixing LEDs & HPS grow lights for flowering: Recently there have been tests by growers coming out which indicate that using a mix of HPS and LED grow lights during the flowering stage of growth tend to produce buds that have a terpene (taste & smell) profile that mimics bud grown directly under the sun. Learn more. It’s possible that the future of indoor cannabis growing is going to feature a mix of HPS and LED grow lights in the flowering grow room.
Now on to the pros and cons of HID grow lights like MH and HPS…
Pros
- Proven to work great – Sometimes called the “Golden Standard” of grow lights for growing cannabis, MH/HPS grow lights have been used by growers for decades and will consistently produce great growth rates, great yields, and great results
- Easy to scale up – works well for growing just a few plants or dozens of plants
- Efficient – When you consider the amount of light produced for the amount of electricity, HID grow lights are some of the most efficient grow lights on the market (more efficient than CFLs or other fluorescent grow lights) with the possible exception of some of the newer models of LEDs
- Deeper light penetration and greater coverage area, which is why HID grow lights usually work better than CFLs for growing bigger and taller plants
- Intuitive – After being set up, MH/HPS grow lights are intuitive to use and tend to be easier for new growers to quickly understand and master than fluorescent grow lights or LEDs
- No need for constant adjustment – you will only need to adjust the height of your HID lights a few times during your grow, and there’s only one fixture to adjust instead of many tiny bulbs like with CFLs
- Some models work well for smaller grows – A small 150W HPS can be purchased with a built-in ballast & hood so you can connect the lights directly to a plug in the wall without any extra light sockets or equipment
- Electricity Use & Heat are similar to CFLs watt-for-watt – HID grow lights will produce about the same amount of heat as the same wattage worth of CFLs, but you will tend to get bigger yields and better results with HIDs. So for example, let’s say you purchased 7 x 23W CFLs(161W worth of CFLs). This setup of 7 small CFL bulbs equaling 161W of CFLs will produce roughly an equal amount of heat and use about the same amount of electricity as a 150W HID grow light, except you’ll usually have to get better results with the 150W HPS, and you won’t have to buy 7 light fixtures and find a way to hang 7 bulbs within 2″ of your plants.
Cons
- Need a tall grow space – Since HID bulbs must be kept relatively far from your plants, MH/HPS grow lights can only be used even when the grow space is taller than 4 feet (1.2 meters), though 5+ feet (1.5+ meters) of height is recommended for the best results.
- Higher initial investment – Will almost always cost more of an initial investment to get started with HIDs (compared to CFLs) though you are much less likely to need to upgrade your lights during your grow
- HID grow lights can be difficult to find locally – Since HIDs are considered specialty growing lights, they almost always must be purchased online or from a grow store.
- Heat means you will likely need an exhaust system – HID grow lights produce a lot of heat when you use bigger bulbs like 400W, 600W, and especially 1000W HID grow lights, so you will need to create a way to exhaust the heat outside of your grow space. However, I will teach you how to set up exhaust systems and show you the relatively inexpensive way I set up a stealthy exhaust system for my house below. This exhaust system has proven effective for cooling a 600W light without an air conditioner, even in sunny southern California 🙂
Conclusion: MH/HPS Ended Up Being Right For Me…
I’m glad I first started growing cannabis with CFL grow lights, because they were cheap, gave me beautiful buds, and taught me how to grow. Yet when I started looking at upgrade options a few years ago, I realized I was ready to take my grow room to a new level of efficiency. I knew I was ready for professional grow lights, and I believe getting a 600W MH/HPS light was the best decision I’ve ever made for my grow room.
I knew that if I upgraded to HID grow lights, I could spend less time worrying about adjusting lights and more time on learning new, better ways to improve yields, potency, and taste.
The results of the switch have been amazing, and today, I will walk you through the whole process so you can understand exactly what you need if you’re ready to go pro and set up the perfect MH/HPS grow light system for your indoor garden.
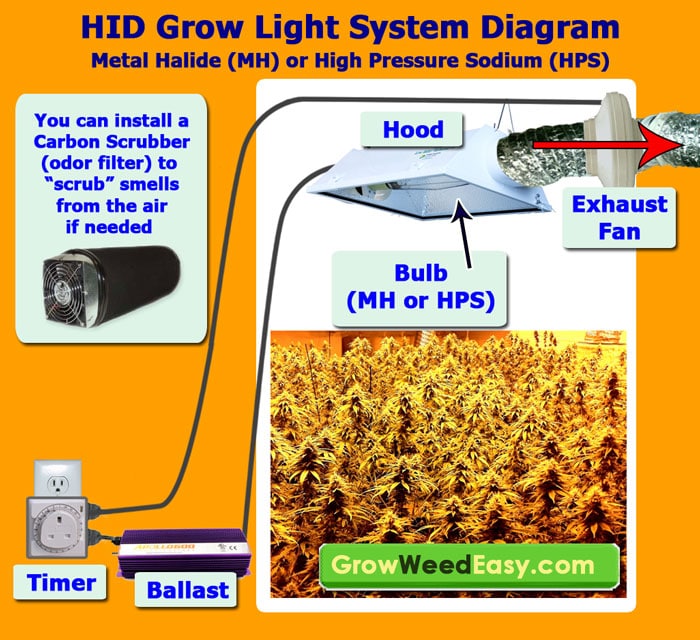
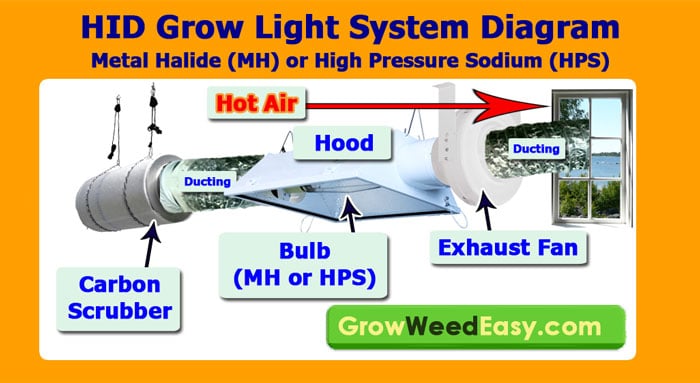
The Different Components of an HID Grow Light System
- MH and/or HPS Light Bulbs – MH/HPS bulbs give off the right kind of light for plants with high light needs, like cannabis. MH (Metal Halide) bulbs are perfect for the vegetative stage and HPS (High-Pressure Sodium) bulbs are perfect for the flowering stage. Either one can be used for the whole grow, though most growers who choose just one opt to use HPS for the whole grow.
- Ballast – MH/HPS grow light systems use bulbs with big bases that can’t connect to a regular light bulb socket. Instead, they use a socket that requires a special ballast to start and maintain their arcs for power. Some ballasts can accommodate both MH and HPS bulbs. Some ballasts are digital, which gives you additional options for controlling the amount of light given off and electricity used.
- Hood – This sits above (or around) your bulbs and reflects the light from the bulbs downward to your plants for maximum penetration and brightness. Many hoods are enclosed to keep heat away from the plants and for easy venting.
- Exhaust – A fan plus ducting is used to pull hot air away from the bulbs and outside so that the hot air doesn’t heat up your grow room or plants
- Timer – Standard electrical timer to turn your lights on and off for you on a schedule.
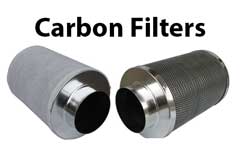
- Odor control (if needed) – carbon filter (carbon scrubber) will remove odors from the air before it’s exhausted outside. Learn about your options for marijuana odor control.
- Grow tent (highly recommended) – Many closets are too small and not a suitable shape or size for growing. In many closets, there is no convenient way to exhaust hot air out, waterproof the floors, make all the walls reflective, and keep the plants safe from specks of dust or light leaks. I ended up opting for a grow tent because quality grow tents are made specifically for growing with high powered grow lights like HIDs, and make it easy to hook everything up without having to DIY. Plus, a grow tent is a relatively discrete way to set up a garden and exhaust right next to a window – the front of a grow tent looks a lot like a clothes wardrobe if you’re not familiar with them.
What’s the difference between Metal Halide and High-Pressure Sodium? MH lights are generally used in the vegetative stage of growth (when young plants are growing only stems and leaves), while HPS lights are considered optimal for use during the flowering stage when cannabis plants are producing buds.
Either MH or HPS lights can be used for the entire grow and will get good results, but modern ballasts often allow a grower to interchange MH and HPS bulbs, so many growers choose to use what’s been proven to get the best results and grow with both types of bulbs. If you want to use MH and HPS bulbs with the same ballast, it’s important you look for this feature to make sure you don’t accidentally put the wrong bulb in the wrong ballast. It’s actually simple in practice, and I’ll walk you through everything in the choose your ballast section below.
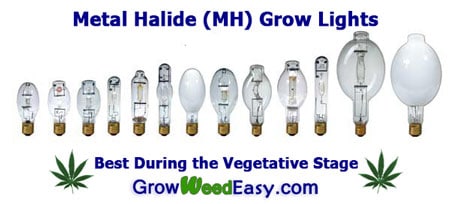
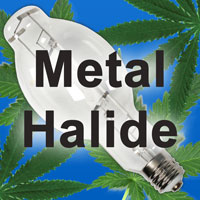
Metal Halide bulbs produce a bluish bright light that mimics the spring sun, and using MH bulbs during the vegetative stage will promote short, bushy growth in your plants. MH lights are not as efficient as HPS bulbs, and used in the flowering stage MH lights don’t seem to cause buds to bulk up as much as a similar wattage HPS. Some growers use a MH bulb for the entire grow, but most growers who choose just one bulb opt for using an HPS for the whole grow.
Some growers use a mix of both MH and HPS lights in the flowering stage to help mimic the complexity of sunlight, and believe it may actually produce buds that have a more complex terpene (taste & smell) profile, but right now, more tests are needed to confirm this. Please contact us if you’d like to share your experience using both MH and HPS grow lights during the cannabis flowering stage.

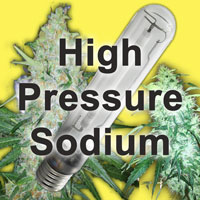
High Pressure Sodium bulbs produce a yellow, golden light which mimics the color spectrum of the sun in the fall, and using HPS lights during the flowering stage of growth will tend to produce dense budding, resulting in long, thick colas.
When using just HPS for the whole grow (without using HPS during the vegetative stage), you are more likely to get stretchy growth in the vegetative stage unless you train your plants to grow short. Keeping plants short and wide is often considered better in this type of indoor setup because short bushy plants get better results and bigger yields when using HID grow lights that are situated directly above.
Since the light from the bulbs is coming from directly above the plants, when growing indoor cannabis plants you should consider trying to create a large area of leaf matter when looking down from above. At the same time you want to keep bulbs as close to your plants as possible, so you want to keep an even canopy.
Learn more about how to train your plants to grow short & bushy to get the best results with HID Grow Lights.
 A ballast is a special piece of equipment which is needed to run HID lights. Some small models of HID lights like the 150W come with the ballast built in, but most models have them separate. You plug the ballast into an electrical outlet, and then connect your hood to your ballast (your bulbs will connect directly to the hood). The ballast converts the electricity from the wall into what’s needed by your bulb to ignite and stay lit.
Think of your ballast as a power source for your HID bulbs.
You will need to choose a ballast that is made for the type of HID light you would like to get. For example, if you want to run a 600W HPS bulb, you’ll need a 600W ballast that supports HPS bulbs.
Ballasts generally come in a few standard “sizes,” 150W, 400W, 600W, and 1000W.
For first-time growers, I recommend getting a 400W or 600W ballast, unless you have too small a grow space. 600W grow lights are the most efficient, and so if you have a large grow space, it may be the most efficient to get multiple 600W lights compared to the other sizes.
A 150W ballast is not as efficient on electricity as the bigger models, and will only be able to cover a 2′ x 2′ (0.6m x 0.6m) area, which is sufficient for 1-2 plants. Many models of 150W HPS lights come with a built-in ballast & hood, which can make setup easier and usually comes with a way to air-cool the light (and hook up to an exhaust) if needed. If you’re growing in a very short space with less than 4′ (1.2m) height, or an oddly shaped space, you may want to consider going with several smaller CFLs instead, as you may be able to get better light distribution in a small or awkward space for about the same amount of electricity.
A 400W ballast will be able to cover an area of about 3′ x 3′ (0.9m x 0.9m). This is popular choice for beginner growers as it creates less heat than it’s larger counterparts, but will still bring in impressive yields.
A 600W ballast is the most efficient of all ballasts as far as electricity used per amount of light produced, and will cover an area of about 3.5′ x 3.5′ (1m x 1m). I use a 600W ballast in a 4′ x 4′ (1.2m x 1.2m) grow area and have average well over a pound per harvest. Check out a recent grow where I harvested over 23 ounces from a single 600W light! Because 600W bulbs are the most efficient of all HID grow lights, and are very unlikely to accidentally cause light burn when adequately cooled (unlike 1000W grow lights), many growers who want to upgrade opt for multiple 600W HID lights instead of getting a bigger light.
A 1000W ballast is slightly less efficient than a 600W lights and will cover an area of about 4′ x 4′ (1.2m x 1.2m) up to about 5′ x 5′ (1.5m x 1.5m). The further your light from the plants, the less powerful the brightness but the greater and area the light will cover. You will optimize your brightness in a smaller space by keeping the light as close to the plants as possible without burning your plants. 1000W lights need a significant amount of cooling power as the bulbs get very hot in a small amount of space. In big grow operations in the US where indoor space is very limited, some growers opt to use several 1000W grow lights, as even plants along the edges get strong amounts of light, and this reduces the total number of grow lights to adjust up and down as rows of plants grow taller. Sometimes 1000W lights are placed on automatic movers so they can cover more plants and prevent these powerful lights from accidentally causing light burn.
Digital vs Magnetic Ballasts – Digital ballasts cost a bit more than a magnetic ballast, yet a digital ballast runs cooler, uses less electricity, tend to produce higher light intensity, and will save you money in the long run.
Digital ballasts are also more likely to be compatible with more types of bulbs, where a magnetic ballast needs special bulbs and will burn out the wrong type of bulb.
For the sake of ease of use, I recommend getting a ballast that is digital, dimmable, and supports both MH and HPS bulbs.
Make life easy on yourself, get a great ballast…
- Digital
- Dimmable
- Supports MH and HPS bulbs
This gives you the most flexibility as you can use either type of bulb, and digitally control how intense you want the light to be at any moment.
With a digital, dimmable ballast, you can adjust the ballast to put out less light (and use less electricity) when plants are small and don’t need full-strength light yet. This can shave quite a bit off your electricity bill and make it easier to nurture young plants.
I highly recommend getting the best ballast you can afford, as better ballasts last longer, are easier to use, and offer the “bells and whistles” you’ll wish for after you start growing. Even the most expensive ballast will pay for itself after a single successful harvest.
 Your bulbs will need to match your ballast. If your ballast supports 600W Metal Halide, you need to get 600W Metal Halide bulbs. If your ballast supports 1000W High Pressure Sodium, you need to get 1000W High Pressure Sodium bulbs.
Some ballasts support both Metal Halide and High Pressure Sodium, and will clearly state that on the box.
Some ballasts are digital and dimmable, which means you need to get bulbs that support digital/dimmable features.
Some bulbs claim to be “enhanced” or be ultra-efficient. While there is not a whole lot of difference between the different bulbs, you will tend to get slightly better results from the higher quality bulbs, and they tend to be more durable/long-lasting.
Therefore, like with the ballast, I recommend getting the best bulbs you can afford. These bulbs generally last 1-2 years of normal use, so you will not have to replace them for quite a while. They do get dimmer over time, so it’s a good idea to always replace all your bulbs every 3-4 grows, even if they haven’t burnt out yet.
Never buy used bulbs!
Some sellers will actually replace burnt out bulbs within a certain time period, so definitely take advantage of new bulbs with guarantees if you can!
For longer lasting bulbs….
- The biggest wear to HID light bulbs come from turning the lights on and off, as opposed to how long they run. The worst thing you can do as far as wear and tear is turn off an HID light and then turn it on again before it’s had a chance to fully cool off.
- Sometimes bulbs blow right away, and the most common reason this happens is because the type of bulb doesn’t match the type of ballast you have. So make sure your ballast matches your bulb in every way that’s listed on the packages. If your ballast says “magnetic” your bulb should say “magnetic.” Getting a digital ballast with your grow light system will lower the chances you run into problems with incompatible bulbs, since they’re compatible with the most kinds of bulbs.
- If you’re using a non-standard ballast (for example a 150W HID grow light with the ballast and hood built-in instead of separate), it’s a good idea to double-check the specifications of your ballast just to double-check it doesn’t need some special kind of bulb. When you buy your bulb and ballast together as part of a set, you generally don’t need to worry about incompatibility, and you can make sure to always get the same type of bulbs if you ever need to replace it.
- Always double-check to make sure you have a way to return or exchange a bad or malfunctioning bulb, especially when purchasing bulbs from a small local shop or unfamiliar online seller
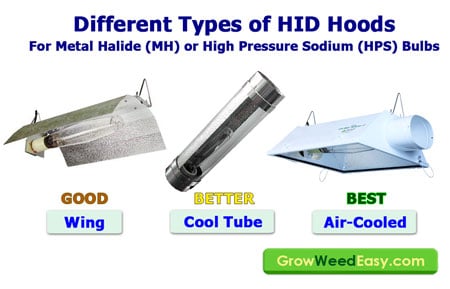
There are many different kinds of hoods for HID lights, from wings to cooltubes to air-cooled hoods. The hood will reflect the light from the bulbs down at your plants, and may come with special cooling features, too.
In my experience and from talking to all the growers I know who’ve experimented with different hoods, many growers seem to agree that air-cooled hoods, especially extra wide air-cooled hoods, get the best yields and results when growing marijuana.
Winged Reflectors

A winged hood is basically just a reflector with a socket for your bulb and a plug to connect to your ballast. They are the simplest type of “hood” for HID grow lights and also tend to be the least expensive.
Wings will get the job done, but they are not good at managing heat, and using this type of reflector will oftten require that you have a great exhaust system and/or a naturally cold growing area in order to keep grow room temps under control.
Wings aren’t good for controling heat because they do not contain the heat produce by the bulbs in a specific area (like the next options you’ll se listed here) and they also have no built-in cooling features. With a winged reflector, the heat from the bulbs will basically be radiating downward from the bulbs onto your plants with nothing in between to shield your plants from the heat.
Cooltubes
 Cool tube grow lights are easier to cool than a wing, because they trap the air and allow it to be easily exhausted, but cooltubes are not as good at reflecting light as a bigger air-cooled hood.
The reflector part of cooltubes is not large (as you can see pictured here), and that measn they aren’t as good as spreading the light efficiently over the breadth of your grow space.
Additionally, many cooltube owners have reported that they can create unexpected hot spots (places where light can focus and burn plants). A cooltube is better than a wing, but not as good as an air-cooled hood.
However, Cool tube grow lights are a great choice in situations where you can’t let air out from your grow room, for example when using CO2 enrichment where a sealed grow space is necessary.
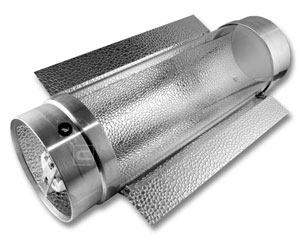
Air-cooled hoods
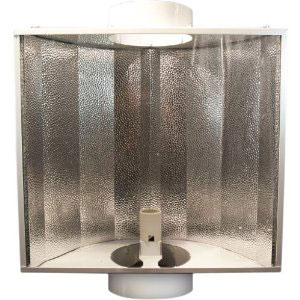
Air-cooled hoods reflect light directly towards your plants, and have piece of glass or plastic which keeps hot air contained near the bulb (and away from your plants).
They’re called “air-cooled” because they are set up to easily connect to an exhaust system, so a fan can pull all the hot air away from the bulbs and directly out a window (or wherever you’re exhausting your air).
They generally come with a very wide reflective surface, which allows you to spread the light from your bulb over a greater area in your grow space.
No matter which hood you choose…
Please note that you want the hot air exhausted out a window, up a chimney or otherwise out of your grow area. You don’t just want to pull this air into your grow room, or you’ll just end up with an incredibly hot room and the hot air will have no where to go.
Things to look for in a good hood/reflector:
- Seals well (as air-tight as possible) to keep heat contained and ensure odor-proof ventilation. This is why the “Wing” type hoods tend to get much hotter and be more difficult to cool properly.
- Easy to open so you can easily change the bulb as needed. For Air-Cooled hoods, the best design is when you have latches on one side and a hinge at the other.
- The more wide and smoothly curved the reflector is, the more even the light spread will be. So look for a wider hood that has an even curve or at least a lot of “sections” to it. Notice in the pictures above that the “Wing” hoods usually only have a few convolutions. The “Cool Tube” hoods are smoothly curved, but not wide. These drawbacks are part of why these hoods are less efficient at spreading light than the smooth, wide curve from the “Air-Cooled” hood.
Setting Up & Using Your MH/HPS Grow Lights
The following section will teach you what you need to know about setting up and using your MH/HPS grow lights for growing cannabis. I’ll share the hints and tips I’ve learned along the way to help you achieve the best results with your new lights!
How Far Away Should My MH/HPS Grow Lights Be From My Plants?
There are a couple factors you must consider when deciding how far away to keep your grow lights from your plants. The most important is to make sure it’s not causing too much heat where your plants are.
Every Time You Adjust Your Lights, Perform the “Hand Test” To Check for Heat
A great way to check for heat is to use the “hand test.” After your grow light has been turned on, place one of your hands (palm facing downward) near the top of your plants and let it sit there for 10 seconds. If the light feels too hot for your hand, it’s too hot for your plants and you will need to either move the light up or find a way to better control heat. Plants that are allowed to be too hot for too long will begin to show signs of heat stress.
Even if the heat is under control, it’s still important to follow these guidelines to prevent your plants from experiencing light burn.
Quick Guide – Distance From MH/HPS Lights To Plants
Here’s a quick reference guide to use as a starting point:
| Grow Light | Closest | ~ Sunlight | Furthest |
| 150W | 8″ (20cm) | 10″ (25cm) | 12″ (30cm) |
| 250W | 10″ (25cm) | 12″ (30cm) | 14″ (35cm) |
| 400W | 12″ (30cm) | 14″ (35cm) | 19″ (48cm) |
| 600W | 14″ (35cm) | 16″ (41cm) | 25″ (64cm) |
| 1000W | 16″ (41cm) | 22″ (55cm) | 31″ (79cm) |
150W – covers 2′ x 2′ (0.6m x 0.6m) area
250W – covers 2′ x 2′ (0.6m x 0.6m) area up to 2.5′ x 2.5′ (0.8m x 0.8m)
400W – covers 3′ x 3′ (0.9m x 0.9m) area up to 3.5′ x 3.5′ (1m x 1m)
600W – covers 3.5′ x 3.5′ (1m x 1m) area up to 4′ x 4′ (1.2m x 1.2m)
1000W – covers 4′ x 4′ (1.2m x 1.2m) area up to 5′ x 5′ (1.5m x 1.5m).
Please note: The further your light from the plants, the less powerful the brightness but the greater and area the light will cover. Investing in a wider hood will allow you to cover a bigger area while keeping bulbs close.
Use a Lux Meter to More Accurately Measure Light Levels
If you have a Lux Meter to measure your brightness levels, you can get even more accurate with your grow light distance. While a Lux meter isn’t perfect for everything, it works well for measuring light levels under fluorescent, MH and HPS grow lights.
Quick Guide – Lux Levels for Optimal Cannabis Growth
| Life Stage | Maximum | Good | Minimum |
| Vegetative | 70,000 lux | 40,000 lux | 15,000 lux |
| Flowering | 85,000 lux | 65,000 lux | 35,000 lux |
< 15,000 lux – sparse or “stretchy” growth – plant isn’t getting enough light
15,000 – 50,000 lux – good amount of light for healthy vegetative growth
45,000 – 70,000 lux – optimal amount of light for cannabis plants in the flowering (budding) stage
70,000 – 85,000 lux – a lot of light, some strains thrive at this light level, but some plants lose their top leaves early under this light intensity, especially plants that are not resistant to heat/light (like many indicas)
> 85,000 lux – at this light intensity, you’ve hit the plant’s “saturation point” which means your plant can’t use all the light (be careful of light bleaching!)
Learn more about using lux meters to increase yields
Note: Unfortunately, a lux meter is not a good tool for measuring the brightness of LED grow lights.
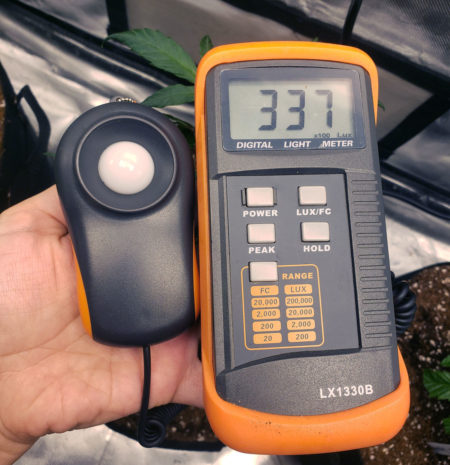
Get a Lux Meter to more accurately measure light levels
 You have a few options. One option is to control odor with products like Ona Gel, which neutralize and cover up smells. These products are great in a pinch, or when you need to cover up smells in your living areas, but they shouldn’t be placed in the same area as your plants as they can eventually alter the smell of your buds.
A much better way to control odors is to get a carbon scrubber and install it where you’re exhausting your hot air. This cleans the air of any smells right before the air is vented outside, and with a strong fan as part of your exhaust completely venting all the air in your grow area every few minutes, none of the smell will escape to other parts of the house, even in the midst of the budding stage.
Learn more about your options for marijuana odor control
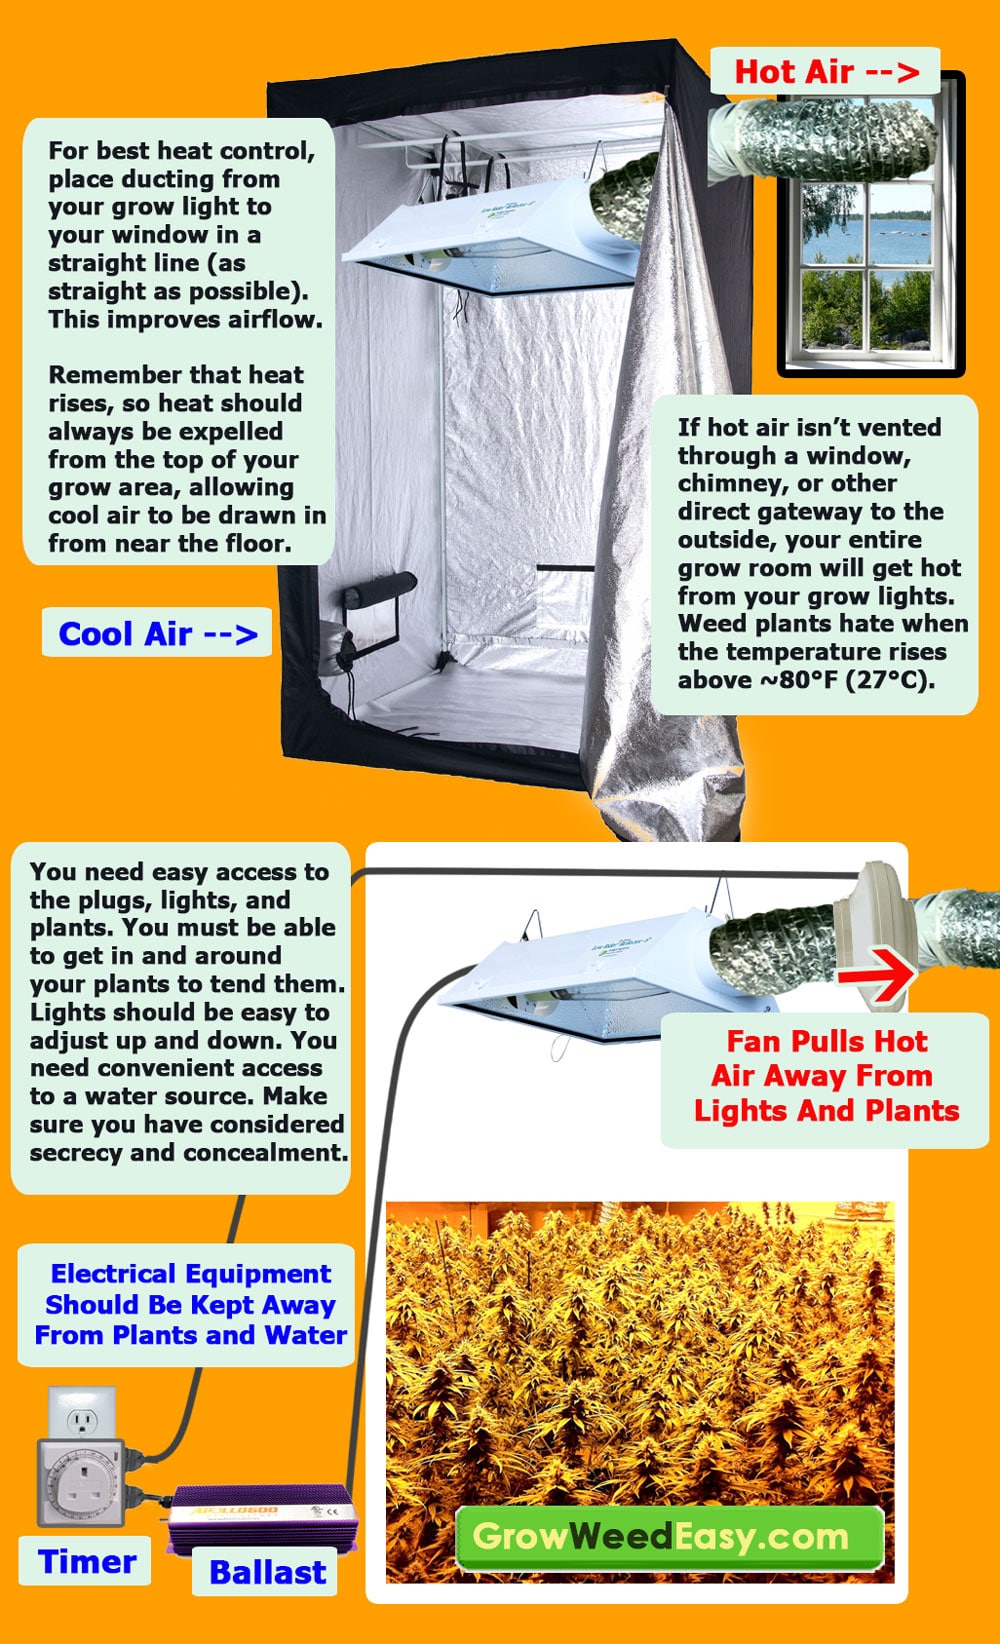
Optimally, you want the exhaust to pull air from your hot lights and directly out a window, in a short, straight line if possible.
Exhausts become less and less efficient at cooling the further your air has to travel, and the less straight the path. A short, straight, direct line to a window is the best case scenario when it comes to setting up your exhaust.
Use ducting and a strong fan to pull air directly from your air-cooled hood and out your exhaust.
When worried about heat, it’s important to create enough suction with your fans to completely replace all the air in your grow tent as rapidly as possible, at least once every few minutes. Even when you’re not worried about heat, it’s still important to regularly replace the air and make sure there’s plenty of airflow and circulation above and below your plants.
Here are a few guidelines that will help you achieve the best exhaust system possible:
- It’s important to have as strong-enough exhaust fan for the grow space to make sure that you are completely changing out all the air in the tent often.
- Designing your exhaust will be much simpler if you take the time to understand airflow in a room – the whole idea of setting up an exhaust system is to create negative airflow in the grow space or grow tent so that any hot air is regularly replaced with new, fresh cool air.
- All the air in the tent should be replaced by new air every 1-3 minutes for the best results. You can calculate the strength of exhaust fan you need based on the dimensions of your grow space. Learn how to calculate the type of fan you need below…
- When your grow tent is bending in from the exhaust fan, it means you’ve got good suction going in there and have created negative airflow
- Make sure your intake hole is bigger than your exhaust hole to achieve proper suction – in other words the holes/spaces for new air to come in (vents, intake fans, doors, windows) should be bigger than the hole/space where air is being pulled out the tent by your exhaust fan
- Even with a good exhaust system, it is recommended that growers still install small fans in their grow space to blow air above and below to the plant canopy to improve air circulation and help prevent any hot spots or humid pockets of air
How to Calculate The Exhaust Fan Strength You Need
In the US, most exhaust fans have a “CFM” rating. This means “cubic feet per minute” and is talking about how much air the fan can move each minute. It’s important to get a fan with the correct CFM rating for your size space.
Here’s a short equation to help you determine what CFM rating you need for your fan in your space.
Determine the cubic area of your space by multiplying Length x Width x Height. You want to exhaust this amount of air every minute.
Exhaust Efficiency – Every exhaust system has some level of inefficiency which will lower the amount of air being moved by the fan. This step tells you how much extra air-moving power needed to compensate. With an efficient exhaust, air goes in a short, straight line after passing through the fan. An inefficient path is when air has to go a long way after leaving the fan, or if the air has to go around turns instead of being in a straight line. This step will help make sure your fan is moving enough air to properly ventilate your space.
• Efficient path – multiply previous number by 2
• Inefficient path – multiply previous number by 3Pick your fan. Fans are measured by CFM (cubic feet/minute), so you need a fan that has a CFM higher than the number you figured out in the last step.
Fan CFM Rating Table
(here are some examples of possible setups using the equation above to figure out CFM)
| Grow Space Size | Wattage of Light | CFM of Fan* |
|---|---|---|
| 2’ x 4’ x 5’ | 250W | 80-120 CFM |
| 3’ x 3’ x 6’ | 400W | 108 – 162 CFM |
| 3.5’ x 3.5’ x 6.5’ | 600W | 160 – 238 CFM |
| 4′ x 4′ x 7′ | 1,000W | 224 – 336 CFM |
* Of course fans don’t come in all these sizes, so round up to the closest fan size available.
You’ll need a lower CFM rating if your grow space tends to stay cool and dry. You’ll need a higher CFM rating if your grow space tends to get hot or humid.
While this doesn’t affect most indoor growers, if the exhausted air has to move a very long ways after going through your fan before it’s vented outside (for example the air has to go through several feet of ducting after passing through the fan), a bigger exhaust fan might not be enough – you may need booster fans along the way.
When in doubt, it’s usually better to get a bigger exhaust fan than you need. You can always turn off the fan if it’s moving too much air. For example you could use a speed controller or put the fan on a timer if the exhaust fan is moving air out of your space too fast. There are often times during a grow where it’s helpful to be able to move more air, so size up if you can when it comes to exhaust fans.
Even with a good exhaust system, it is recommended that growers still install small oscillating fans in their grow space to blow air above and below to the plant canopy to improve air circulation and help prevent any hot spots or humid pockets of air.
Cannabis plants like having a lot of fresh air all the time, and they will reward you for your diligence in setting up a proper exhaust system.
Choose the Placement of Your Grow Tent & Exhaust Carefully
Consider that you want a direct line to the exhaust, with as short a distance as possible, so that hot air is quickly and easily released outside of your home.
Learn how to make a stealthy “secret window” exhaust system like this below…
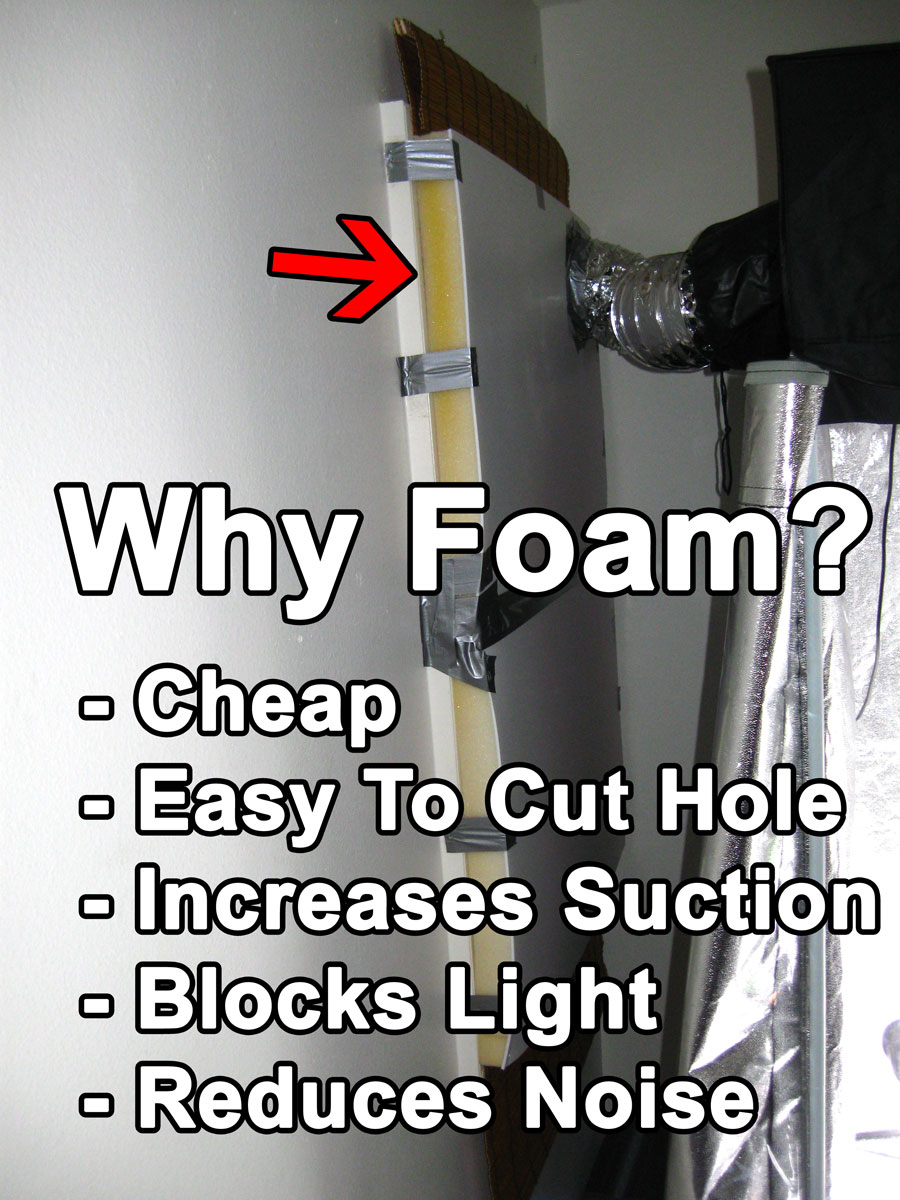
Having trouble finding a cheap & easy way to stealthily exhaust out hot air from your grow tent? I used a combination of the following items to create an awesome exhaust system for about $45 (just add your fan).
What You Need
- wicker blinds
- foam
- corrugated plastic
- duct tape
- ducting
- super glue/hot glue
- staple gun
*All these items can be found at a home improvement store, as they are common items for upgrading around the house
First, hang the wicker blinds in your window like normal. Air can escape through these blinds, but you can’t see through them to the other side. They are commonly used in bedrooms and other windows that lead into private areas.

I bought a huge sheet of foam and glued (super glue and hot glue for best results) it to a sheet of corrugated plastic. You can buy both these items for a few bucks at a home improvement store like Home Depot.
Next, use some ducting to trace a round, duct-sized hole on the foam/plastic. Note: Cut out the duct-sized hole in the foam/corrugated plastic near the top of where it will be mounted. Remember, heat rises, so having the exhuast exit near the top is much more efficient.
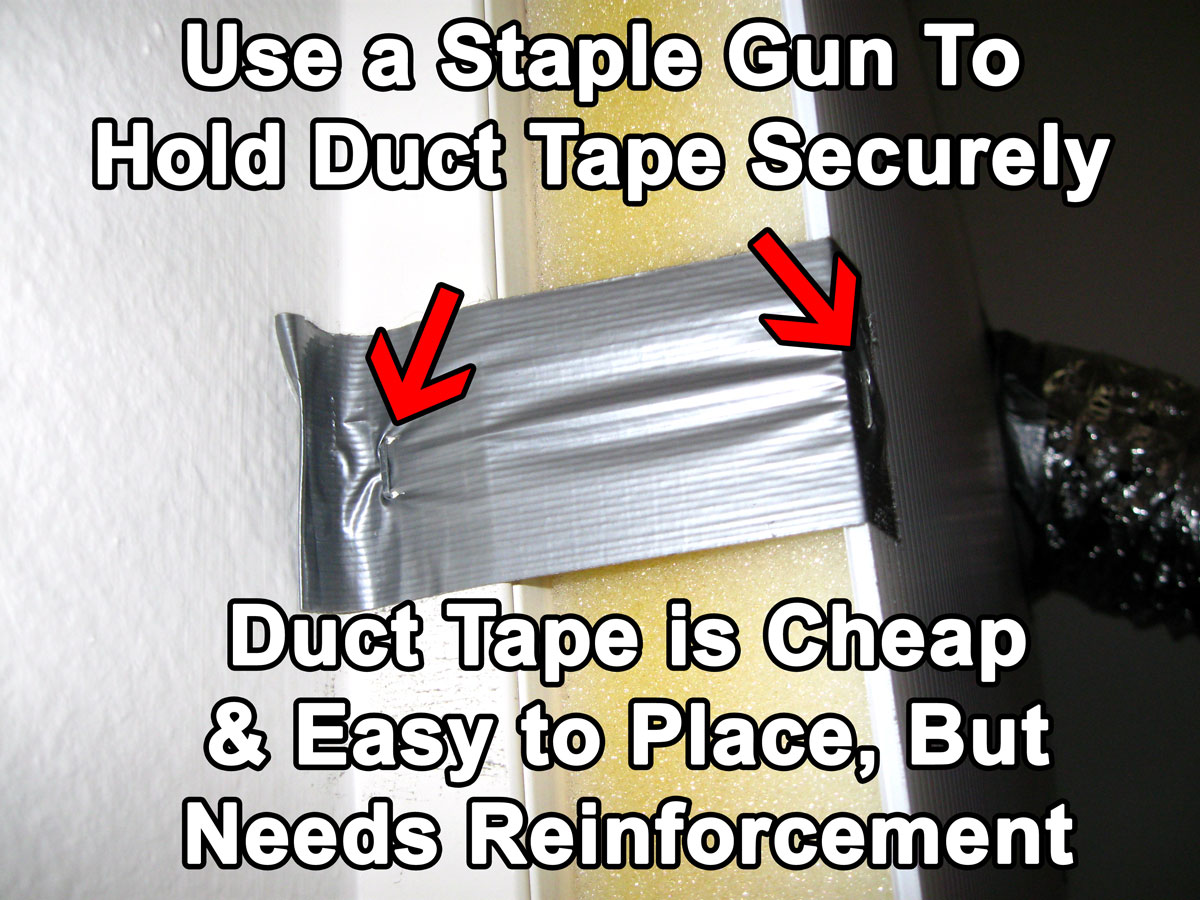
Run the ducting through the hole you cut, and right up to the wicker blinds. The ducting should be butted up against the wicker blinds so that heat escapes directly outside (since it will be able to pass through the blinds easily). Use duct tape to hold the foam/plastic in place, then use more duct tape to hold the ducting in place. At the end after everything is placed and you’re happy with how everything looks, you will use a staple gun to staple all your duct tape in place, but don’t worry about that yet.
I also used duct tape to secure the foam to the window because it’s cheap, easy to use, and is very durable when combined with staples.

Use a staple gun to reinforce anywhere you use duct tape, including where the ducting goes through the hole you made in the foam.
I like using foam + corrugated plastic because it’s inexpensive and easy to cut the hole for the exhaust. Having the foam/plastic combo in the window increases the suction in the room so more hot air is vented out and blocks light (no light gets in or out). As an added bonus, the foam dramatically reduces the noise of the fan (so you can just barely hear it even when you’re standing right outside the window).
When I originally started growing weed, I was worried about excess heat, high electricity bills, and making sure I was as stealthy as possible.
Yet at the same time, I was also worried about spending a whole bunch of money on grow equipment since I wasn’t even sure if I could successfully grow.
I ended up going for the cheapest stealth grow light I could find, LED grow lights, which work fantastic for growing weed. LEDs tend to use less electricity and produce less heat than HPS grow lights. After I got the hang of growing weed, LEDs consistently produced a lot of dense buds. However, I was intrigued by the sheer size and thickness of buds produced by HPS grow lights.
You might wonder if you should get LEDs or MH/HPS grow lights for your first grow. If so, I’ve compiled some helpful information below to help you decide which one is right for you.
LED Grow Lights
LEDs work well in most setups, big or small. You can get tiny LED grow lights in a tiny grow space and produce a surprising amount of potent weed. As a general rule of thumb, LED grow lights are the best choice for most home growers.
Pros
- Less heat produced – On average, LED grow lights output less heat than HPS, which means if it gets warm in your grow space, LEDs are almost certainly the best choice for you.
- Plants are also more resistant to heat – Not only do LEDs put off less heat, but plants grown under LEDs are overall more resistant to heat. This is because LEDs don’t raise the internal temperature of leaves as much as the big bulb from an HPS. So you get double heat protection!
- Less electricity – LEDs are more electrically efficient than HPS. So overall, LEDs tend to be kinder to your electricity bill than HPS grow lights.
- Shorter grow spaces are okay – Modern LED panels are relatively flat and don’t take up as much room as an HPS. The smaller ones (below 200W) can also be kept surprisingly close to your plants. That means LEDs can be successfully used in smaller grow spaces. See an example of a tiny LED grow setup.
- Don’t need to replace bulbs – LEDs stay at full power for a long time, so they usually don’t need to be replaced unless they actually break. On the other hand, HPS bulbs need to be replaced every few grows because the bulbs tend to get less powerful over time.
Cons
- Weaker penetration (especially certain models) – Although modern cannabis LEDs get good penetration into the plant, some models are better than others. While the light from an HPS goes DEEP into the plant, producing longer and often thicker buds than most LEDs.
- Big LEDs are pricey – Small LEDs are pretty cheap. But when you get to bigger sizes, HPS grow lights are much cheaper. For example you can get a 600W HPS grow light for under $150. A comparable LED grow light is the 630W HLG Scorpion Diablo, which costs almost $1300. These use about the same amount of electricity, and get similar yields, but the HPS costs more than a thousand dollars less! Even a “cheap” LED in that size costs double the same size HPS. HPS can be a great way to “get your feet wet” with growing before investing in more expensive grow lights.
- Inconsistent results between models – While all HPS grow lights of the same wattage produce almost exactly the same results, LEDs are different. Some companies produce low quality LEDs that just don’t grow good weed. When buying LEDs for growing weed, it’s crucial to pick an LED company that’s proven to work well with cannabis plants.
- May still need an exhaust system – LEDs may produce somewhat less heat, but the bigger ones still get surprisingly hot. If your LED is bigger than 150-200W, you may need to set up an exhaust system to keep your garden cool.
- LEDs are a bad choice for cold grow space – Cannabis plants grown under LEDs are weak to cold because the LEDs don’t raise the internal temperature of the leaves (unlike HPS). That means if your grow space is on the cooler side (for example a basement, or during the winter), then your plants might grow slow and unhappy under LEDs. HPS not only warms the air but also directly heats up the leaves, so they are more resistant to cold.
Candy Games #38 grown under a 300W Mars Hydro LED grow light (here is the full setup)
 You now know everything I wish I’d known before I started growing with HID lights. If you’re serious about growing cannabis, HID grow lights are going to give you some of the best yields, most ease of use, and (in my opinion) the most enjoyable growing experience.
Now that you know exactly how to get started…
Is 2025 the year you decide to go pro with your garden?
About Sirius Fourside
Sirius co-founded GrowWeedEasy.com in 2010 with fellow grower Nebula Haze.
A huge proponent of hydroponic growing, especially bubbleponics, Sirius is dedicated to getting information out there so other growers see how easy it can be to grow pounds of marijuana out of your closet.
Jump to…
7 Tips to Growing Top-Shelf Buds
(Advanced Only) Cannabis Leaf Defoliation Technique
How to Grow Hydroponic Cannabis via Bubbleponics
Supercropping: Simple Secret to Bigger Yields